Authenticating using OAuth
OAuth 2.0 is a modern, more secure alternative to passing usernames and passwords that has been adopted by many APIs. The details of this protocol can get complicated, but when building a Pack you only need to specify some configuration options and the platform handles the token exchange, storage, refresh, etc.
Read the Authentication guide for more information about how to authenticate users in Packs.
OAuth 1.0 not supported
The platform doesn't support the older 1.0 or 1.0a versions of the OAuth specification. If you would like to connect to an API that only supports these versions of the standard please contact support so that we can continue to gauge interest.
Supported OAuth flows
The OAuth2 protocol supports a variety of flows, also known as grant types, which specify how exactly credentials are exchanged. The Pack SDK currently supports two of these flows:
- Authorization Code (
grant_type=authorization_code) -
This is the standard OAuth2 flow that most people are familiar with, meant for accessing a user's private data. The user at the keyboard is redirected to a screen where they login to the application, approve access, and then are redirected back.
To use this flow in the Pack SDK select the authentication type
OAuth2. - Client Credentials (
grant_type=client_credentials) -
This OAuth2 flow doesn't usually involve the user and the keyboard at all, but is a way for the Pack to authenticate itself with the application. It's essentially a more secure version of an API key, since it uses short-lived tokens.
To use this flow in the Pack SDK select the authentication type
OAuth2ClientCredentials.
Other OAuth2 flows are not currently supported. The majority of this guide will assume you are using the Authorization Code flow, but see the section Client credentials flow for more information about that flow specifically.
Setup OAuth authentication
To enable your Pack to authenticate users with OAuth you need to configure the OAuth flow and enter your developer credentials.
Add configuration code
To configure OAuth2 authentication you must specify the authorization URL and the token URL. These URLs are found in the technical documentation of the API you are connecting to, and will be different for each API.
pack.setUserAuthentication({
  type: sdk.AuthenticationType.OAuth2,
  // These URLs come from the API's developer documentation.
  authorizationUrl: "https://example.com/authorize",
  tokenUrl: "https://api.example.com/token",
});
Many APIs also support granular scopes, allowing you to request a limited set of permissions from the user. These can be specified as an array in the scopes field:
pack.setUserAuthentication({
  type: sdk.AuthenticationType.OAuth2,
  // These URLs come from the API's developer documentation.
  authorizationUrl: "https://example.com/authorize",
  tokenUrl: "https://api.example.com/token",
  scopes: ["user", "projects", "tasks"],
});
There are many subtle variations to the OAuth2 flow, and the platform can accommodate a variety of them. You can find the additional configuration options in the OAuth2Authentication documentation, as well as sample code showing how to set up OAuth for the most popular APIs.
However if the API provider deviates too far from the OAuth 2.0 specification it may not be possible to find a configuration that will work. Additionally, the platform currently only supports the Authorization Code and Client Credentials grant types. If you get stuck please contact support to explore other options.
Flexible authentication during token exchange
The OAuth2 specification doesn't require a specific authentication schema your app must use when exchanging tokens. The platform supports the two most popular variants:
- Sending the
client_secretin the JSON body - Sending an
Authorization: Basicheader using the client ID and secret.
No configuration is required, both will be tried automatically to see what works.
Set developer credentials
After you add the configuration code, build a new version of your Pack and then navigate to the Settings tab. There you'll see an Add OAuth Credentials button you can use to set the Pack's credentials.
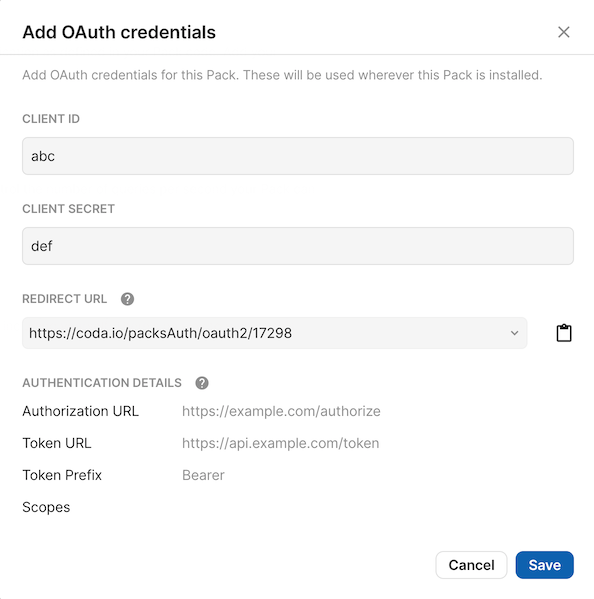
These credentials identify your application and are the same for every user that uses your Pack. You need to obtain these credentials from the API provider, typically by registering your application in the provider's developer console or portal. These values are typically called the client ID and secret, but may in some cases be referred to using terms like "consumer" or "application".
Redirect URL
When registering you application in the API provider's console you will be asked to provide a redirect URL. This is where the provider should redirect the user to after they have signed in and approved access.
The Add OAuth credentials dialog discussed above will show the redirect URL to use for your Pack and allow you to copy it to your clipboard. In general it follows the pattern:
https://docs.superhuman.com/packsAuth/oauth2/{PACK ID}
Legacy redirect URLs
Previously the redirect URL for a Pack was hosted on coda.io and/or didn't include the Pack ID.
We still support these URLs using the Legacy options in the dropdown menu, but for the best experience migrate your Packs to use the URL format shown above.
Token expiry and refresh
Many APIs return short-lived access tokens which expire after a few hours. Token expiration isn't tracked directly; instead, a refresh is attempted when an API request using the token fails. Specifically, a refresh only happens when:
- The Pack execution fails with a
StatusCodeErrorwith a 401 status (Unauthorized) - The OAuth provider returned a
refresh_tokenduring a previous token exchange
If you have error handling in your Pack, make sure to re-throw these 401 errors so that the token refresh process takes place.
try {
  let response = await context.fetcher.fetch({
    // ...
  });
  // ...
} catch (error) {
  if (
      sdk.StatusCodeError.isStatusCodeError(error)
      && error.statusCode === 401
    ) {
    // Perhaps the token has expired, re-throw the error to attempt a refresh.
    throw error;
  }
  // Else handle or throw the error as normal.
}
Additional scopes
As your pack grows you may find that you need to request more OAuth scopes than you initially did when your existing users connected. New scopes can be added to Pack OAuth settings in a non-breaking way: we don't prompt the user to re-authorize until they try to use a Pack feature that fails. Once that happens, we notice that the connection the user was using was created with a stale list of OAuth scopes and we prompt them to re-authenticate it to get your new scopes.
Triggering a prompt
Normally the user will be prompted to approve new scopes if the Pack fails with a StatusCodeError with a 403 status (Forbidden). However some APIs may fail with different status codes, or only return partial information, if scopes are missing. In those cases you can detect the problem in your code and throw a MissingScopesError to trigger the prompt.
try {
  let response = context.fetcher.fetch({
    // ...
  });
} catch (error) {
  // Determine if the error is due to missing scopes.
  if (
    sdk.StatusCodeError.isStatusCodeError(error)
    && error.statusCode === 400
    && error.body?.message.includes("permission")
  ) {
    throw new sdk.MissingScopesError();
  }
  // Else handle or throw the error as normal.
}
Incremental authorization
Even when you do know all of the scopes you need, you may not want to request them all at once. An approval screen with a long list of permissions can be intimidating to new users and some my choose to abandon your Pack. In these cases you may want to use incremental authorization, made possible in Packs by the formula field extraOAuthScopes. You can use it to specify additional scopes that are needed in order to run a specific formula.
pack.setUserAuthentication({
  type: sdk.AuthenticationType.OAuth2,
  // ...
  scopes: ["read"],
});

// ...

pack.addFormula({
  name: "UpdateItem",
  // ...
  isAction: true,
  extraOAuthScopes: ["update"],
  // ...
});
When the Pack above is installed the user will only be required to grant access to the read scope. However, when they try to use the UpdateItem action formula and it fails they will then be prompted to grant additional access to the write scope. This prompt is displayed as a pop-up dialog at the bottom of the doc:
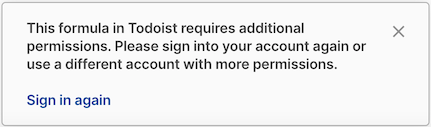
When the user signs in again they will be prompted to approve the additional scopes, after which they will be able to use the formula successfully.
For two-way sync updates
For sync tables that support two-way sync you may want to set additional scopes that only apply when the user is making edits to the table. To do so, set the field updateOptions.extraOAuthScopes to the scopes needed to send edits.
pack.setUserAuthentication({
  type: sdk.AuthenticationType.OAuth2,
  // ...
  scopes: ["read"],
});

pack.addSyncTable({
  name: "Items",
  // ...
  formula: {
    // ...
    executeUpdate: async function (args, updates, context) {
      // Send edits ...
    },
    updateOptions: {
      // Additional scopes needed to send edits (run executeUpdate).
      extraOAuthScopes: ["write"],
    },
  },
});
The updateOptions.extraOAuthScopes field overrides the value of extraOAuthScopes if it is already set. In this case you'll want to make sure that your update scopes are inclusive of your regular sync scopes, so that the correct scopes are requested regardless of the entry point.
pack.setUserAuthentication({
  type: sdk.AuthenticationType.OAuth2,
  // ...
  scopes: ["user:read"],
});

pack.addSyncTable({
  name: "Items",
  // ...
  formula: {
    // ...
    execute: async function (args, context) {
      // Sync the rows ...
    },
    executeUpdate: async function (args, updates, context) {
      // Send edits ...
    },
    // Additional scopes needed to sync.
    extraOAuthScopes: ["items:read"],
    updateOptions: {
      // Additional scopes needed to sync and send edits.
      extraOAuthScopes: ["items:read", "items:write"],
    },
  },
});
URL limitations
Some services host a unique domain or subdomain for each account, and require that API requests be sent there. The account-specific endpoints feature can be used to determine the endpoint for a given account, but it assumes that the user has already authenticated using a common set of OAuth URLs.
It currently isn't possible to change the authorizationUrl and tokenUrl dynamically or prompt the user to specify them. One workaround is to create a copy of the Pack for each domain you want to connect to, but that obviously doesn't scale well.
Additionally, in order to prevent abuse, the platform enforces that the authorizationUrl and tokenUrl configured have the same domain. This is almost always true, but in rare cases an API provider may use a different URL for each. To request an exemption from this restriction fill out the Approval request form.
OAuth domain and network domain
The domain of the OAuth configuration URLs does not need to match the network domain configured for fetcher requests. This is convenient for services where the OAuth provider is a 3rd party (Okta, Auth0, etc).
Advanced settings
Depending on the OAuth provider you are connecting to, you may need to utilize these additional settings when configuring OAuth.
Proof Key for Code Exchange (PKCE)
Some OAuth providers offer or require the use of Proof Key for Code Exchange (PKCE) during the OAuth flow. It is an additional flow layered on top of the standard Authorization Code flow that increases security by helping prevent against certain forms of attack. To use it in a Pack you simply need to enable the feature using the useProofKeyForCodeExchange field of the authentication configuration.
pack.setUserAuthentication({
  type: sdk.AuthenticationType.OAuth2,
  // ...
  useProofKeyForCodeExchange: true,
});
The PKCE standard supports two different ways of creating a challenge from the verifier: S256 (the default) and plain. The platform will use the more secure S256 method by default, but you can override it using the pkceChallengeMethod field.
pack.setUserAuthentication({
  type: sdk.AuthenticationType.OAuth2,
  // ...
  useProofKeyForCodeExchange: true,
  pkceChallengeMethod: "plain",
});
Dynamic Client Registration (DCR)
Some OAuth providers support Dynamic Client Registration (DCR), which allows applications to automatically register themselves and obtain client credentials (client ID and secret) without manual setup in a developer console. This is common with services that support MCP servers.
When DCR is enabled, the platform will automatically:
- Discover the authorization and token endpoints based on the pack's declared MCP servers and network domains.
- Register OAuth client credentials (client ID and secret) with the provider.
This means you don't need to manually obtain or enter a client ID and secret, and the authorizationUrl and tokenUrl fields become optional.
pack.setUserAuthentication({
  type: sdk.AuthenticationType.OAuth2,
  useDynamicClientRegistration: true,
  useProofKeyForCodeExchange: true,
  scopes: ["read", "write"],
});
If the automatic endpoint discovery doesn't work for your provider, you can still specify the URLs manually alongside DCR:
pack.setUserAuthentication({
  type: sdk.AuthenticationType.OAuth2,
  useDynamicClientRegistration: true,
  authorizationUrl: "https://example.com/authorize",
  tokenUrl: "https://api.example.com/token",
  useProofKeyForCodeExchange: true,
  scopes: ["read", "write"],
});
Not supported in local testing
Dynamic Client Registration is not supported when testing locally with the packs execute command. You will need to upload your Pack to test this feature.
Client credentials flow
While the Authorization Code flow discussed above is used to access private user data, the Client Credentials flow is typically just used to authenticate the integration itself. Therefore it's most commonly implemented as a system-wide form of authentication, although per-user authentication is also supported.
To setup the authentication all you need to do is set the type and provide the URL used to token exchange.
pack.setSystemAuthentication({
  type: sdk.AuthenticationType.OAuth2ClientCredentials,
  // This URL comes from the API's developer documentation.
  tokenUrl: "https://api.example.com/token",
});
If using system-wide authentication you'll need to set the client ID and secret in the Pack settings. If using per-user authentication the user will be prompted for their client ID and secret when connecting their account.
Like with the Authorization Code flow, a variety of other advanced options are also available to support non-standard OAuth2 implementations. See the class OAuth2ClientCredentialsAuthentication for more information.