Skip to content
Font: This is the style or look of the letters (like Times New Roman or Arial).Bold: Makes text darker and stands out.Italics: Makes text slanted.Underline: Puts a line under the text.Alignment: This is how your text is positioned on the page, like lining it up with the left margin, right margin, centered, or stretched evenly across the page.Text Highlight Color: Adds a colored rectangle behind your text, like using a highlighter pen.Change Case: Changes text to all capital letters (UPPER CASE), all small letters (lower case), or other styles.
Step 1: Select the text that has the formatting you want to copy.Step 2: Go to the Home tab.Step 3: In the Clipboard group, click on the Format Painter command. Your mouse pointer will change into a brush shape.Step 4: Click and drag the brush pointer over the text where you want to apply the copied formatting. The formatting will instantly appear on the new text!To apply the same formatting to multiple places in your document, double-click on the Format Painter button. This keeps the brush active.To stop using the Format Painter, press the ESC key on your keyboard.

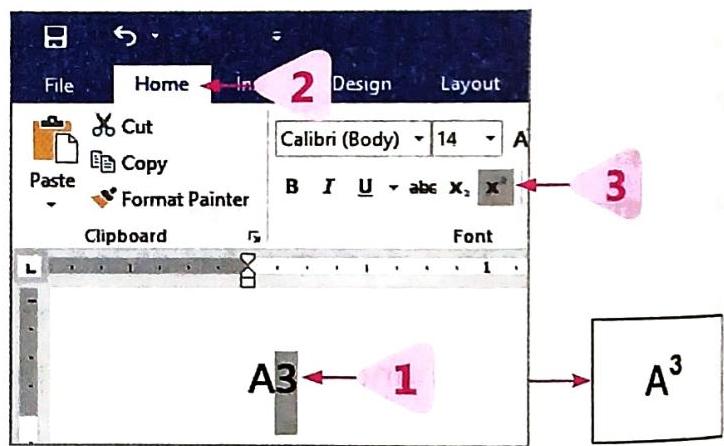
Superscript: This command places the selected text or number slightly above the normal line of text (like the ‘3’ in A³).How to Change Text to Superscript:Step 1: Select the text or number you want to change.Step 2: Go to the Home tab.Step 3: In the Font group, click on the Superscript command (it looks like X³).
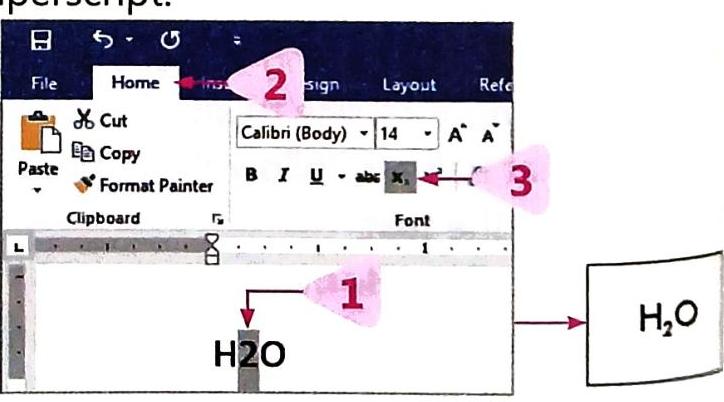
The selected text will move slightly above the baseline.Subscript: This command places the selected text or number slightly below the normal line of text (like the ‘2’ in H₂O).How to Change Text to Subscript:Step 1: Select the text or number you want to change.Step 2: Go to the Home tab.Step 3: In the Font group, click on the Subscript command (it looks like X₂).The selected text will move slightly below the baseline.Shortcut for Superscript: Ctrl + Shift + =Shortcut for Subscript: Ctrl + =
The selected text will move slightly above the baseline.Subscript: This command places the selected text or number slightly below the normal line of text (like the ‘2’ in H₂O).How to Change Text to Subscript:Step 1: Select the text or number you want to change.Step 2: Go to the Home tab.Step 3: In the Font group, click on the Subscript command (it looks like X₂).The selected text will move slightly below the baseline.Shortcut for Superscript: Ctrl + Shift + =Shortcut for Subscript: Ctrl + =

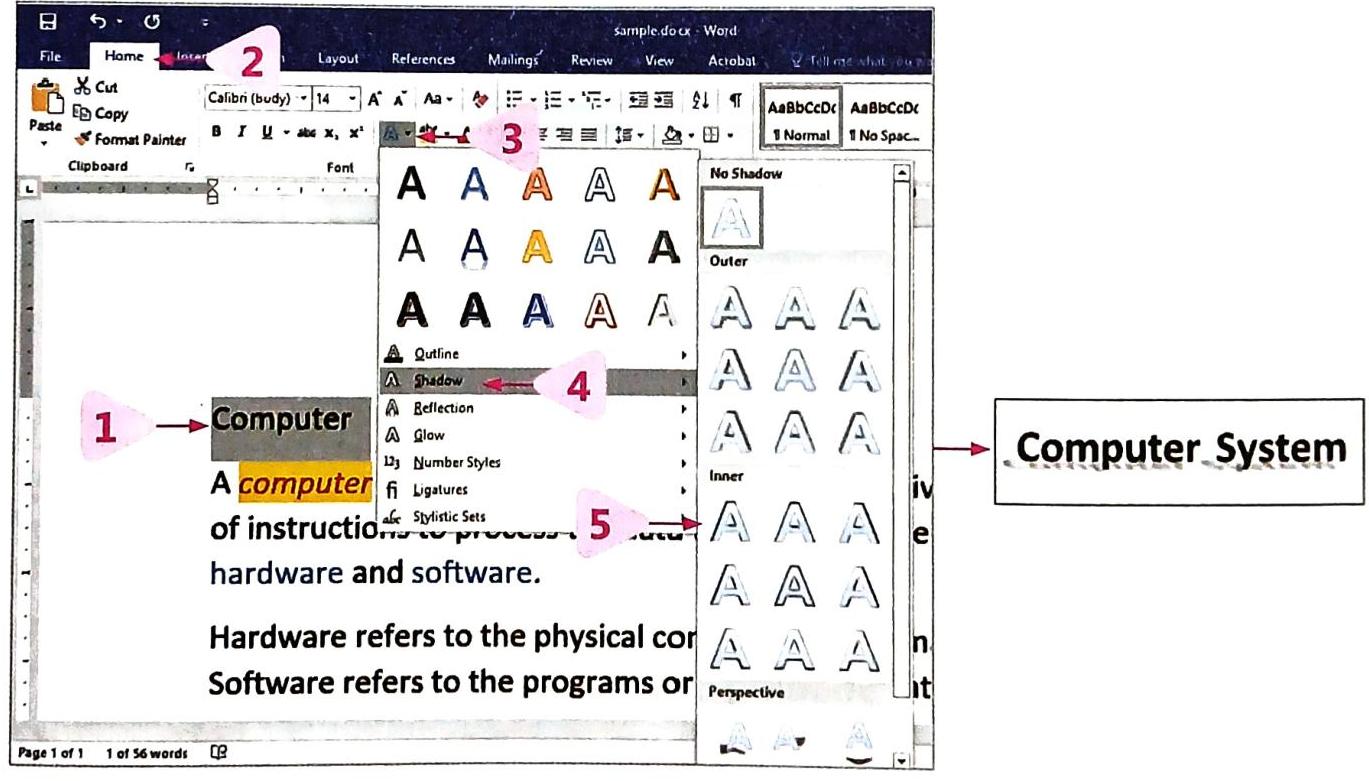
Step 1: Select the text you want to apply the shadow to.Step 2: Go to the Home tab.Step 3: In the Font group, click on the Text Effect command (it looks like an ‘A’ with a glow).Step 4: A drop-down menu will appear. Hover your mouse over the Shadow option.Step 5: Click on any Shadow Effect style you like from the gallery.

Step 1: Select the text you want to add a border to.Step 2: Go to the Home tab.Step 3: In the Paragraph group, click on the Borders option (it looks like a small square with lines).Step 4: A drop-down menu will appear. Select Borders and Shading…
 Step 5: In the Borders and Shading dialog box, make sure the Borders tab is selected.Step 6: Choose a Style (the type of line for the border) and a Color for your border. You can see a preview on the right.Step 7: Click on the OK button.
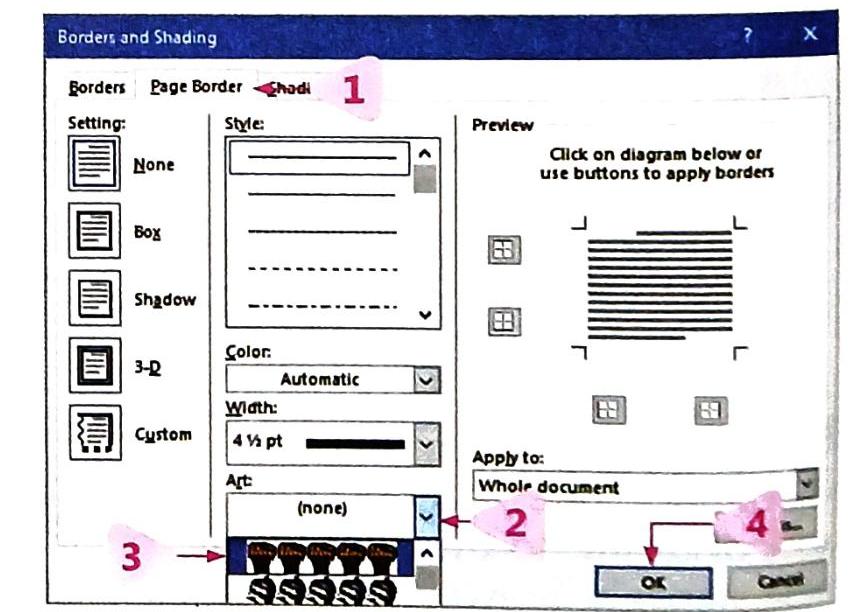
Step 1: In the Borders and Shading dialog box (which you can open using the steps above), click on the Page Border tab.Step 2: Click on the drop-down arrow next to the Art option.Step 3: Scroll through the list and choose your desired artistic border style.Step 4: You can also change the color of the artistic border by clicking on the drop-down arrow in the Color option.Step 5: Click on the OK button.
 To remove a border you’ve applied, select the text (or go to the Page Border tab for page borders) and then choose the No Borders option from the Borders drop-down list.

Step 1: Open the Borders and Shading dialog box and click on the Shading tab.Step 2: Click on the drop-down arrow next to the Fill option.
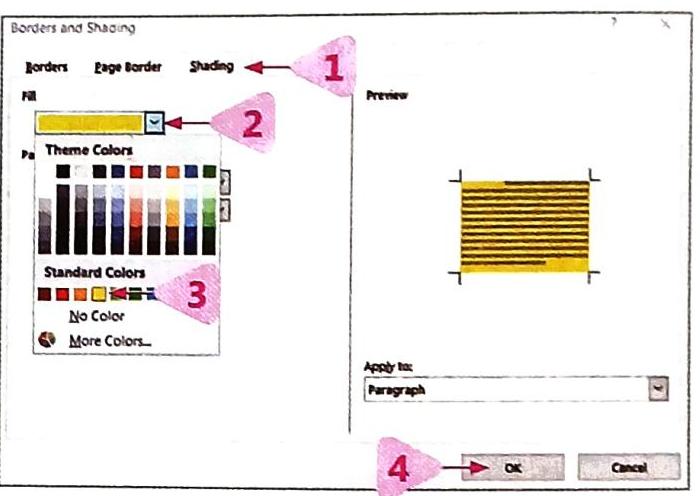 Step 3: Choose any color you like from the color palette.Step 4: Click on the OK button.
Selecting Text: Before you can change text, you usually need to select it. You can do this by dragging your mouse over the text or using different key combinations.Removing Text: Easily delete text by selecting it and pressing the Backspace or Delete key.Cutting Text (Move): When you “cut” text, it disappears from its original spot and can then be “pasted” somewhere else. This is like moving text.Cut: Ctrl + XPaste: Ctrl + VCopying Text (Duplicate): When you “copy” text, it remains in its original location, and a duplicate appears where you “paste” it.Copy: Ctrl + CPaste: Ctrl + VUndo: This command helps you cancel the very last action or command you performed.Undo: Ctrl + ZRedo: This command reverses the action of the Undo command, bringing back what you just undid.Redo: Ctrl + YSpelling and Grammar Check: Word helps you spot mistakes!Spelling mistakes are marked with a red wavy line.Grammatical mistakes are marked with a green wavy line.

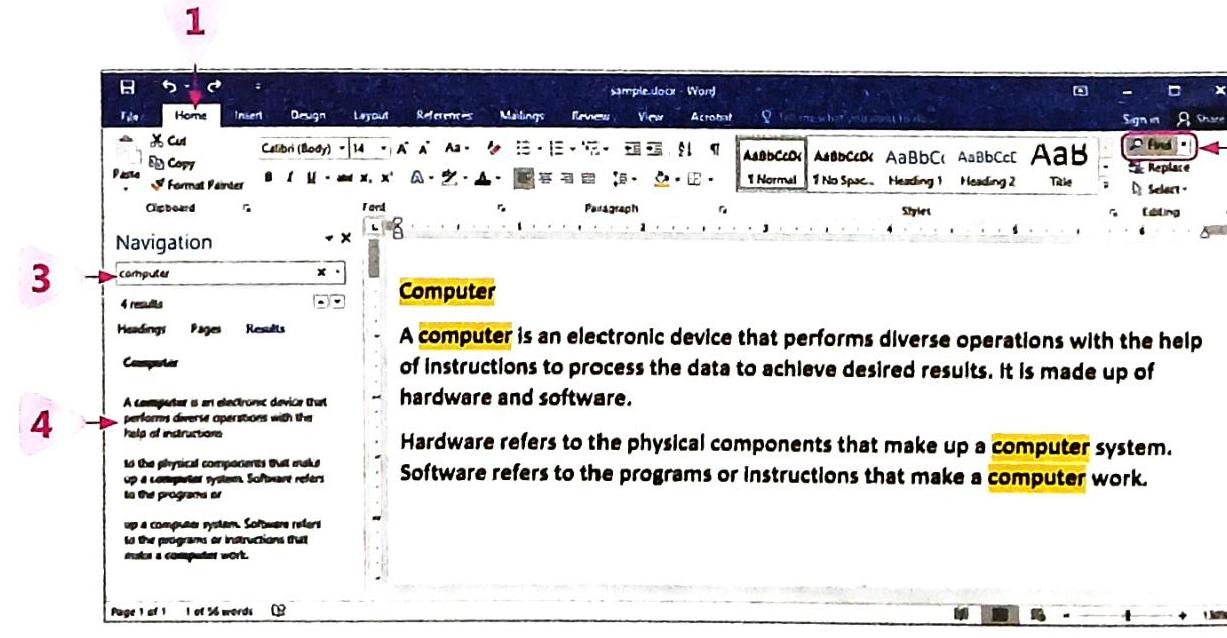
Step 1: Go to the Home tab.Step 2: In the Editing group, click on the Find command. This will open the Navigation panel on the left side of your Word window.Step 3: Type the word or phrase you’re looking for into the text box at the top of the Navigation panel.Step 4: The Navigation panel will immediately show you a list of all the places where your word or phrase appears in the document. Word will also highlight these occurrences in your document.Step 5: Press the Enter key to jump to the next place the text appears.
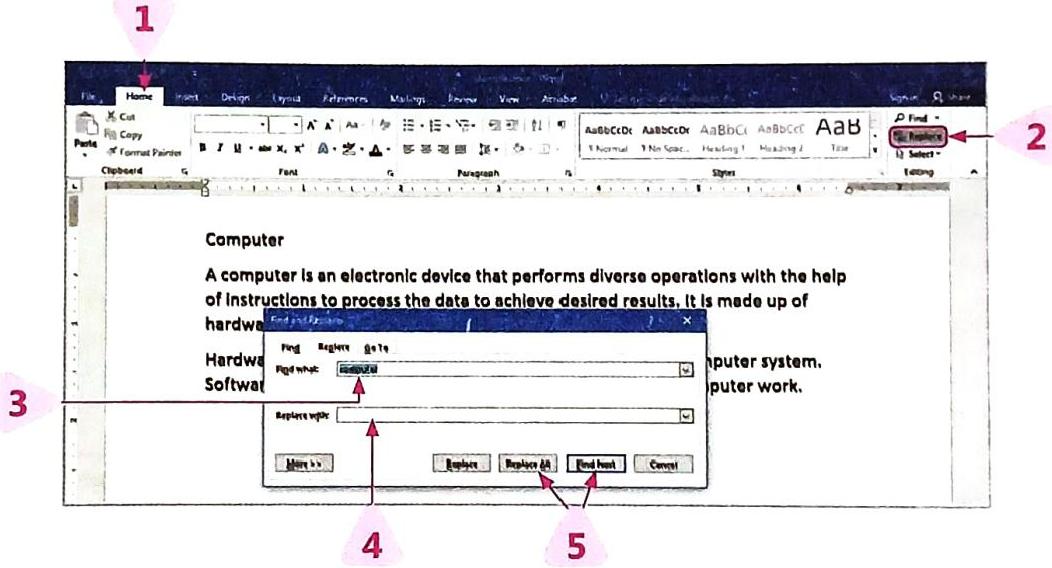
Step 1: Go to the Home tab.Step 2: In the Editing group, click on the Replace command. This will open the Find and Replace dialog box.Step 3: In the Find what: text box, type the word or phrase that you want to change.Step 4: In the Replace with: text box, type the new word or phrase that you want to use instead.Step 5:Click Find Next and then Replace if you want to replace words one by one, deciding each time.Click Replace All if you want to change every instance of the existing text with the new text automatically.
 Shortcut for Find: Ctrl + FShortcut for Replace: Ctrl + H

Header: Text that appears at the very top of each page.Footer: Text (like page numbers or document titles) that appears at the very bottom of each page.Step 1: Open your document in Word 2016.Step 2: Click on the Insert tab.Step 3: In the Header & Footer group, you will find the Header and Footer options. Click on the one you need.Step 4: A list of options will appear. You can choose from various pre-designed header or footer templates, or select the Blank option to type your own text.
This will open the Header or Footer section of the page, where you can type the text you want to appear on every page.
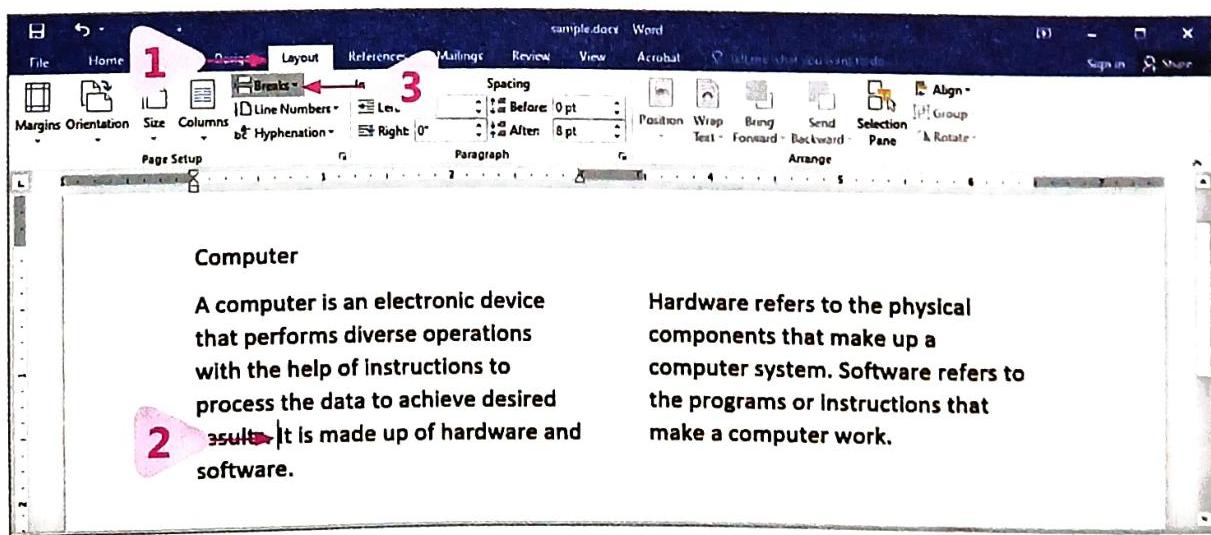
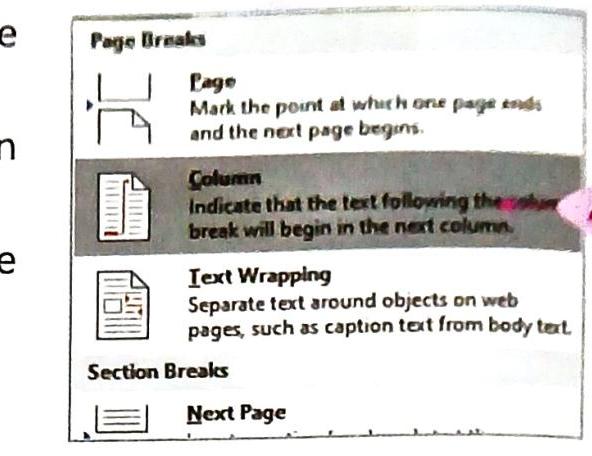
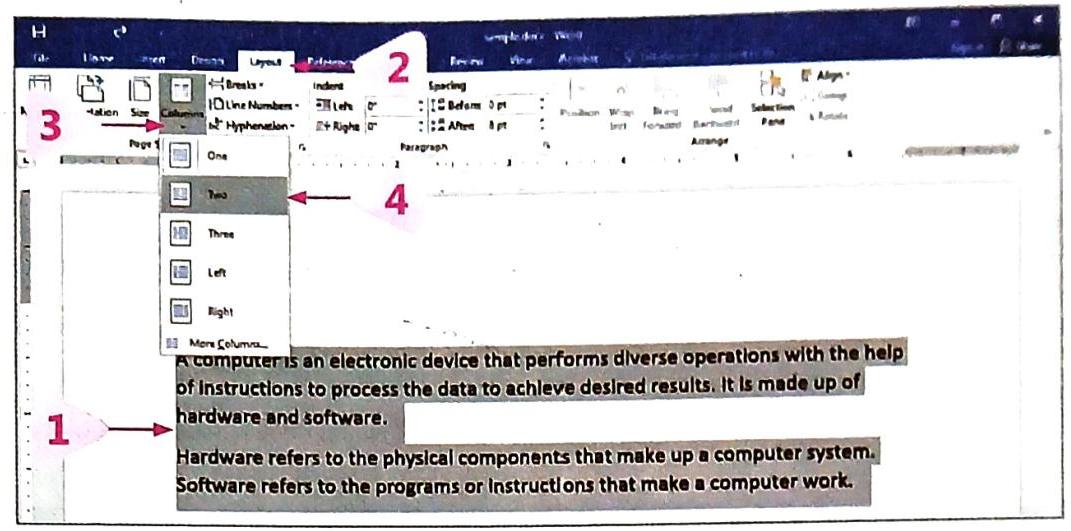
Step 1: Select the text you want to divide into columns. If you don’t select anything, the whole document will be affected.Step 2: Go to the Layout tab.Step 3: In the Page Setup group, click on the Columns command.Step 4: A drop-down menu will appear. Select the number of columns you want (e.g., Two, Three). The selected text will now be divided into the number of columns you chose.Step 1: Go to the Layout tab.Step 2: Place your cursor exactly where you want the column break to occur.Step 3: In the Page Setup group, click on the Breaks command.Step 4: A drop-down menu will appear. Click on the Column option.The text after your cursor will immediately shift to the beginning of the next column.
 Shortcut for Column Break: Ctrl + Shift + Enter

Step 1: Go to the Layout tab.Step 2: Place your cursor at the position where you want the new page to start.Step 3: In the Page Setup group, click on the Breaks command. A drop-down menu will appear.Step 4: Click on the Page option.The page break will be inserted, and all text after your cursor will automatically move to the beginning of the next page.
Shortcut for Page Break: Ctrl + Enter
Shortcut for Page Break: Ctrl + Enter

Place your cursor at the required position and press the Shift + Enter keys together.

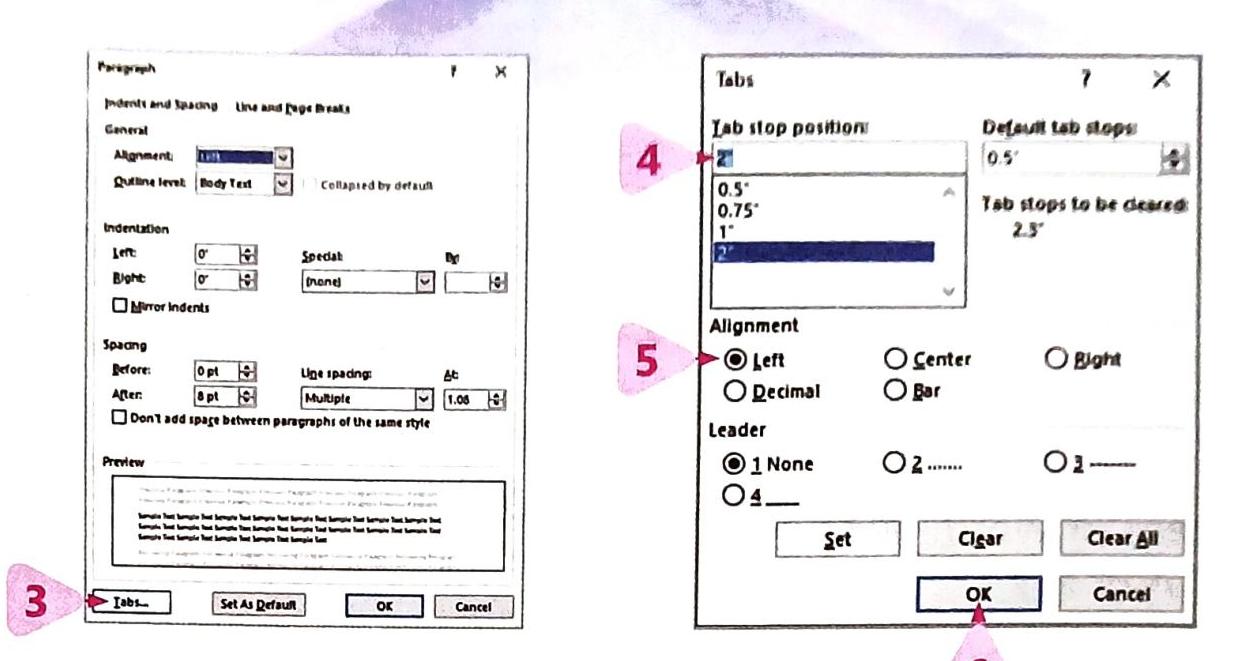
Step 1: Go to the Home tab.Step 2: In the Paragraph group, click on the small arrow icon in the bottom-right corner (called the Paragraph Dialog Box Launcher).
Step 3: In the Paragraph dialog box, click on the Tabs… button at the bottom left. The Tabs dialog box will open.Step 4: In the Tab stop position field, type the measurement (e.g., “1.5” for 1.5 inches) where you want your new tab stop to be.Step 5: Choose an Alignment (Left, Center, Right, Decimal, or Bar) for your tab stop.Step 6: Click Set, then click OK.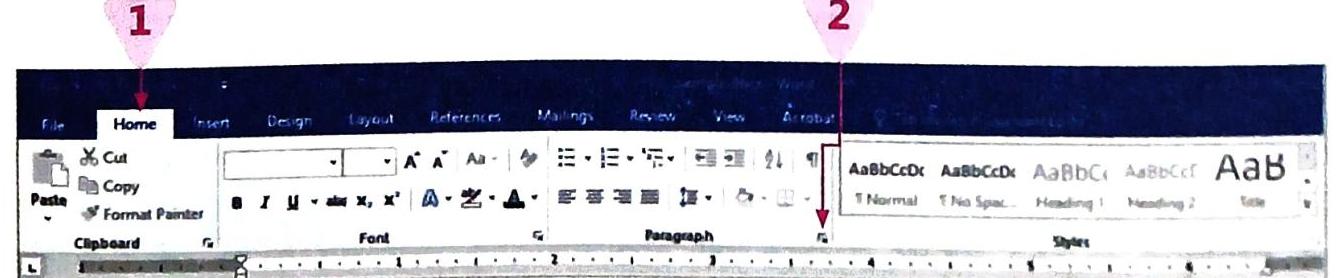

If you can’t see the ruler at the top of your Word window (which helps with indentation), go to the View tab and click the checkbox next to Ruler.
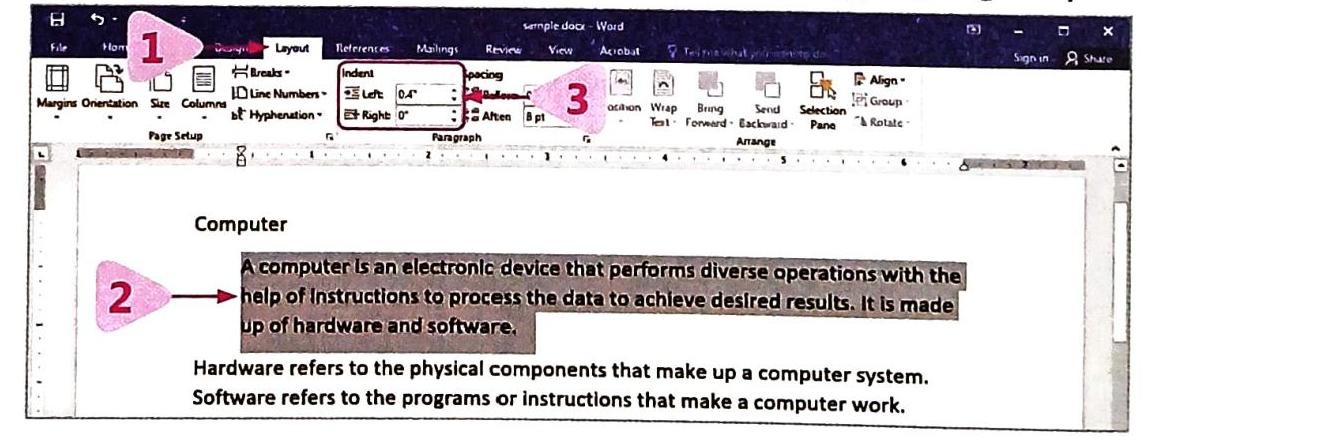
Step 1: Go to the Layout tab.Step 2: Select the text (paragraph or lines) you want to indent.Step 3: In the Paragraph group, click on the Increase Indent button (it looks like a small paragraph icon with an arrow pointing right). The selected text will shift to the right side.
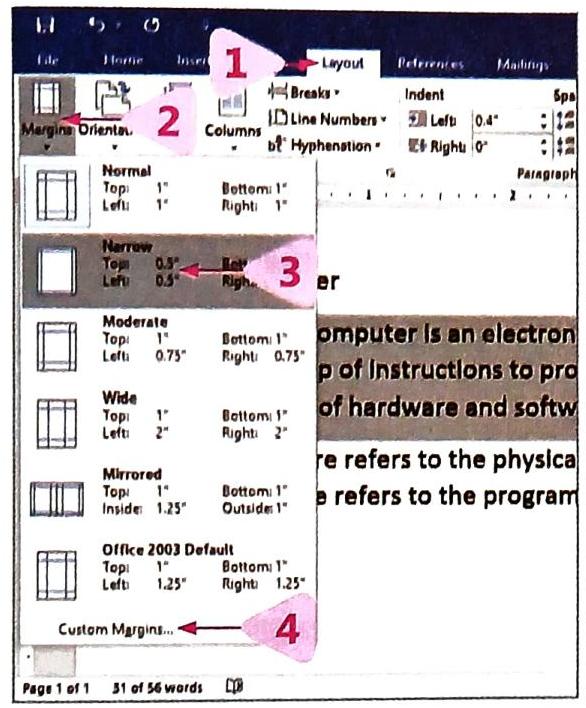
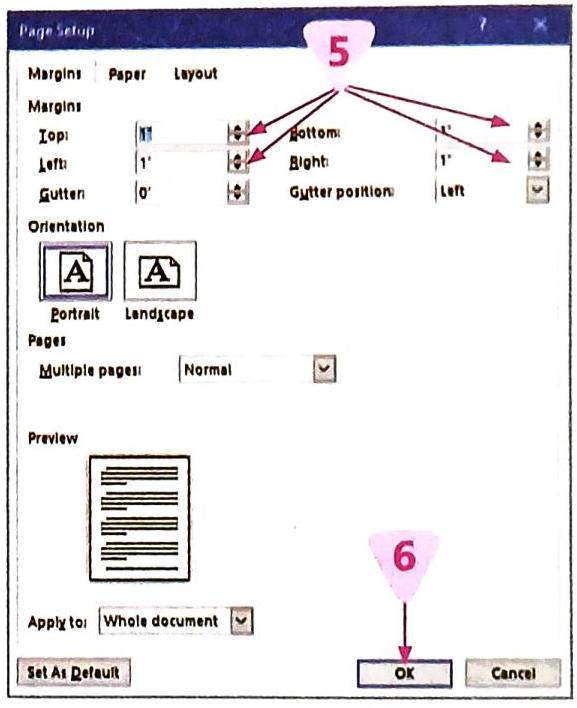
Step 1: Go to the Layout tab.Step 2: In the Page Setup group, click on the Margins command.Step 3: A drop-down menu will appear, showing different preset margin styles (like Normal, Narrow, Moderate, Wide). Select the style you want.Step 4: If none of the presets work for you, select Custom Margins… at the bottom of the menu. This will open the Page Setup dialog box.Step 5: In the Page Setup dialog box, you can type in specific measurements for the Top, Bottom, Left, and Right margins.Step 6: Click on the OK button.
5th Grade - Demo
- Pages
Share
Explore
 Self Study
Prepared by: learnloophq@gmail.com
Last edited 181 days ago by Learn LoopHQ.
Chapter: 03. Advance Features Of Word 2016
Advanced Features of Word 2016
This chapter will help you learn about the special tools in Word 2016 that make your documents look amazing and professional. We’ll explore how to change the way your text looks, how to edit what you’ve written, and how to set up your pages just right.
TEXT FORMATTING TOOLS
Text formatting means changing how your text appears in a document to make it look more attractive and easier to read. You might remember some basic formatting commands from before, like:
Now, let’s dive into some more advanced formatting tools!

Format Painter
The Format Painter tool helps you quickly copy the formatting from one piece of text (like its color, style, and size) and apply it to other text in the same document. It’s a real-time saver!
How to Use Format Painter:
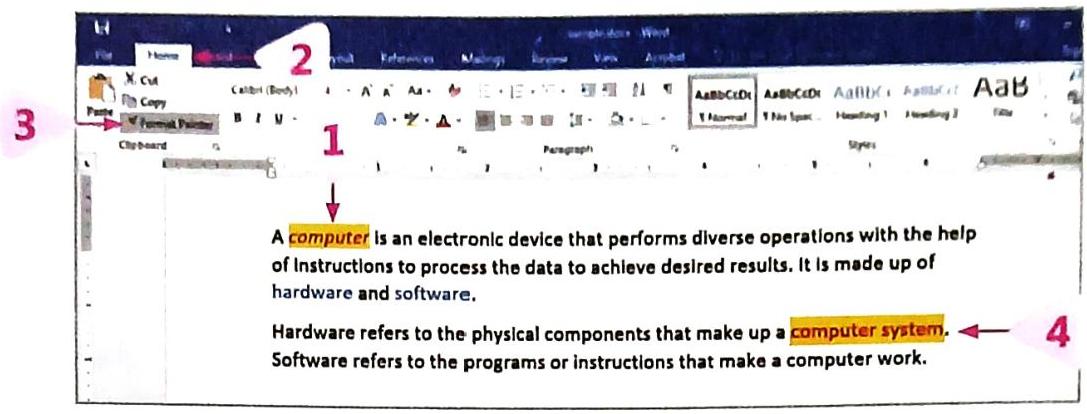
TECH FUNDA:
Superscript and Subscript
When you’re writing formulas or equations, Superscript and Subscript commands are very useful.
TECH FUNDA:
Shadow Effect
The Shadow Effect adds a realistic shadow to your text, shapes, pictures, and WordArt, making them look like they are floating above the page. It makes your text more appealing and gives it a 3-D (three-dimensional) appearance.
How to Apply Shadow Effect:
Border
Borders are a great way to decorate your document and highlight specific parts of text or even the whole page. They add a frame around your content.
How to Apply a Border to Selected Text:
Artistic Border
To make your entire page extra attractive, you can apply an artistic border. These are often fun patterns or designs.
How to Apply an Artistic Border:
TECH FUNDA:
Shading
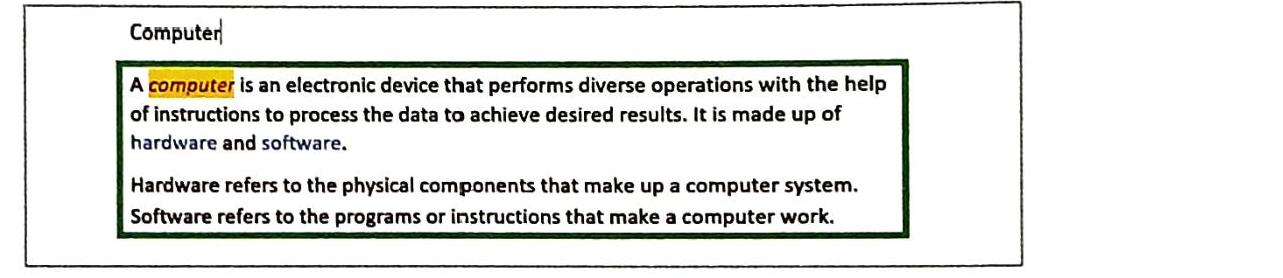
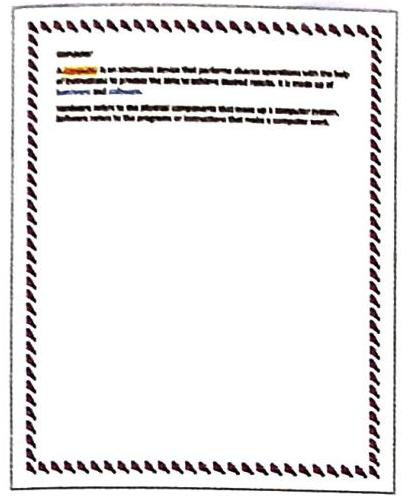
Shading adds a background color to selected words, paragraphs, tables, or other elements, making them stand out and visually attractive.
How to Apply Shading:
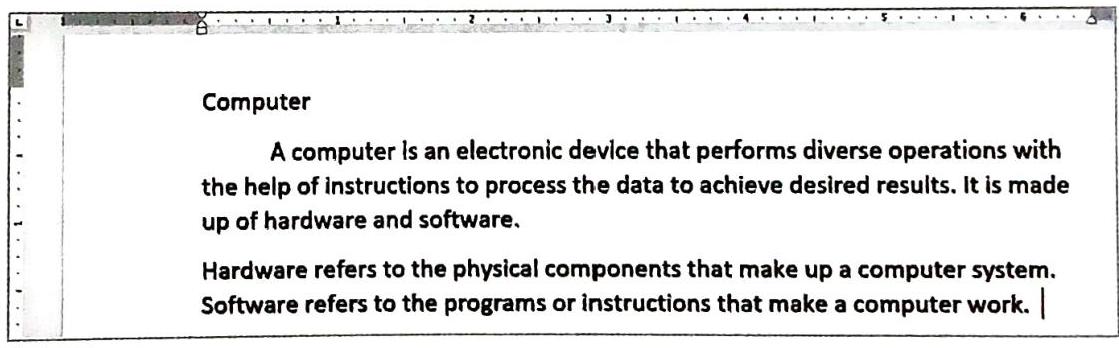
Here’s an example of text that might have shading applied:


TEXT EDITING TOOLS
Editing means making changes to an existing document. You’ve likely learned some basic text editing commands already:
Find and Replace
These features are incredibly useful for working with long documents!
Find
The Find feature helps you quickly locate a specific word or phrase anywhere in your document without having to read through everything yourself.
How to Find a Word or Phrase:
Replace
The Replace feature allows you to automatically substitute one word or phrase with another throughout your document. You can choose to replace just one instance or all of them!
How to Substitute a Word or Phrase:
TECH FUNDA:
PAGE FORMATTING TOOLS
Page formatting means changing how your entire page is laid out. These settings are usually found in the Page Setup group. Let’s learn about different ways to format your pages.

Header and Footer
Headers and Footers are special areas at the top and bottom of your pages where you can place information that you want to appear on every page.
Using Headers and Footers saves a lot of time and effort because you don’t have to type the same text on every page. It also helps prevent errors like forgetting important details on a page.
How to Insert a Header or Footer:
Word 2016 also makes it easy to automatically add page numbers to your document through the Footer options.


Column and Column Break
By default, a Word document is written in a single column, stretching across the page. However, for things like newsletters or magazines, you might want to divide your text into multiple columns.
Columns
How to Insert Columns:
Thinking Point: Imagine you’re creating a class magazine using Word. What creative sections would you include (like interviews, puzzles, or student artwork features), and how would you use columns, different fonts, and images to make it look exciting and stand out?
Example of text in columns:
You can also find more advanced column options by clicking on the More Columns option in the drop-down menu.
Column Break
After you’ve set up columns, sometimes you might want to force text to jump from one column to the next before the current column is full. This is where a column break comes in handy.
How to Insert a Column Break:
TECH FUNDA:
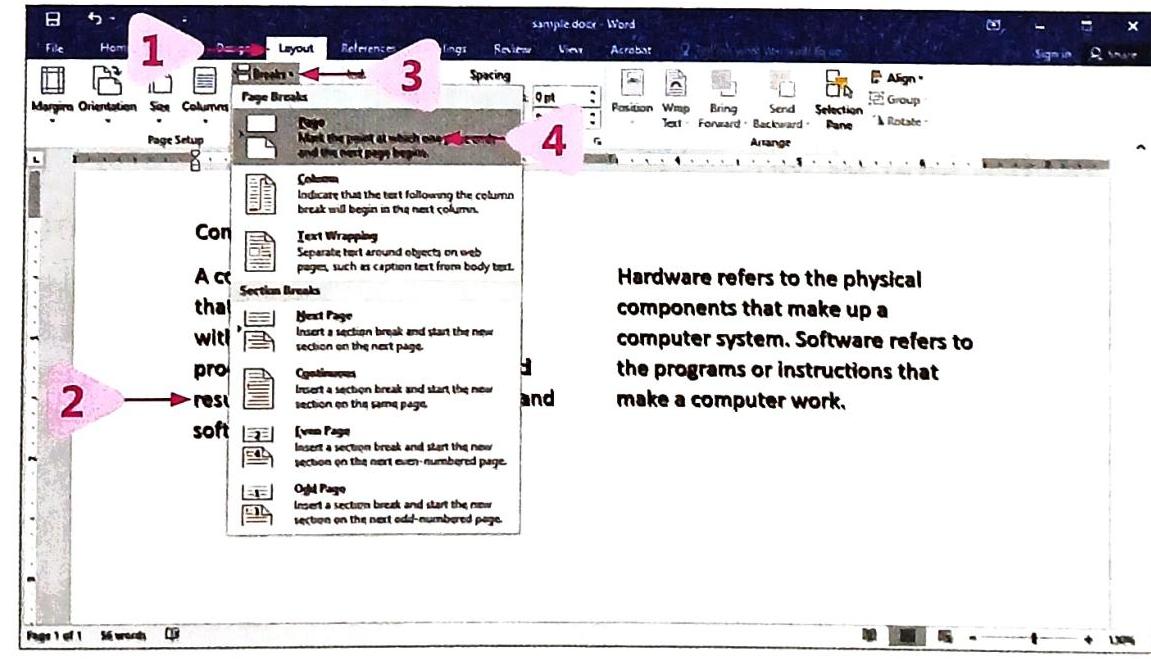
Page Break
If you are writing a document and want to start a new section of text on a brand new page, even if the current page isn’t full, you can insert a page break.
How to Insert a Page Break:
TECH FUNDA:
Line Break
You know that pressing the Enter key creates a new paragraph and moves the cursor to the next line. A Line Break is different: it creates a new line but without starting a new paragraph. This is useful when you want to keep lines of text together as a single block but still have them appear on separate lines (like in an address or a poem).
How to Add a Line Break:
Tabs
Tabs are used to create precise spacing and indentations in your documents. When you press the Tab key on your keyboard, the cursor moves a set distance. By default, this distance is one-half inch (0.5 inches).
The exact position where the cursor stops after you press the Tab key is called a Tab Stop. For example, if you place your cursor at the beginning of a paragraph and press the Tab key, the first line of that paragraph will be indented by 0.5 inches.
How to Add a Custom Tab Stop:
Indentation
Indentation refers to the distance your text is set in from either the left or the right margin of the page. It’s used to move whole paragraphs or even just the first line of a paragraph inwards.
TECH FUNDA:
How to Indent Text:
You can also reduce the indent (move text back to the left) by clicking on the Decrease Indent button (which has an arrow pointing left).
Y

Page Margin
Page margins are the white, empty spaces around the edges of the printed area of your paper. They define where your text begins and ends on each line.
This space is important because it prevents your text from being hidden or cut off when papers are bound together into a book or stapled. By default, new documents in Word have one-inch margins on all sides (top, bottom, left, and right), which is called the “Normal” setting.
How to Set Page Margins:

Page Orientation
Page Orientation refers to how your document is displayed or printed, either vertically (taller than it is wide) or horizontally (wider than it is tall). This is very helpful when you need to fit different types of content, like a wide table.
Want to print your doc?
This is not the way.
This is not the way.

Try clicking the ··· in the right corner or using a keyboard shortcut (
CtrlP
) instead.