Kapi - Documentation
Share
Explore
Kapi's modules

Items

📹

How to create a SalesCatalogItem

It all starts with by creating a Sales Catalog item. You can click on the Settings section located in your left menu, then you must click on the Sales Catalog Items option located on the secondary menu. Then you’ll see a page with a list of existing Items, this page will be empty on your first visit. Next you should click on the “Add SalesCatalogItems’ button.
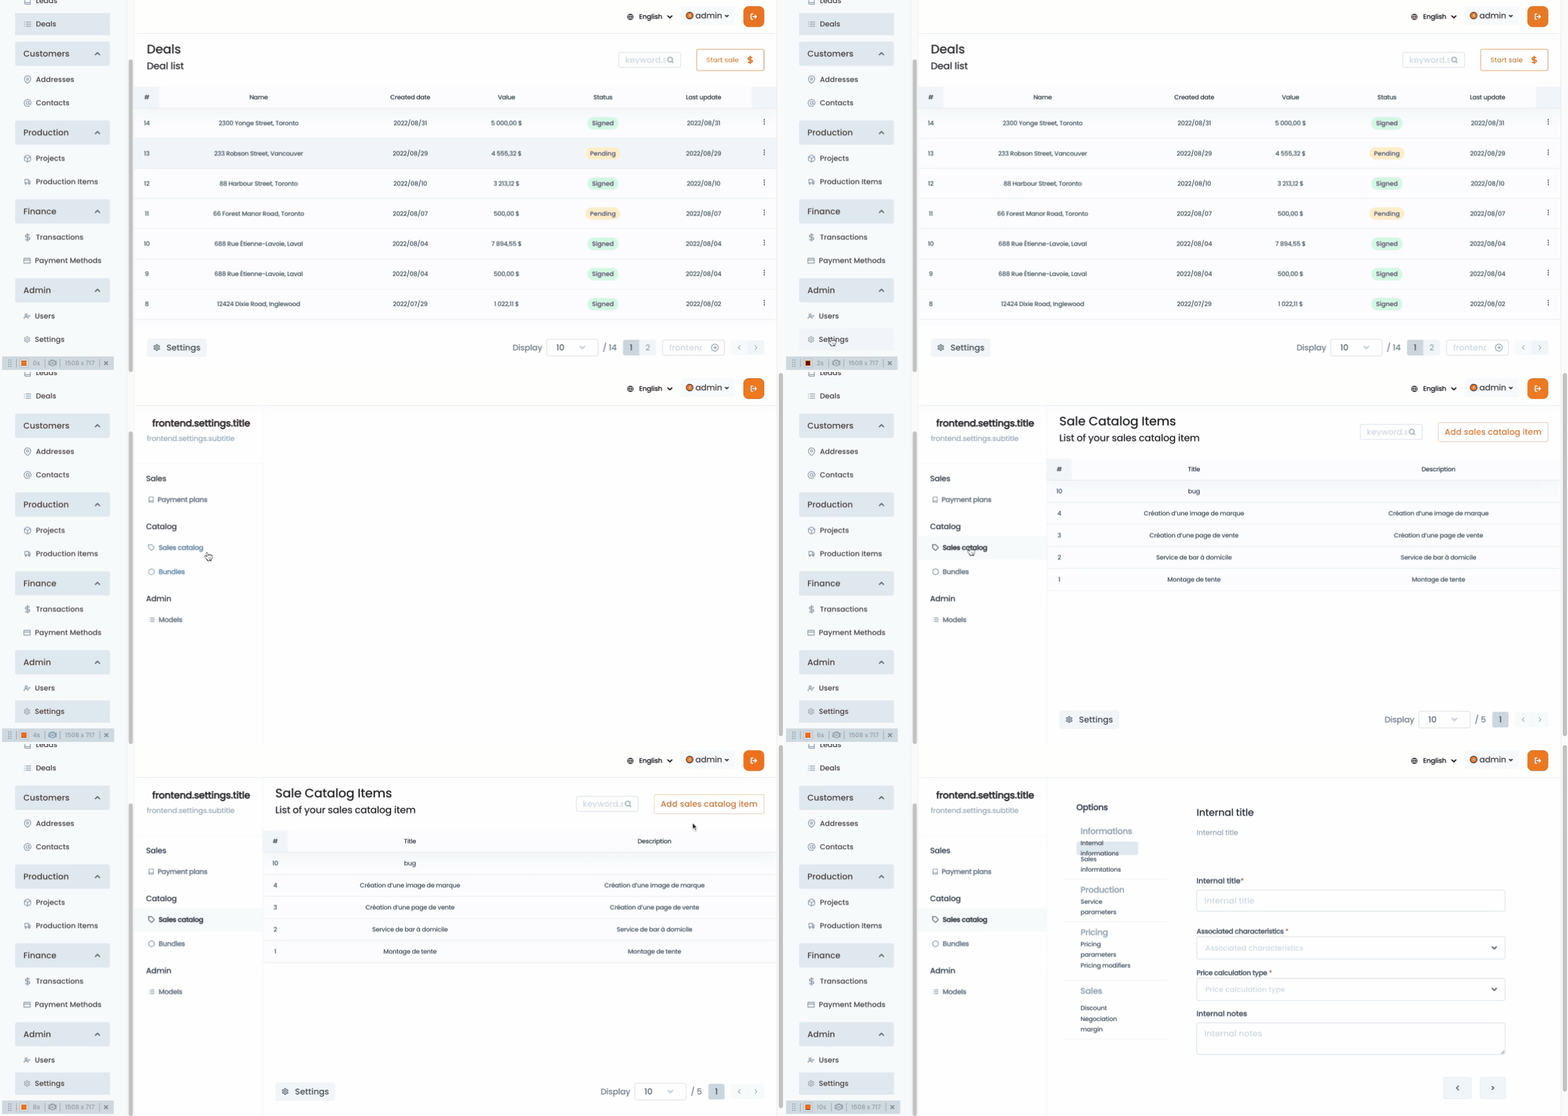
sci.gif

Follow bellow steps to create your first product/service. Please note that you will be able to create the item after completing the required fields located within the first two pages. Also you’ll have an action bar at the bottom of the page with the following options:
image.png
create/save: use this button when you’re ready to create the service, after you create the service this button will change to Save changes.
Reset changes: Resetting the informations will cancel all updates since your last save.
Delete: use this option if you want to delete an item.
Navigation buttons <> : use them to navigate through the pages, you can also switch between the pages by clicking any page within the Item’s sub menu on your left.

Create your first service

It all start by Clicking the “AddSalesCatalogueItems” button, then you’ll see the form you should complete to create your service.

Internal information

Provide Internal information (used by you only)
Internal title *: This may be a name used internally within your company to identify the service
Associated characteristics*: This is the main question used to calculate the pricing for your services, i.e. number of windows to clean, number of guest for an event, etc.
Price Calculation type*:
Time based price calculation: use this if your price will be calculated by the amount of time spent on a task. i.e. A car reparation would be calculated $100 per hour.
Simple unit based price calculation: use this if your service have a standard per unit price. i.e. An oil change will be $100 for the service.
Internal Notes: use this field to add any note relevant to the service description, this note will be visible just to you.

Sales Information

Provide Sales Information (public)
à la carte title * : this is the title that will be shown to the public
Description: use this field to add a short description to your service.

Service parameters

Add Service Parameters (includes user interactions)
Maximun buy quantity: use this field to specify the max quantity a user can buy in a single order.
À la carte: choose this option if
Upscalable
Renewable: Choose this option if you want the service to be renewable, this will

Pricing Parameters

Add Pricing parameters
Associated characteristics: read only field, will show the selected option in the first screen.
Price Calculation type: read only field, will show the selected option in the first screen.
Then you’ll have the option to indicate the prices of your services. You have to specify the price in ranges. i.e. From 1 to 10 the price will be $10, from 10 to 20 it will be $9 and from 21 to N it will be 8. This will give you all the flexibility needed to get to a better pricing experience.
image.png

Pricing Modifiers

Pricing modifiers are one of the most important steps in setting up smart pricing on your services. In this screen you’ll have the opportunity to add parameters that would increase or decrease the price of the service. Each component has a drop down where you can select the option that better suits your needs.
image.png
ℹ️ You need to create your custom fields first in order to use pricing modifiers. For example: Number of windows to clean?

Custom field

The custom field is a predefined characteristic according to your business model, normally an information you require from your customer to provide a quote. The type of custom field selected here will affect the options of the other fields available in this screen.
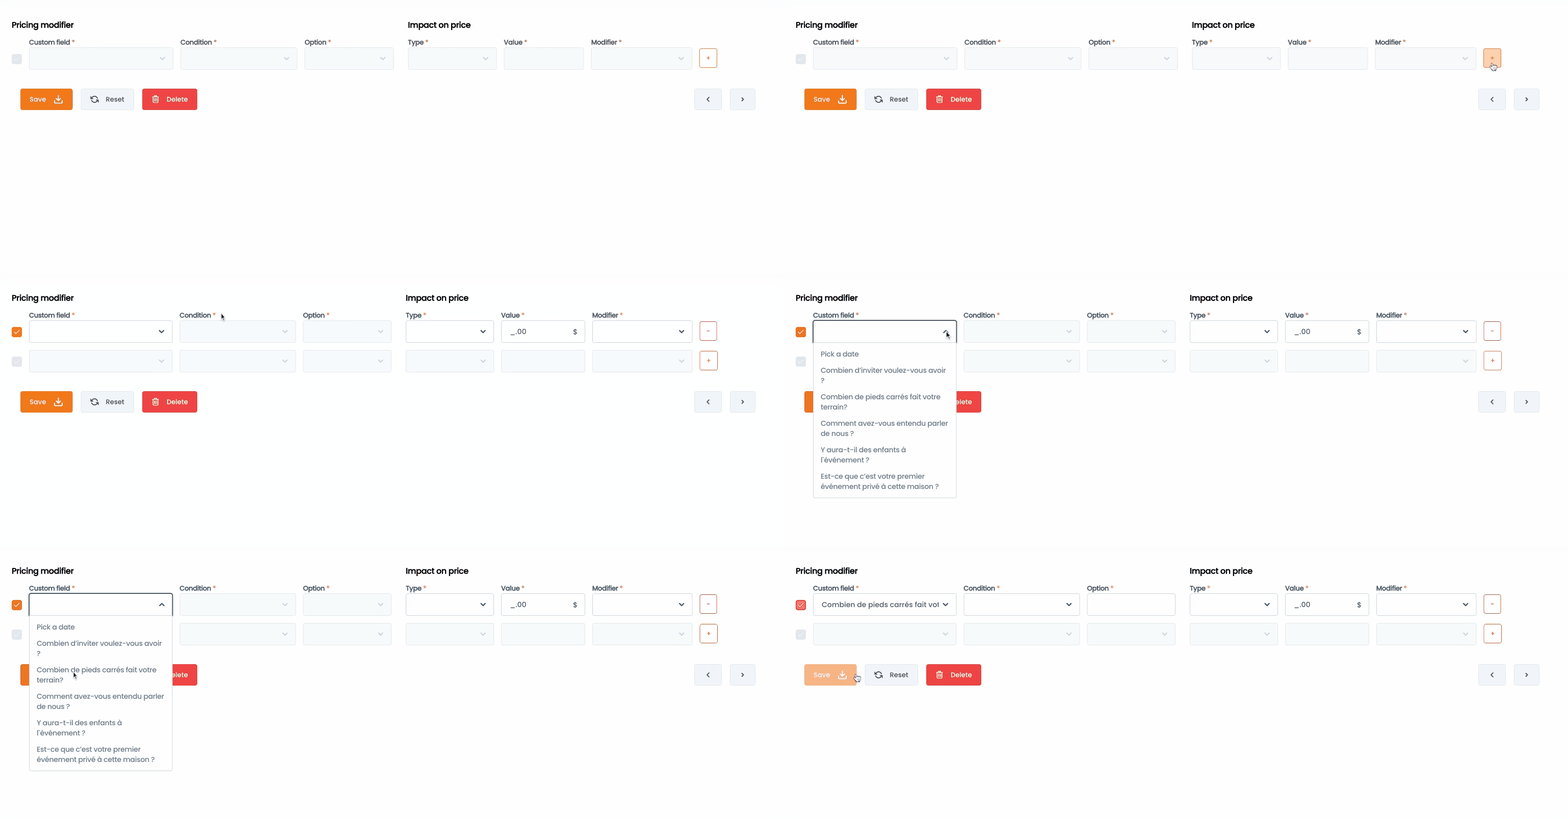
priceM.gif
Condition

Use this field to indicate the condition the custom field must meet to get to your desired outcome, you can select from a list of logical operators:
Name
Example
1
Equal to (=): if the answer to the question is equal to
Not equal to (/=): If the answer to the question is not equal to
Less than or equal to (<=): if the selected value is less or equal to
Less than (<): if the selected value is less than
Greater than or equal to(>=): if the selected value is higher or equal to
Greater than (>): if the selected value is higher than
image.png
There are no rows in this table
ℹ️ The list of conditions showed in this field will depend on the type of custom field you selected on the previous option. For example:
If your custom field is a Number type, where the user will have to input a number, you’ll see all the logical operators mentioned above. If the custom field
If your custom field is an option, where the user will have to select one of the available option as an answer, you will only see 2 logical operators, equal to and not equal to.

Option

The option field will reflect the actual response from the user during the sales workflow. Once again this field will be conditioned to the type of custom field you selected.
Number custom field: the option field will become an input field where you can enter the value you want to compare the answer of your customer.
Select custom field: the option field will be a dropdown selector with the options available for this custom field.
select if the modifier will act as a fix number or a %
Type: select if the modifier will increase (+) or discount (-) money from the price of your service.
Value: define the value or amount.
You can add several modifiers, but you need to specify which ones will be active by selecting them using the checkbox located at the beginning of each raw.

Type

Use the type of modifier to define if the rule you are defining will add or subtract value from the price of your service.
Add (+) → Select add if you want this rule to add value / money to the price of your service.
Subtract (-) → Select Subtract if you want this rule to reduce the price of your service.

Value & Modifier

This is the last part of setting a new rule, The value is the number you want to add or subtract depending the rule you are setting while the modifier will define if the value will be a fixed amount or a percentage. If you enter 50 on the field value, then your selection on the modifier field will determine if you’re adding 50 dollars or incrementing the service value by 50%.

image.png

Creating Discounts

It all starts by clicking on the discount link within the Sales catalog item menu, you’ll be taken to the discount tab.
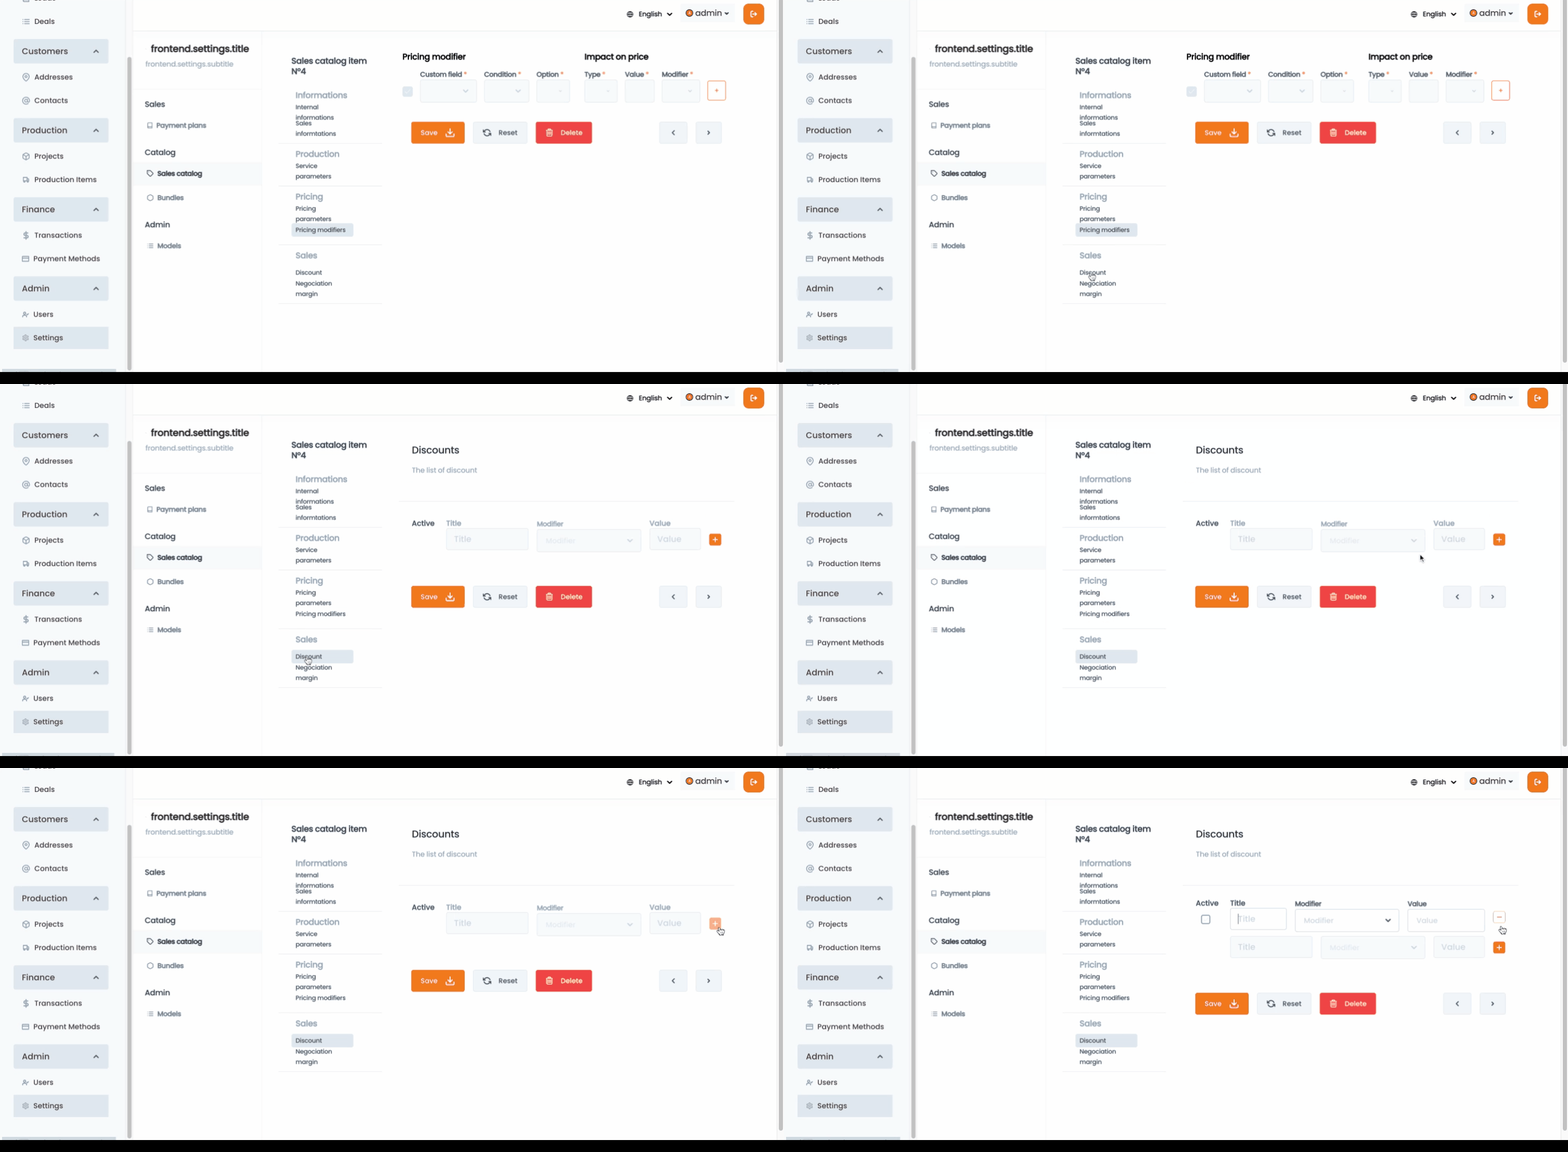
Discount.gif

To create a discount you need to click on the + icon at the end of the raw, next you need to provide the following information
Title: This is a reference field for yourself, it won’t be visible to the end user.
Modifier ($ / %): This field will help you define if the discount will be a fixed amount or a percentage of the service’s price.
Value.: Enter the value you want to discount.
Next you’ll have the ability to activate or deactivate the discount. Don’t forget that this discount will be applied only to the service where you are creating it.

Negotiation Margins

Negotiation margins will be available only for an admin and authenticated user, it allows you to set some flexibility on the price of a service, enabling the user making the sale to go above or below the price of a service to close a deal.
Minimum: enter in term of percentage the lowest the service could be sold
i.e. If a service is worth $ 100 and you set 80% as the minimun value, this service could be sold in $ 80.
Maximum: enter in term of percentage the highest the service could be sold
i.e. If a service is worth $ 100 and you set 120% as the maximum value, this service could be sold in $ 120.


Once you’re done with your modifications you can click on Save Modifications, once clicked you’ll see a notification indicating the item was successfully created.
image.png

Next, you will notice a page listing your new Catalogue item.

Share
 
Want to print your doc?
This is not the way.
Try clicking the ⋯ next to your doc name or using a keyboard shortcut (
CtrlP
) instead.