Skip to content
Jira Pack guide
- Pages
 How to log into Jira using Python and the Coda Jira Pack [2024]
Tutorial on how to log into your Jira workspace using the Jira Python API library and a simplified way to login and access your data using Coda.
This tutorial will walk you through how to log into Jira using the Jira Python library. At the end, I’ll also show you an alternative way to access and visualize your Jira data in a spreadsheet-like way using the .
Accessing your Jira project with Python used to be possible with just your Atlassian username and password. This basic authentication is no longer possible in 2024 as Atlassian requires you to authenticate with your Jira API token. The following tutorial is for Jira Cloud (not Data Center) and you need to have Python 3.5 and above. For full details on the Jira Python API, read the documentation
. Watch the video tutorial below for a more visual walkthrough:
Step 1: Create an Atlassian API token
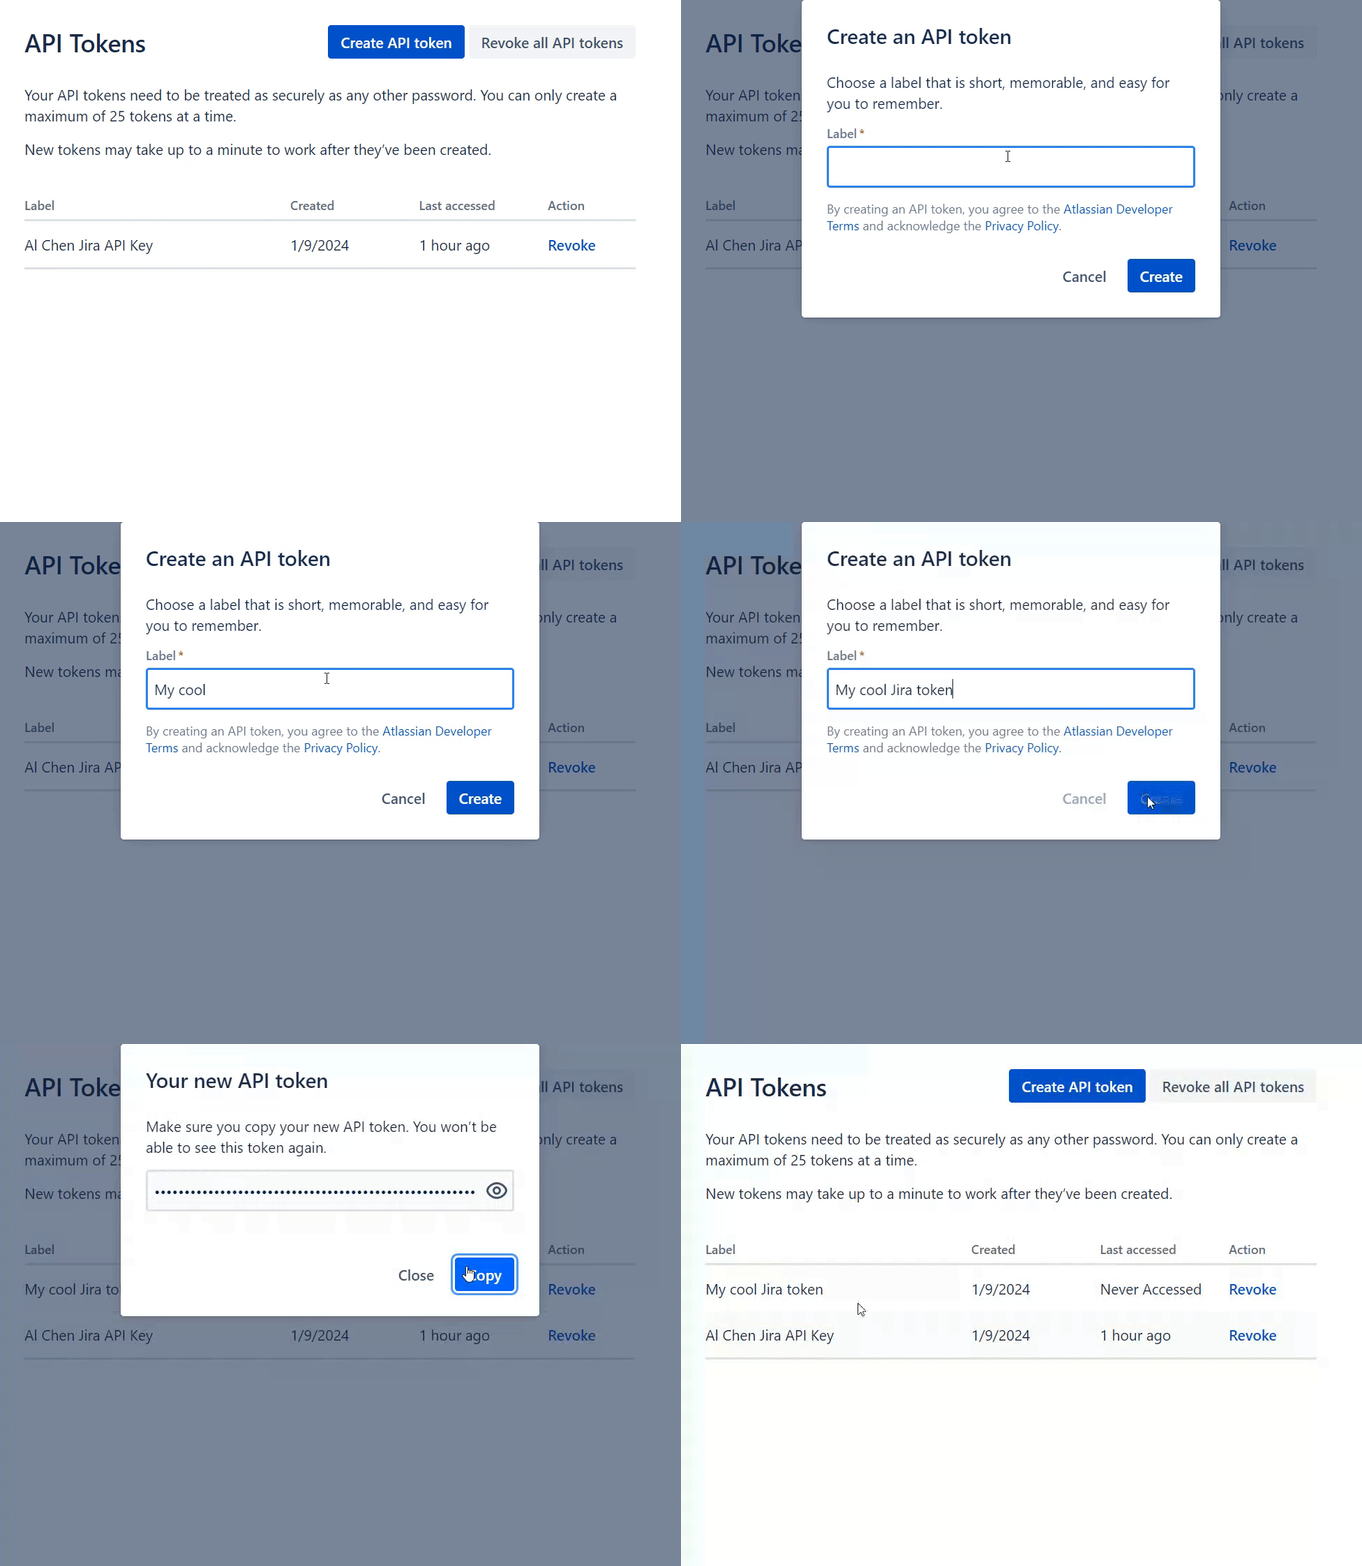
Go to your and click the “Create API token” button and give the token a unique name. Copy the token and paste it in a doc or other secure place as we will use this token later.


Step 2: Install the Jira Python library
In your terminal run pip install jira to install the Jira Python library. Then start your Python shell by typing python in your terminal.


Step 3: Copy and paste your Jira URL, email, and API token into the code block to sign into your Jira account
After replacing the placeholders for your Jira URL (YOUR_JIRA_URL.atlassian.net), email (YOUR_JIRA_EMAIL), and Atlassian API token (YOUR_API_TOKEN) in the code block below, copy and paste these three lines and run it in your Python shell. The API token is the long string of characters from Step 1. Make sure to keep the double quotes in the code block below after you replace the Jira server URL, email, and API token.
from jira import JIRA
jiraOptions = {'server': "https://YOUR_JIRA_URL.atlassian.net"}
jira = JIRA(options=jiraOptions, basic_auth=("YOUR_JIRA_EMAIL", "YOUR_API_TOKEN"))
That’s pretty much it! The jira variable now contains your Jira instance. Here are some examples of how you can retrieve data using the Jira Python library (see all the Jira Python endpoints
).Step 4: Get all the project keys from your Jira instance
Assuming you followed Steps 1-3 above, you can run the following code to get all the project keys from your Jira instance:
for project in jira.projects(): print(project.key)


Step 5: Get a list of all issues for a project and the reporter of the issue
You can run the following code to get all the issues for a specific project and who reporter the issue. Replace YOUR_PROJECT_NAME with the name of a project from your Jira workspace.
for singleIssue in jira.search_issues(jql_str='project = YOUR_PROJECT_NAME'): print('{}: {}:{}'.format(singleIssue.key, singleIssue.fields.summary, singleIssue.fields.reporter.displayName))


👉 Simplify signing into your Jira account and retrieving your Jira issues with the Coda Jira Pack
This is the part of the tutorial where I show you an alternative way to access your Jira projects and issues. Coda is an all-in-one platform that blends the best of spreadsheets, docs, and applications.
You’re probably reading this tutorial because you are looking pipe your Jira data into another 3rd party reporting tool, time-tracking tool, or some other SaaS application. Or maybe you just want to export certain data about your Jira project into a spreadsheet. Either way, just logging into Jira and using the Jira Python library is just the first step in a series of steps to get the reporting or visualization you’re looking to build. Moreover, maintaining your workflow or pipeline might mean going into AWS or Azure or whatever hosting/compute service you’re using to run the commands above.
One of the main benefits of visualizing your Jira issues and projects in Coda is that there is 2-way syncing. The steps below show you how you can sign into your Jira account (using the ) and creating a synced table of issues from one of your Jira projects. You can also follow the tutorial in .
Step 1: Insert the Jira Pack into a new Coda doc
After you’ve created a Coda account, create a new doc and type /jira on the page and select the Jira option under “More Packs” on the menu that pops up. Click Add to doc:


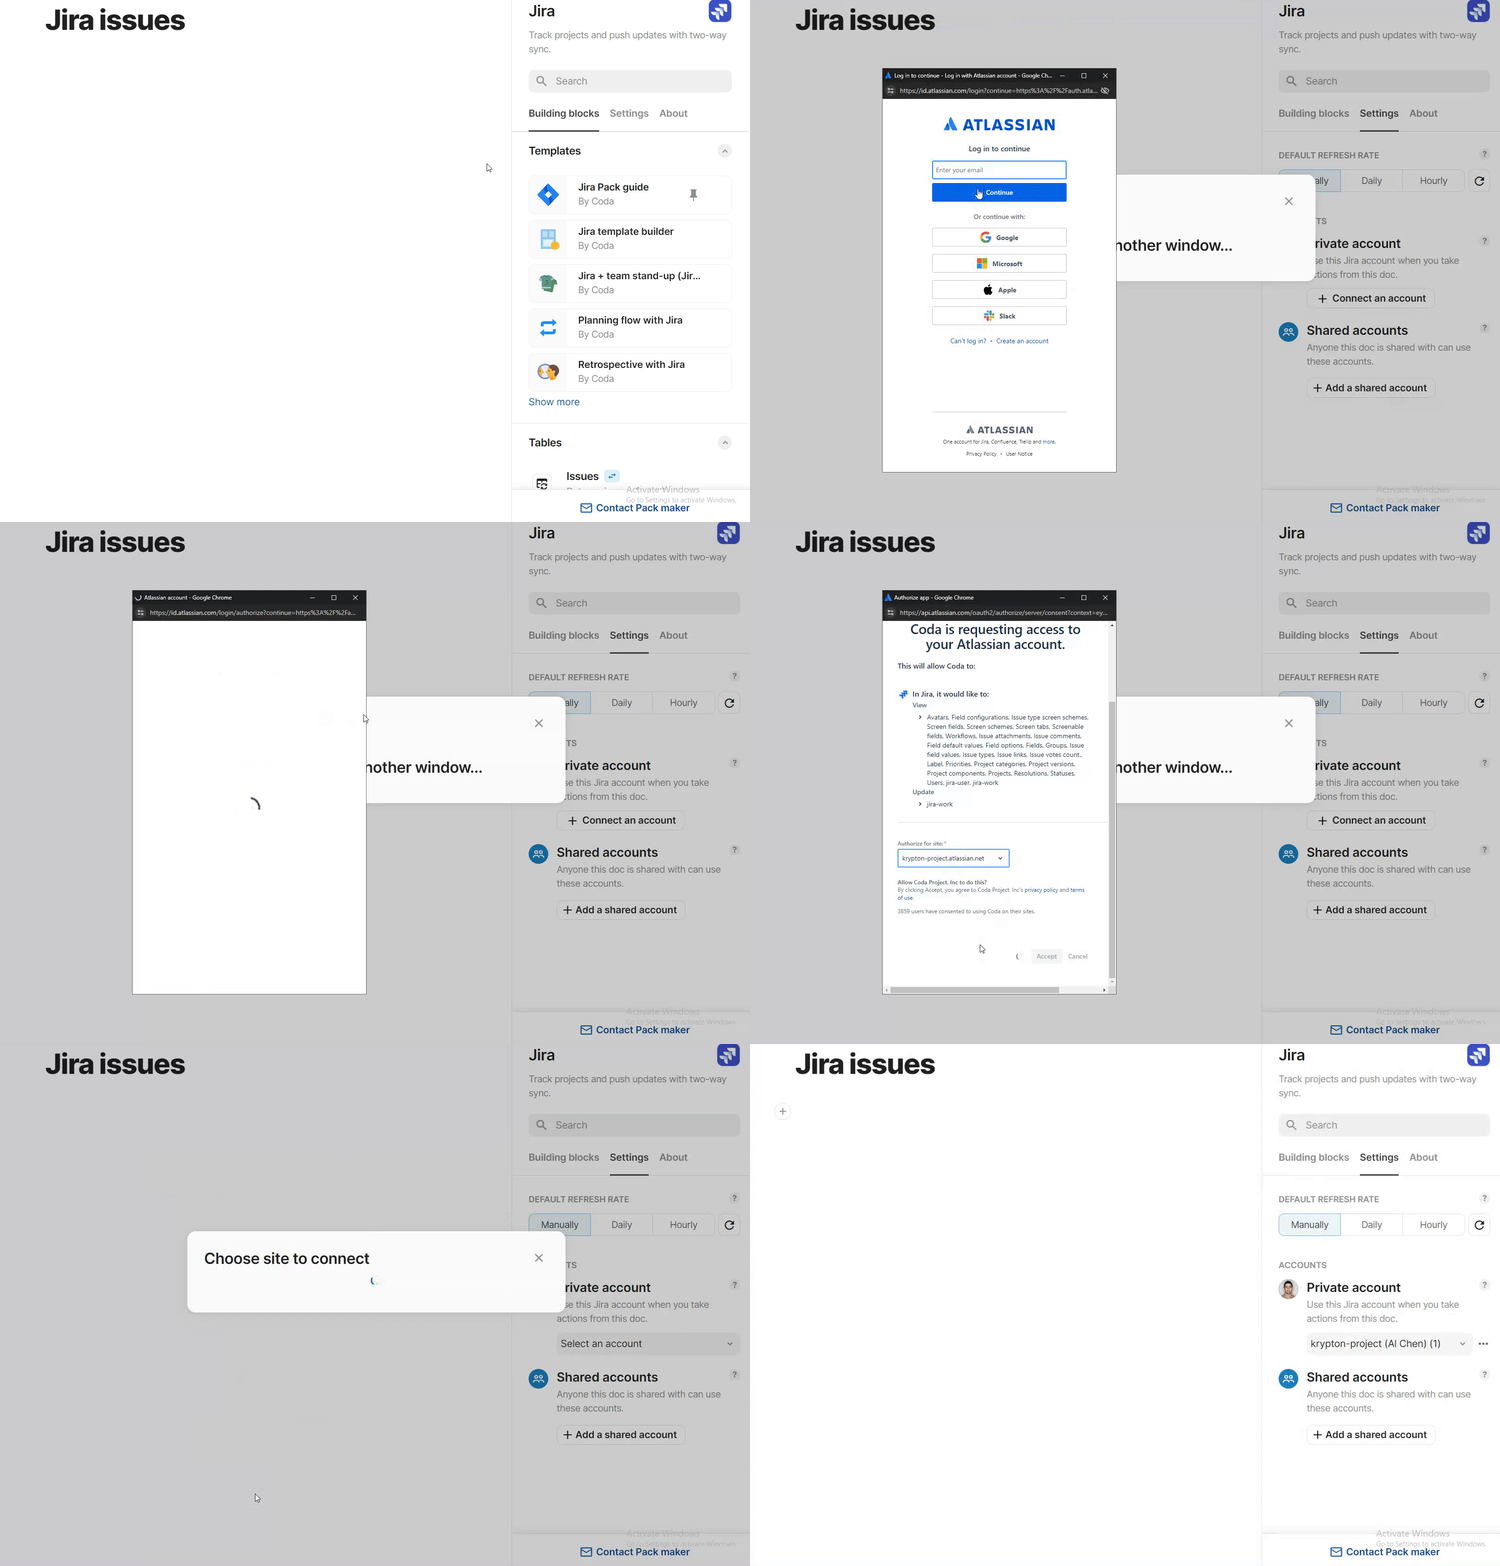
Step 2: Log into your Jira account
Click on Settings → Connect an account → Sign in with Jira and follow the on-screen instructions to sign into Jira. You can view the read scopes of Coda’s access to your Jira site on the Atlassian pop-up. Click on the site that contains the project you want to pull issues from:


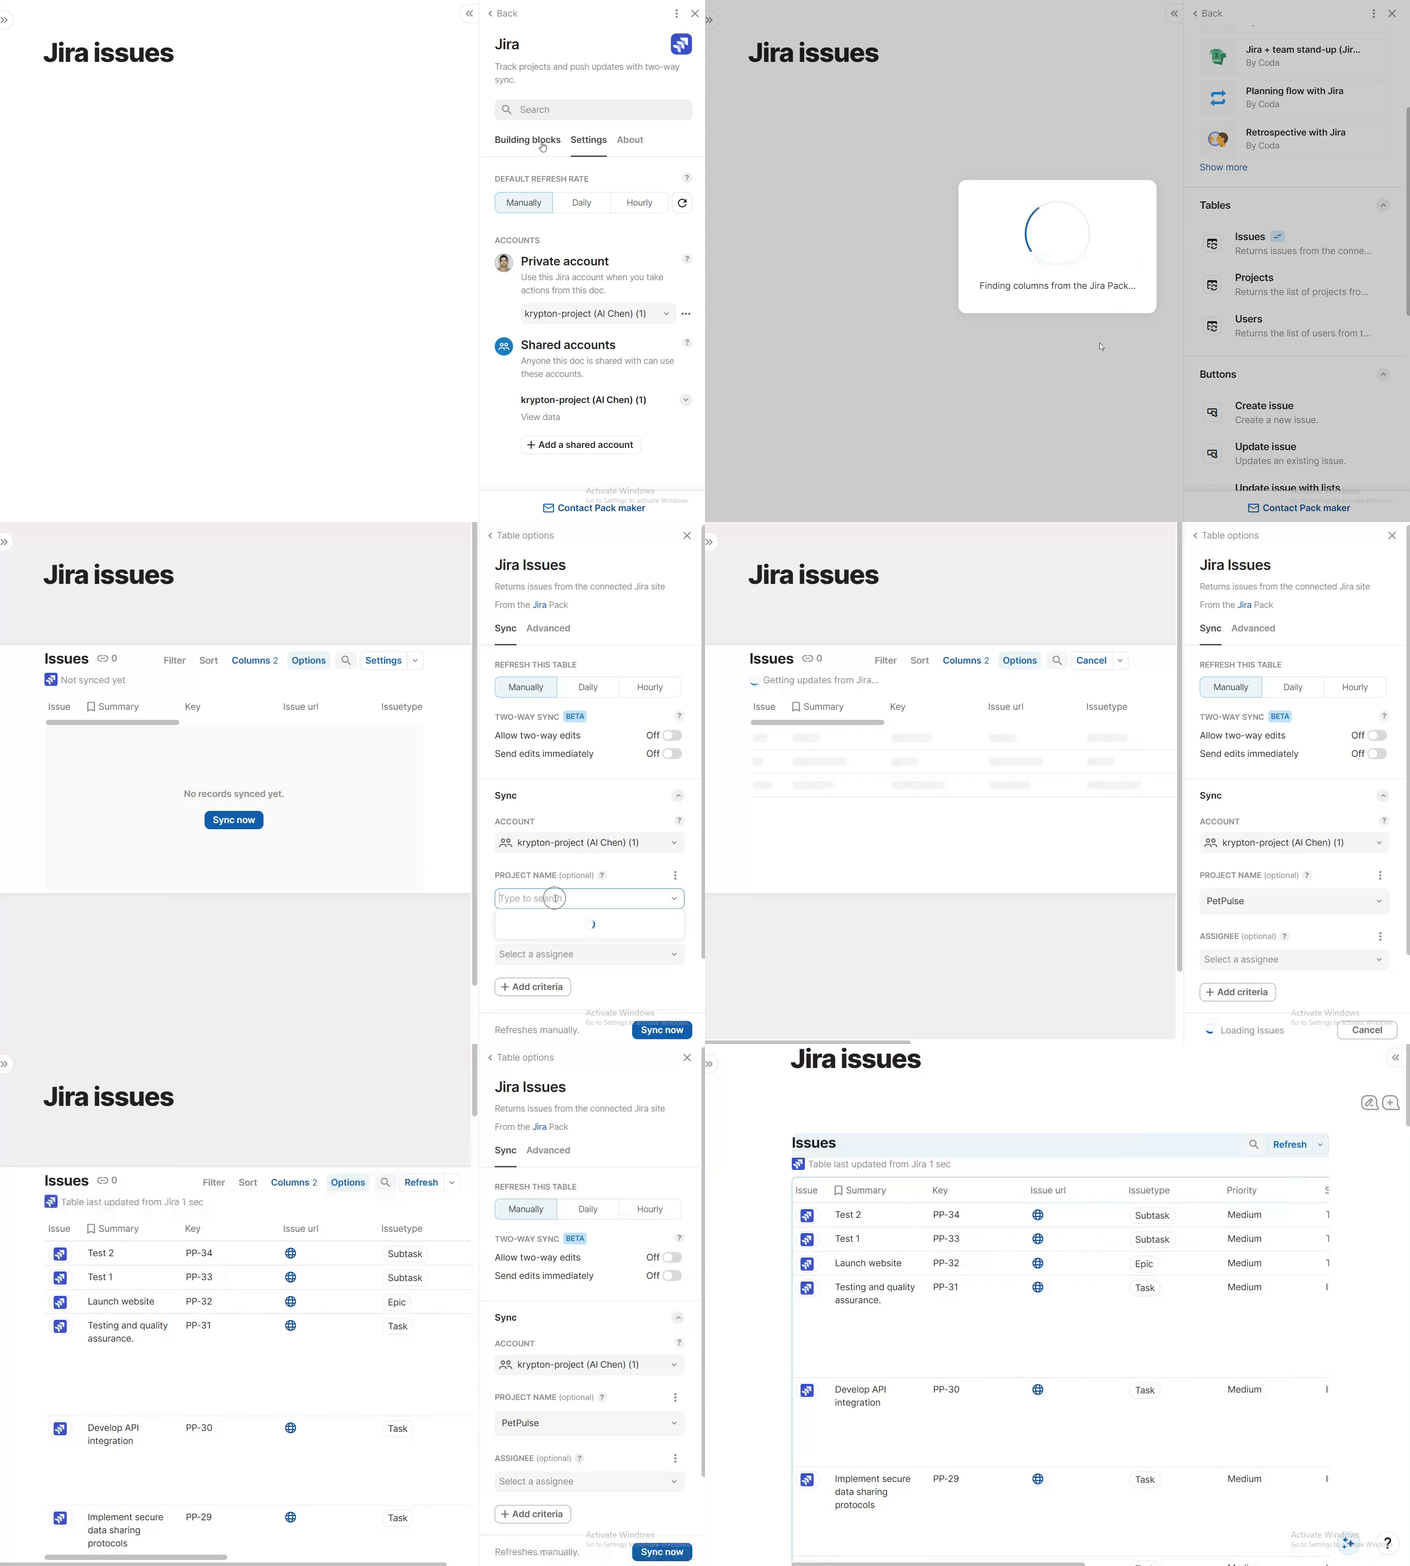
Step 3: Retrieve a table of issues from a project in your Jira site
Click back on the Building blocks panel on the right sidebar and scroll down the screen. Drag-and-drop the Issues option into the page. By default, Coda will pull in some standard properties from your Jira issues. Click on Create Issues table. Under the Project Name field, enter the project you’d like to see pull issues for:


Now you can filter, sort, and manipulate this table of issues like you could in a spreadsheet. You can also build custom charts and reports off of this table of data. For more templates, check out .
Want to print your doc?
This is not the way.
This is not the way.

Try clicking the ··· in the right corner or using a keyboard shortcut (
CtrlP
) instead.