Skip to content
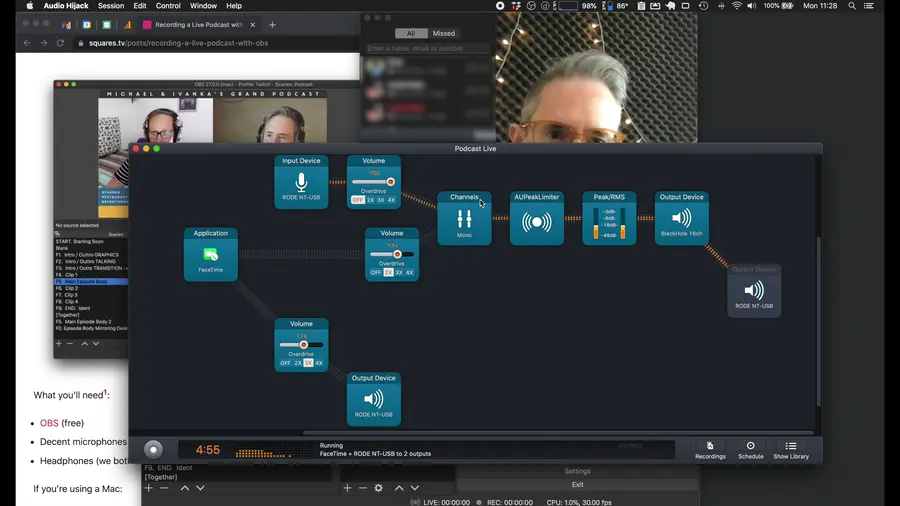
My mic went into a 2 channel mixerApplication capture from Facetime was boosted and sent into the mixerA limiter prevents unexpected peakingAn audio meter shows me (kind of) how loud we areThat goes to that to a virtual audio cableThat virtual audio goes to a special scene in OBS that is used in all other scenes where I want both of our audioAn extra audio delay was added inside OBS to sync up the microphone with the cameraI also split off the application capture from Facetime via another volume controller into another audio device so I can hear my cohost in my headphones but not myself
AUDIO. No longer do I scratch my head over audio. CueCam handles metering, mixing, ingesting and my mix-minus needs, and looks no more complicated than a Zoom window.OVERHEAD AND REMOTE CAMERAS. With Shoot, I can stick my phone anywhere, get it level, view and control it from my Mac.DRAWING. Video Pencil works seamlessly with CueCam Presenter. I can draw on anything and never have to think about how.EYE CONTACT AND REMEMBERING WHAT TO SAY. CueCam lets me write and run scripts from my Mac, and works with my big teleprompter or on my iPhone. IMMERSIVE PRESENTATIONS. CueCam lets me add immersive slides to my talks and shows without adding any extra screen shares, video feeds, or presenter controls.
5 Video Production Problems I Forgot I Solved
The great thing about solving a problem is you can forget about it.
I have solved a lot of problems with the apps I’ve made. I actually find it a little painful to think about how complicated things used to be, compared to now.
But you might still be facing some of these problems and you might not know I’ve fixed them, so I’m taking a deep breath and going back to the past to open up some old wounds, so I can compare and contrast, in the hope that I can rescue you from unnecessary pain!
1. Audio Routing
I used to need a convoluted Audio Hijack patch and an audio loopback setup, requiring extra kernel extensions and disabling certain macOS system security features.
For example, here’s how I set up a simple podcast recording.
That’s a lot to think about when you’re just trying to have a chat about the state of the world!
Here’s how that looks now. CueCam Presenter’s bottom toolbar looks like this.

My mic is on the left.
FaceTime’s audio is captured using the official macOS ScreenCaptureKit framework, automatically mixed into CueCam’s output for recording.
I don’t hear my mic in my headphones, and I hear my guest via the normal system output.
LUFS measurement allows for accurate loudness metering (unlike RMS), and hence can be included as a small, glanceable meter.
CueCam has a built-in audio delay calculator so it’s simple to get everything precisely synchronised.
It’s so easy, I don’t even worry about audio any more.
2. Overhead and Remote Camera Control
I own a C-Stand. One of these monstrosities.

Why?
Because I wanted to do overhead shots on some of my videos. A YouTuber told me I should get one of these to mount my Canon EOS 5D Mark III overhead. It’s a heavy camera, so it needs something very sturdy.
I ran an HDMI cable from the camera to my laptop so I could see the output. I had to install Magic Lantern to stop it turning itself off every 20 minutes. I bought a hardware remote control so I could autofocus from the right position instead of having to be close enough to touch the camera buttons.
To adjust settings, I had to go up on a chair and squint at my laptop screen from a distance.
Getting the camera level was awkward and temporary. I have a special mount that can be screwed into position, but it was easy for the weight of the camera to throw it off, especially if I needed to move the stand.
So I built Shoot Pro Webcam
It’s an iOS remote controlled camera app.
So instead of getting out the C-Stand, I can stick my phone on a selfie-stick.
I can get it perfectly level with the built-in Grid feature.
I can control the camera settings from any web browser or my Apple Watch, but I prefer to control Shoot directly from CueCam.
With Shoot, no cables are required - AirPlay is amazingly low-latency, and CueCam lets you take a wireless feed with no extra steps.
Now if I want an overhead camera, I just stick my phone up a stick and share it in CueCam.
3. Drawing
It’s amazing the lengths you once had to go to just to draw over your webcam.
One technique involves connecting an iPad with an image editor loaded. Make the background bright green. Capture the iPad’s output and feed it into Ecamm or OBS. Key it on the green background to make it transparent and stick it over the top of your camera.

When you look at your iPad, you won’t know where you’re drawing, so it’s pretty limited. Mostly a style flex.
The other technique involves a graphics tablet with a built-in screen, like a Wacom One, and a piece of video keying hardware like an ATEM Mini.
I had to look this up again because it’s so convoluted.

You plug your camera into the Atem.
You take an HDMI output from your laptop into another one of the ATEM’s inputs.
You take the mixed output from the ATEM into the tablet’s HDMI input.
So the tablet is a screen showing the ATEM’s output.
This same output is also available as a webcam on your computer, so that’s what’s going into Zoom or wherever.
If the ATEM was only being used as a switcher, you’d press a button to switch from one source to the next. But we need to mix one source with another.
This means we need to load up the special ATEM software to key one source with another source.
We run a drawing app with that lets us draw on a black background. Video Pencil actually provides this on Mac, for example.
We take our camera input in the ATEM and add a LUMA KEY. This has two main settings, the “PIP SOURCE” and the “KEY SOURCE”. We can take the same source for both. This will be the laptop’s HDMI output, where will put our drawing software full-screen.
Because the drawing software has a black background, using a Luma Key makes the black parts transparent, and lets the camera feed show through.

That gives you the ability to draw with a Wacom tablet on your camera input.
If you want to do any screen sharing, you’ll need to set up another source into the ATEM, either from your main or a different Mac.
When I first created Video Pencil, I made it support this usage, as well as providing NDI connectivity.
Now it was possible to send an NDI output from Ecamm Live or OBS, for selection in Video Pencil.
Video Pencil provides a transparent overlay with just the drawing, which can be added back into OBS or Ecamm. As long as the layers are lined up perfectly, and you don’t mind the composite signal being fed back to the iPad (resulting in a feeling of lag when you press “Clear” in Video Pencil), and you don’t mind troubleshooting your network connection (NDI has a bug where plugging in an iPad over USB breaks the connection when it worked over WiFi!), that might be enough for you.
But I don’t even bother with that.
I’m using CueCam as my webcam, so I just grab my iPad and launch Video Pencil.
CueCam connects automatically and starts sending my webcam to the iPad.
I can draw on the iPad and I (and my audience) can immediately see the drawing on my Mac.
It works effortlessly with anything I’m sharing in CueCam, whether that’s my desktop, a window, another camera, a picture or a video. It just works.
Not only that, but if I’m running a presentation in CueCam, my drawings are restored as I move back and forth between cards.
I can even zoom in using a gesture on the iPad. I can literally make my MAC zoom in, on whatever it’s sharing, from my iPad! And if I’m playing a video from my Mac, I can control it with the iPad’s shuttle wheel.
With Video Pencil and CueCam Presenter, it just works.
4. Eye contact and remembering what to say
When I started making videos, I never really understood what makes you look natural on camera. I’d bring in someone to talk to off-camera to do an interview, for example.

I discovered that if you didn’t have footage of myself talking to camera, I had to source b-roll for every second of a video, which made things very time consuming.
This was my first attempt at speaking to the camera, but I still didn’t really understand what to do.

The secret is to look directly into the lens - that’s what makes it natural. I heard someone say you have to picture the camera lens as ‘somebody who likes you’.
It feels unnatural because it is. It’s weird. But it leads to better content that is much easier to edit!
But you still have to know what to say. If you’re looking down and reading notes, you’ve lost eye contact. If you don’t write anything down, you’ll be editing out filler words like “um”, “err” and “sort of” (my own personal tick) for hours on end.
When I wanted to get serious with a new podcast, back int 2021, with “Can You See My Screen”, I taped my intro on a bit of paper under my camera so I didn’t mess it up.
My first teleprompter was a cheap thing off Amazon that I could put my phone into.
I made a little app for myself that let me copy in a script and advance through it using the volume control on my headphones. Now I could record directly into my camera. That gave me footage like this.

I made an app called Beat Sheet so I could edit scripts on my Mac. This would send the teleprompter text over Bluetooth to my iPhone in the teleprompter.
Then somebody asked my if I could add a transparent mode to Beat Sheet to use in a teleprompter connected to their Mac, placed on top of their video preview.
Putting a Mac window in your teleprompter opens up a world of possibilities. You can put your Zoom window in your teleprompter and now you can make eye contact with whoever you’re talking to, instead of looking at their chin (which is what it looks like when you look at their video feed on your laptop screen - you’re looking down instead of directly at the camera).
Now you don’t have to picture your camera lens as somebody who likes you, you can just talk to someone who likes you.
And when you’re filming content to-camera, you can see yourself, instead of just the camera lens.
Of course, that’s only a benefit if you like yourself!
Anyway, I learned to like myself a little more and got a bigger teleprompter that I could put an iPad in. This worked with the Duet app to become an extra screen that could be flipped so it’s not backwards after it’s been mirrored by the teleprompter.
Eventually I got tired of all the extra software, hardware and camera stands, and got myself an Elgato Prompter, which now hangs ‘gracefully’ from the zoom lens attached to my Canon R6. It’s always on, it’s always ready.
As an aside, I was never interested in these iPhone apps that do AI auto-scrolling, that stuff seems too flakey to use in a performance, especially if I ever want to go off-script for a moment (I always do). I like the ‘next card’ mechanic, as it keeps me in control of the flow. Newsreaders have a special person to keep the teleprompter scroll in sync. For the rest of us, a Powerpoint-style “next” interaction works best.
Don’t get me started on Elgato’s scripting app, by the way - I can’t imagine who would want to use that. How about a keyboard shortcut or some drag and drop!
Anyway, now I don’t worry about anything. CueCam Presenter handles all my teleprompter needs, from writing a script to recording and live streaming. It puts my speaker notes in my eyeline, along with my program preview or Zoom call.
If I don’t have my big teleprompter with me, I can use Shoot on my phone instead - it shows the CueCam program preview and the teleprompter text right next to the iPhone’s camera.
5. Immersive Presentations
I do not like the way presentations work over screen shares in video conferencing software. You see somebody’s entire desktop, their Powerpoint window with all its ribbon buttons, you see the thumbnails of their deck before they’ve started. They disappear into a corner of the screen and you don’t see their face for the next half hour.
Not to mention, when they use bullet points (fiddly little microscopic bullet points), they end up pausing on the first one for five minutes and you’re watching an otherwise blank white screen with a disembodied voice-over, thinking “why is it like this?”.
I was watching somebody give a talk like this, not too long ago. At the end of the call I said to myself “I just heard this person talk for half an hour would not recognise them if I met them”.
That literally came true. I went to a local business meetup and I didn’t realise I was talking to them until they mentioned they’d given that talk. I knew it!
When I first saw somebody bring a presentation directly into their camera feed, I said YES. THIS IS HOW YOU DO IT.
Like this.

Now, when David Paskin first showed me this on the “Can You See My Screen” Podcast, he also showed his ‘behind the scenes’.

He literally had a second computer, just as the presentation source. He had Keynote set up with slides with green backgrounds, and then used the ATEM to chroma key that into his main webcam feed in Ecamm Live.
All that for a bit of text!
When I first copied this technique, I ran a Keynote presentation on my same machine - green backgrounds, chroma keyed using Ecamm or using the “Live Camera” feature in Keynote.
I didn’t like the green screen approach - you just aren’t seeing the final composition when you’re working.
I didn’t like the Live Camera feature because the screen capture loop introduced an audio delay.
And Keynote doesn’t really like working like this - it assumes a projector, not a screen-capture, so you find yourself fighting with it, cropping out rounded window corners, etc…
All this to add a bit of text into the webcam feed!
I didn’t want to use Keynote, so I added a feature to my other app, “Beat Sheet”, which ran my teleprompter and controlled scene transitions in Ecamm.
I added a new “Title” field to Beat Sheet’s cards and and NDI output to bring into Ecamm.
I also added basic animated bullet points.
This was great, but pretty limited.
I had another little application at the time called “Video Pencil Camera”. I’d built this to provide Video Pencil integration with a webcam, without all the complexity of setting up an NDI loop.
I’d been tinkering with extra features in that little app, like screen sharing, and automatically overlaying the NDI feed from Beat Sheet.
One day I realised that these two apps needed to become one app.
A brand new app called CueCam Presenter.
Something that would let you build a presentation, power your teleprompter, provide a virtual camera and connect to Video Pencil.
Now, when I want to add a bit of text or an image to my talk, I can do it from inside CueCam.

I don’t even have to take my hands off the keyboard to add a title card, and everything lives in one app, controlled by one button.
In summary
The great thing about solving problems with technology is that they disappear and you forget about them. You don’t have to do anything, you just become a more capable human being.
You can do everything I just described by downloading CueCam Presenter today.
This embedded link can't be shown.
This embedded link can't be shown.
This embedded link can't be shown.
Want to print your doc?
This is not the way.
This is not the way.
Try clicking the ··· in the right corner or using a keyboard shortcut (
CtrlP
) instead.