Skip to content

Use the Layers sequencer to trigger the sample you want at the step you wantUse the Slices sequencer to trigger the slice of the current sample you want at the step you wantUse 10 other sequencers to modulate many types of parameters!Edit 4 different patterns per sequencersControl these patterns with a pattern player
Sbam-Tutorial.uvimStart your journey with this one. Tutorial has all the levels locked except the first one. You’ll need to beat the different bosses to unlock the different levels. To beat bosses, use the 3rd and 4th sample layers to give punches. Then, you’ll be able to use the levels power to beat them better 😀The Tutorial has the Save/Load presets buttons locked until you beat the gameWhen you finish the game, I encourage you to use the Unlocked multi as it is a full feature instrumentWhy did I made 2 multis? Because I wanted to make a game, but I also wanted to let the user choose what experience to live.Sbam-Unlocked.uvimThis multi is a full featured SBAM. Just launch it and have fun!
The Yellow keys are the main way to play SBAM: they trigger the sequencer until they are released.The root note is C3. Then it scales the samples per semitones. C2 being -12 semitones, C5 being +24 semitones.The Red keys are playing individual steps from 1 to 16. So when you press one red key, it’ll trigger one step then stop. I added this feature to be able to control SBAM like a drum kit.The 4 Green keys are selecting one of the 4 main patterns of all the sequencers.
A cheat code to disable the game (hint, the 3rd candidate at the french 2022 presidential elections)An option to turn animation offA select Level menu for the default background and boss
The Envelopes sequencerThe Time sequencerThe Sends sequencerThe 4 samples control panels
Layers Steps: you can set the number of steps for the sequencer loop → between 2 and 32 steps.Layers Resolution: you can set the resolution rate at which the sequencer plays → from 2/1 to 1/64. There’s also a button on the left to set the timing → S = Straight; D = Dotted; T= Ternary.Random Steps: when enabled, each steps playing will be determined randomly.Play All Layers: only the Layers Sequencer has this option. It allows you to stack samples steps instead of playing one sample at a time.1,2,3,4 buttons: these buttons allows you to select which of the 4 patterns you want to edit/play.
Slices Steps: you can set the number of steps for the sequencer loop → between 2 and 32 steps.Slices Resolution: you can set the resolution rate at which the sequencer plays → from 2/1 to 1/64. There’s also a button on the left to set the timing → S = Straight; D = Dotted; T= Ternary.Random Steps: when enabled, each steps playing will be determined randomly.Slices Max: set the max Slice value. E.g. if the value is 4, the max value to draw on the sequencer will be the 4th slice of the sample engine.1,2,3,4 buttons: these buttons allows you to select which of the 4 patterns you want to edit/play.
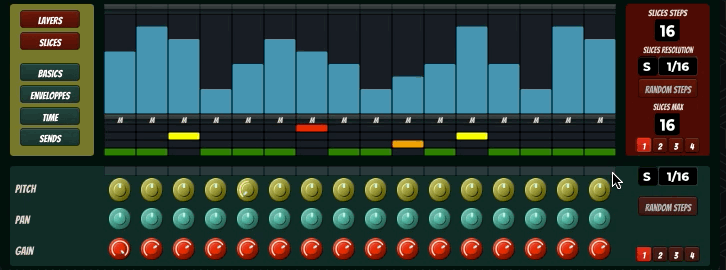
Pitch sets the pitch of the current step, is represented by the yellow knobs and goes from -24 semitones to +24 semitones.Pan sets the stereo panning of the current step, is represented by the turquoise knobs and goes from -1 (left) semitones to +1 (right).Gain sets the volume of the current step, is represented by the red knobs and goes from -infinite semitones to +3 DB.
Basics Resolution: you can set the resolution rate at which the sequencer plays → from 2/1 to 1/64. There’s also a button on the left to set the timing → S = Straight; D = Dotted; T= Ternary.Random Steps: when enabled, each steps playing will be determined randomly.1,2,3,4 buttons: these buttons allows you to select which of the 4 patterns you want to edit/play.
Bypass enable the envelope.Attack sets the attack time of the currently played slice.Decay sets the decay time of the currently played slice.Gate sets the gate time of the currently played slice.
Enveloppes Resolution: you can set the resolution rate at which the sequencer plays → from 2/1 to 1/64. There’s also a button on the left to set the timing → S = Straight; D = Dotted; T= Ternary.Random Steps: when enabled, each steps playing will be determined randomly.1,2,3,4 buttons: these buttons allows you to select which of the 4 patterns you want to edit/play.
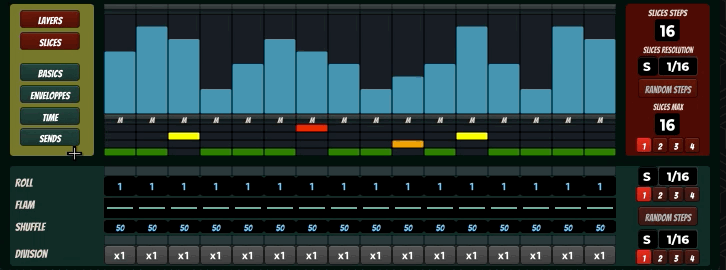
Roll triggers as much notes for the current step duration as there are indicated in the roll num box. From 1 to 32 triggers.Flam is the Roll playing behavior:Straight timingDecrement timingIncrement timingDecrement pitchIncrement pitchShuffle adds a timing offset for the current step triggering.Division multiplies or divide the whole SBAM timing up to 8 division.
Time Resolution (Roll and Division): you can set the resolution rate at which the sequencer plays → from 2/1 to 1/64. There’s also a button on the left to set the timing → S = Straight; D = Dotted; T= Ternary.
Share
Explore

The Slice Beat Amen Melee!
If you’re here, that’s because you wan’t to know more about it. I made this document as a dynamic manual, for you to understand the instrument better.
SBAM is a sampler sequencer. You can load your own samples in 4 sampler engines. These sampler engines automatically slice your samples regarding transients.
Then, you’ll have a lot of options to play with:
SBAM comes with a sample library and a preset library.
You are invited to load your own samples and play with them.
You’ll be able to save and load your own presets.
Special Thanks
To Marcus Beck and Trajectoires for the great testing and feedback! It wouldn’t be as good without your help!
To Joshua Dickinson and Michael Hetrick because they are the boss, they are the best and I learned so much with them!
To all the UA Underground peeps, thank you all for your support and your kindness!
To the Lazy Frogs crew, the best team!
First Steps: Important notes
SBAM consists in 2 multis that you can load only with Falcon. These multis are:
Playing with SBAM

SBAM is a sequencer but not only. There are two ways to play with SBAM:
Main Window
Here’s SBAM Main window

Top Bar

An Init Patch button that’ll initialise your current patch to the default state of SBAM (keeping actual samples)
An option button with:
4 Sample buttons that’ll open a sample panel on the bottom side of the Main Window.
A save and a load preset buttons
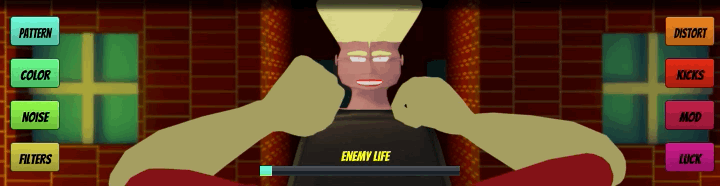
Fight Panel

Here, you’ll be able to look at the fight and have access to the 8 levels powers respectively:
Just click on the Level button to open a new panel on the fight screen.
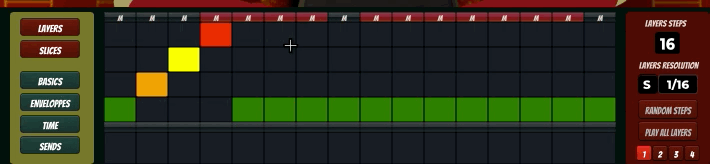
Main Sequencers Panel

The Main Sequencers Panel contains 3 sections
A left panel to select 6 different sequencers
A central panel that displays the Layers and Slices step sequencers
A right panel that contains respectively the Layers and Slices sequencers options
Bottom Panel

The bottom panel can display:
In Depth
In this section, I’ll try to explain how you can use SBAM 😀
Here’s a little video showing some of the features.
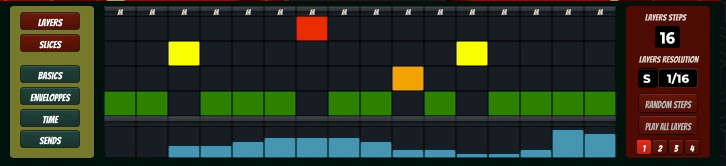
Layers Sequencer
The Layers Sequencer is the main component of SBAM and it allows you to trigger samples one at a time with a step sequencer, as well as mute them.
You can access to the step sequencer by clicking on the Layers button on the left panel. Here is the Layers step sequencer panel.

You can also access to it if Slices panel is selected but in a reduced shape.

Layers Step Workflow
The Layers Step Sequencer allows you to trigger a sample from the 4 available samples at a rate determined by the Resolution control on the Layers Options Panel (right). The step currently playing is highlighted on the top bar.
There are four rows that represent that 4 sample slots.

Layers Options

On the right side, when the Layers Sequencer Panel is activated, you have access to the Layers Sequencer options. Except from the number of max steps and Play All Layers, every sequencers shares the same kind of options (Resolution, Random, Number of steps - Max 16 for every sequencers except Layers and Slices - and Patterns 1/4).
Step Mute
Finally, the top bar allows you to mute steps. Simply click on the upper part of the bar to mute, and the lower part to unmute. Muted steps wont trigger samples and sound will be cut.
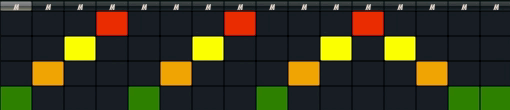
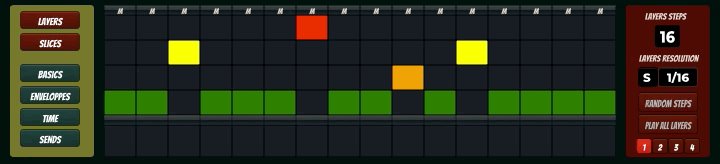
Slices Sequencer
The Slices Sequencer is the secondary component of SBAM and it allows you to select which slice of the current sample (determined by the Layers Step Sequencer) will be played.
You can access to the step sequencer by clicking on the Slices button on the left panel.
Slices Step Workflow
As you can see on the Gif below, when selecting the Slice sequencer, you can draw which slice of the sample you want to play per step.
You can also draw slices when the panel is reduced.
Slices Options

On the right side, when the Slices Sequencer Panel is activated, you have access to the Slices Sequencer options. It is relatively the same as Layers except that the Play all Layers is replaced by Slices Max.
Important: Seq Length
From now on, I’ll present you all the other sequencers. For all of them (so except Layers and Slices) you’ll be able to set the length of the current pattern by dragging the play bar/top bar size like this:
Basics Sequencer
The Basics sequencer is displayed on the bottom panel by default and is accessible while clicking on the Basics button.
Basics Workflow
The Basics Sequencer allows you to set per step Pitch, Pan and Gain.
Basics Options
Envelopes Sequencer
The Envelopes sequencer is displayed on the bottom panel and is accessible while clicking on the Envelopes button.

Envelopes Workflow
The Envelopes Sequencer allows you to set per step Envelopes, with Attack, Decay and Gate length parameters.
Envelopes has a unique feature which are the 3 bulk edit beside Bypass, Attack and Decay. If you click on theme respectively, you’ll be able to drag you mouse to bulk edit the steps values.
Quick note: when bulk editing Bypass, to enable the button, drag at the top of the button, at the bottom for disable.
Envelopes Options
Time Sequencer
The Time sequencer is displayed on the bottom panel and is accessible while clicking on the Time button.

Time Workflow
The Time Sequencer allows you to set per step timing options. There are some crazy features here. Notice that there are 2 different sequencers here: Roll and Division.
Roll:
Division:
Time Options
Want to print your doc?
This is not the way.
This is not the way.

Try clicking the ··· in the right corner or using a keyboard shortcut (
CtrlP
) instead.