Skip to content

MFG/Fabrication Doc
 3D Printers
Ver. 1.0
Start
This doc provides information for both SD and VTA 3D printing.
Please refer to the page outline (to the right) for quick reference.
This document includes:
The 3D Printers:
RNT currently has two 3D printers: A MakerBot Replicator Z18 in the Ventura Office and a MakerBot METHOD at the San Diego Office. Both of these machines operate in a similar manner. If you become comfortable on one, you will have a good grasp of how either functions.
Both RNT printers are FDM (Filament/Fused Deposition Modeling). This is the most common type of printer, especially for home and office use. FDM printers work by positioning a heated print head to extrude plastic (in a filament form) onto a build plate layer by layer. Essentially they are fancy glue guns.
The most common print materials are PLA (Polylastic Acid) and ABS (Acrylonitrile Butadiene Styrene). Unless you are printing a part for functional purposes, PLA is preferred as it is easy to work with and has minimal off-gas during the printing process. ABS has higher strength and melting temp, but is harder to print and off-gases more.
If printing in San Diego with the Method, you have dual extrusion (two print heads) available to you. Typically with this setup you have one head printing your model material and one head printing your support material. Makerbot supplies PVA as an option for support. Support material is a secondary material used to hold up sections of the print that would be otherwise impossible due to gravity. PVA is water soluble, so after a printed part has been removed, it can be soaked/agitated in water to remove the excess support that cannot be removed by hand.
If you are printing in Ventura with the Z18, you are locked into using only PLA. The plus side is that you have a giant build area available to you (11.8 X 12.0 X 18.0 inches).
A single extruder setup (like the Z18) will also print support material, but it will be the same PLA from the same nozzle. The software prints with a certain air gap between the “model” and “support” so that the support can be removed with relative ease by hand or with pliers after.
Makerbot METHOD Serial Number: MM10100001283


Makerbot Z18


The MFG has provided some information specific to each office, but Makerbot has a well documented support page and an online support hotline:
Export to 3D print:
Overview
In order to print something, you must first slice it. FDM 3D printers understand geometry by establishing a 3 dimensional boundary and dividing it into contours in the Z direction. It then provides instructions to the printer to reconstruct the geometry layer by layer.


MakerBot Print and MakerBot Cloud Print (the proprietary slicing and printing software for both machines) use mesh-type files to process.
You can use any 3D software you are comfortable with as long as you can export .obj or .stl files. Typical software at RNT is Revit, Rhino, and Sketchup. If you have no prior 3D modeling experience, Sketchup is probably the quickest/easiest to pickup.
Quality of files
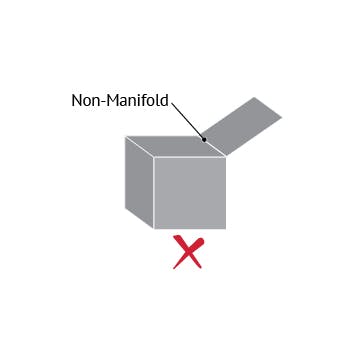
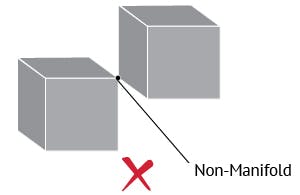
The quality of the model file input into Makerbot Print will directly effect how well the print comes out. 3D models are best processed if non-manifold, non zero-thickness. Basically they can be imagined as “watertight” vessels. The best way to avoid this is by being diligent in your respective 3D program. In REVIT this is much harder to control since the output to .stl file does not give you very many options. This is not necessarily a issue, but can present problems in larger files when trying to identify errors in prints.


See this guide from sculpteo for more info on non-manifold geometry:
Export from REVIT:
1. Open a 3D view.
Note: The exported geometry will be based on the current view. Geometry exported will reflect the visibility and graphics settings of the current view.
2. Click the File tab > Export > CAD Formats > STL.
3. In the STL Export dialog, specify your STL file options.
4. Click Save to create the STL file or click Cancel to close STL Export dialog.


More info from Autodesk on exporting from REVIT here:
Note - The above guide is for Revit 2022. If running an older version, the export to stl option might be under the “add-ins” tab instead. Please guides for other versions here:
Export from RHINO:
1. Select the parts desired to be exported.
2. In the File button, click on the Export Selected.
3. Select STL(*.stl) on the Save as type Input box.
4. Open the options menu.
5. Set the STL Export Options as an Ascii File type.
6. Save.


More info from simscale.com on exporting from RHINO here:
Exporting from others:
You might generate 3D models in other software such as SketchUp, Meshmixer, Blender, etc. Most programs that output meshes with give you .stl or .obj files which should be compatible. A google search will set you straight, but don’t hesitate to reach out the MFG.
Connecting/Sending to the Printer
👀👀👀 READ ME 👀👀👀
Protocol - On the whole, 3D printers are quite safe to operate and pose little risk. The one thing that a user should always do before printing is verify the bed is clear and clean before starting a print. This is best done in person as the integrated webcam is not always in a great position to view the bed and because it can be hard to detect misalignments due to the fisheye of the lens. If you are not in the office you could of course ask someone do to this for you.
Is this rule is observed, the majority of problems that usually occur with prints can be avoided. Risk to the machine becomes very minimal and everybody has a nice time.
At the Ventura Office
You have a couple of options:
Cloud Print
Process print files, send to print, and monitor the Z18 all from a web interface! To be clear, you do not need to download the MakerBot Print desktop software in order to print from the web interface.
ulopez@rntarchitects.com (or DM in Teams).


3. After signing in, if you have been added to the VTA_RNT Workspace you should see a dashboard similar to this:


Figure 3.1
Fig. 3.1 Key
1
Workspaces
This will show you all groups you are a part of. Make sure to select the correct workspace for the location you want to print from.
2
Start a new print
This button will take you to a 3D interface where you can import models for slicing. You can add files to the print queue from here.
3
Workspace printers
This button will show you can the printers in your selected workspace. Typically this will just show one printer per location.
4
Workspace Print Jobs
Here you can check what files are currently printing, what is in queue, and a recent history of prints. You can also start, pause, cancel, and save print files from here.
5
Workspace members
Members of the workspace. You can also check admin type if you need to ask for higher privileges.
6
Help
Makerbot’s help interface. Check here for a more in depth guide to the web interface.
7
Current Workspace Title
A quick way to check if you are in the right workspace.
8
Live View
24/7 live camera view of the printer bed. Useful for visually verifying progress and functional status of printer. You should always verify in person or with someone near the printer that the bed is clear before starting a print.
9
Add/Manage
Depending on admin level you might not see this. Should not be needed in most cases.
There are no rows in this table
4. Go to the Start a new print button (see #2 on above screenshot). A interface will come up that look like this:


Figure 4.1
Fig 4.1 key
1
Add file/Name
Add files to the build plate by clicking on “ADD MODELS”. If desired it is possible to process and print multiple models at the same time.
2
Build Plate
Added models will appear here. Select models and transform with left click. Hold right click to orbit. Hold middle mouse button to pan. Mouse wheel to zoom.
3
View Modes
You can toggle between isometric and perspective views modes here, as well as zoom and elevation views.
4
Print Mode
Read the descriptions for these modes, self explanatory. The majority of prints will print fine under one of these presets.
5
Quick Settings
You can tweak basic settings here.
6
More Settings
Advanced print settings are located under this tab. If you are familiar with printing and have certain attributes you are looking to tweak, they are probably here.
7
Settings/Print Preview
Under the gear icon you can change the model space units (millimeters by default) and keyboard shortcuts. The print preview button allows you to see many metrics for a given print including projected print time, materials used, etc.
8
Queue
Ready to send the print? Click here. The print will not immediately start, you must find it in the queue and send to print from there.
3D prints can be queued and started remotely, so please keep this in mind. Luckily they can also be canceled remotely.
There are no rows in this table
Tech Specs + User Manuals
Makerbot Method Technical Specifications
GENERAL SPECIFICATIONS
Mechanical arrangement: Cartesian XY-head
Manufacturer: MakerBot
3D PRINTER PROPERTIES
Build volume: 190 x 190 x 196 mm
Feeder system: Direct drive
Print head: Dual extruder
Nozzle size: 0.4 mm
Max. hot end temperature: 260℃
Max. heated bed temperature: 100℃
Print bed material: Flexible steel
Frame: Aluminum
Bed leveling: Automatic
Connectivity: SD card, WiFi, USB, microSD
Print recovery: Yes
Filament sensor: Yes
Camera: Yes
MATERIALS
Filament diameter: 1.75 mm
Third-party filament: Yes
Filament materials: Consumer materials (PLA, ABS, PETG, flexibles)
Recommended slicer: MakerBot Print, MakerBot Mobile
Operating system: Windows, Mac OSX
File types: STL, OBJ, AMF
DIMENSIONS AND WEIGHT
Frame dimensions: 650 x 437 x 413 mm
Weight: 29.5 kg
Makerbot Z18 Technical Specifications
Print Technology
Fused Deposition Modeling
Build Volume
30.0 L x 30.5 W x 45.7 H CM
[11.8 L x 12.0 W x 18.0 H IN]
2,549 cubic inches
Layer Resolution
100 microns
Material Diameter
1.75 mm [0.069 IN]
Material Compatibility
MakerBot PLA Material - Large Spool
MakerBot Tough Material - Large Spool
Extruder Compatibility
Smart Extruder+
Tough Smart Extruder+
Experimental Extruder
Nozzle Diameter
0.4 MM [0.015 IN]
Print File Type
.MAKERBOT
Temps
Ambient Operating Temperature
15 -24°C [60- 75.2°F]
Storage Temperature
0- 38°C [32 -100°F]
Additional Resources
Want to print your doc?
This is not the way.
This is not the way.

Try clicking the ⋯ next to your doc name or using a keyboard shortcut (
CtrlP
) instead.