Skip to content
All odd lengths, except 2: There are no beams of length 4, 6, 8, 10, etc. Only one beam with axle holes: Other than the “2-beam with axle hole”, all other beams have only peg holes.
Simon Says: Pair up with a teammate. Have teammate A build a structure but don’t show it to teammate B. Now teammate A needs to describe all the pieces and how they connect to so that teammate B can rebuild the structure without seeing the original. Compare how close they are!Build a square, then a cube: Can you build a square that doesn’t flex? How about a cube?Build a bridge: We’ll come back to this in the next post, but try building a simple bridge that spans a space. How much weight can it hold?
 Lego Part Names
In this newsletter, we’ll cover the common colloquial Lego Part Names - important to be able to build structures with a team and communicate efficiently
Go through this carefully and learn how each of the pieces work. If you find you’re short on pieces, you can . Also, at the bottom of this newsletter, we’ll include a few exercises you can do with your team to help solidify these concepts!
Did you know...
Six 2×4 LEGO bricks can be combined in more than 915 million ways.
Learning the Lego Pieces
Your teammate calls out “hey I think I need 4 9-beams, 8 double pegs, an H-box and 2 binoculars” — do you know what they mean?
Before you can make much progress in your Lego journey, we need to start with the basics. So, let’s start with talking about the names teams commonly use for the Lego Pieces.
Although there are hundreds of different types of Legos, we can break most of them up into 4 categories:
Category 1: Beams and Pegs: lengths, friction vs non-friction
Category 2: Structured Connectors: boxes and panels, same direction, change direction
Category 3: Axles and Gears: lengths, bevel gears, gear calculator
Category 4: Advanced Pieces: pneumatics, half pieces, chains/track, pulleys, weights
When you’re trying to describe a piece to someone, you would naturally describe what the piece looks like using descriptors like length, color, shape, etc. The names Lego has created are often descriptive of the use of the piece, but not of the physical look of the piece which can make them confusing to use to communicate with other people. So we’ve settled on some names that make more sense to us. Let’s go through each category and talk about what we’d call each piece...
Category 1: Beams and Pegs
The most basic and most important category of Legos are Beams and Pegs. You can make millions of structures with just these pieces, and it’s likely that your Lego pieces will be dominated by pieces from this category.
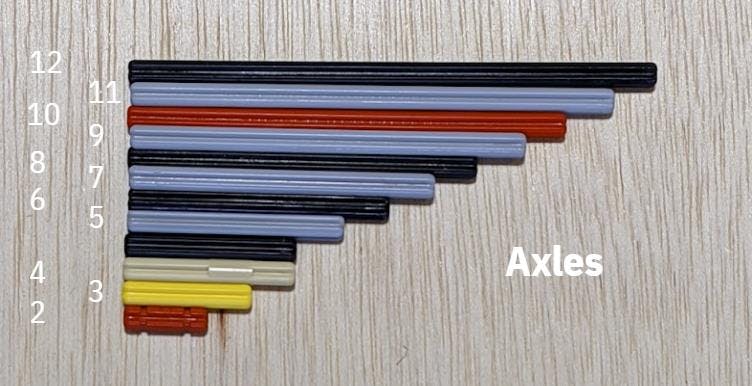
Beams
Beams are straightforward — we just name them by length: “can you hand me a 15 beam and a 5 beam?”
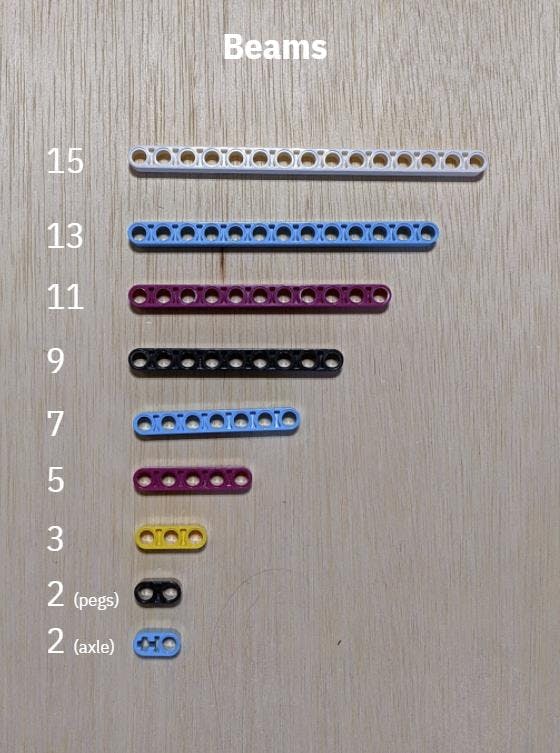
There are a few interesting notes about beams:
Pegs
Pegs are how we connect pieces together.

The most important thing to note about pegs is the difference between friction and non-friction pegs. If you use a friction peg to build something, the pieces at the connection will not spin freely, whereas a non-friction peg will make the connection smooth and able to rotate. In general, if you want the structure to be rigid (i.e. not spin or turn) use friction pegs, if you want to be able to rotate at that peg (i.e. for wheels, scissor connections, etc.) use a non-friction peg.
Category 2: Structured Connectors:
You can make a lot of structures with Beams and Pegs but you will soon learn that you need many pieces from this second category: Structured Connectors.
Single Direction Connectors
Let’s start with the most common and basic structured connectors: ones meant to connect in the same direction as your beams and pegs:
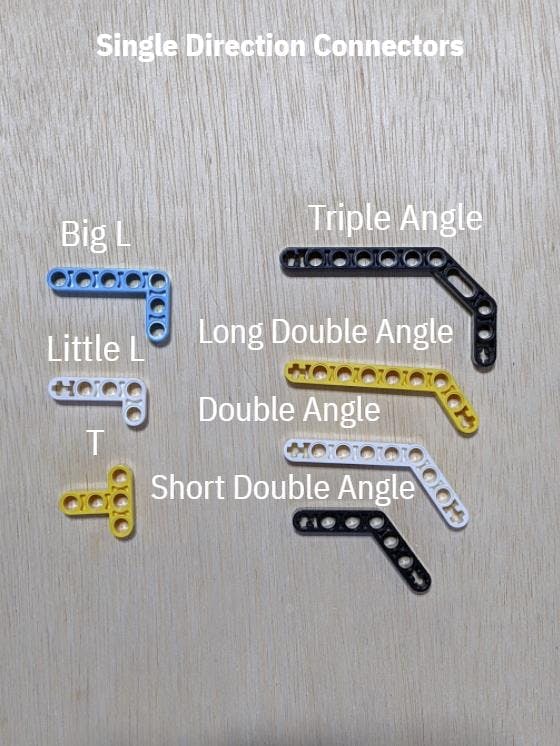
The Ls and T are way more used than the angle pieces, but they are all strong pieces for the same purpose: connecting in one direction. Now, it’s a weird concept to understand exactly what that means, but imagine you have a corner (perhaps made of two beams) and you want to strengthen that connection. You could place a Big L on the joint and that would hold the connection together in 1 direction. As you’re building structures make sure you’re adding Ls to almost every joint!
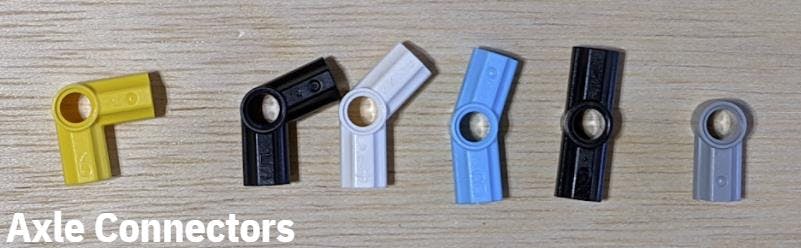
Multi-direction connectors
Ok but what if you want to connect in two directions? E.g. you want to switch from horizontal to vertical?
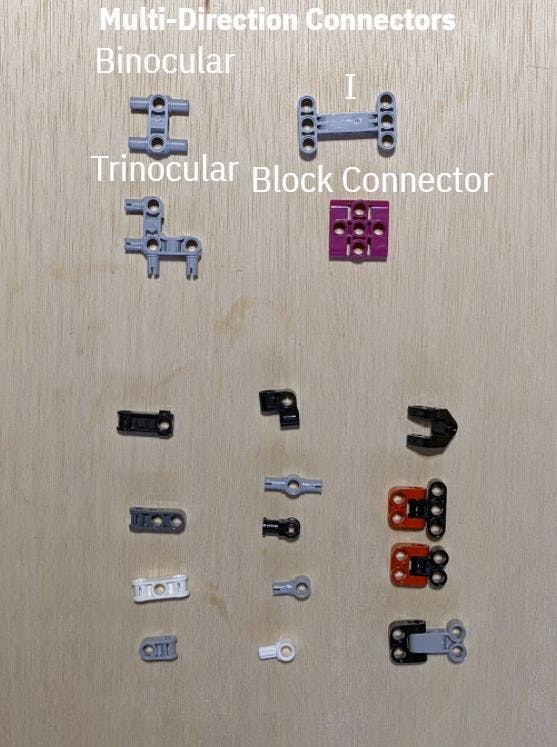
Another way to make things strong is to connect in multiple directions by using these turning connectors. The binoculars and trinoculars are especially useful since they have some peg holes as well as some pegs attached to them. Use these pieces to turn your connections and make even stronger connections.
Boxes and Panels
These pieces are amongst some of the most used pieces in all FLL structures. When in doubt, see if you can use a Box or Panel.
These pieces are the best of both of the other types of connectors — they can be used for connecting in the same direction and in a different direction. But the big bonus: they are structurally very strong as well!
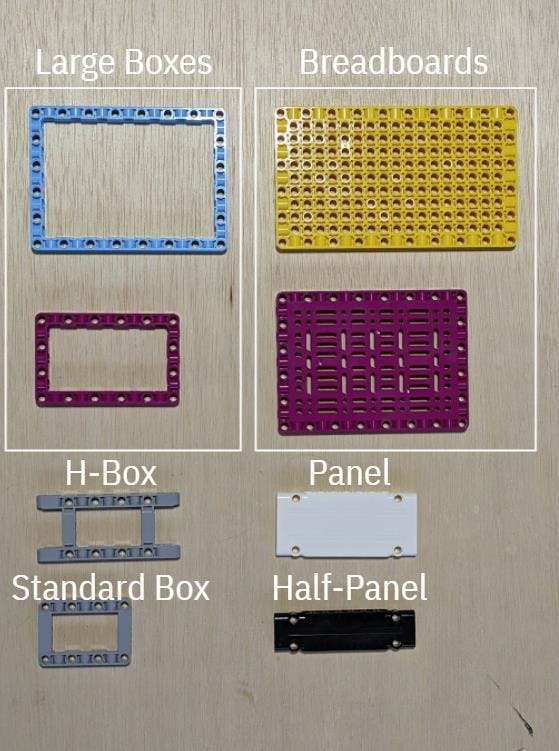
If you’re making a larger structure, always start with these pieces.
Category 3: Axles and Gears
Now we’re ready to make things spin!
Axles
Axles are special pieces because if you put them in a peg hole, they’ll rotate freely, but if you put them in an axle hole, the connection will never be able to rotate. If you want your pieces to stay in a very rigid shape - try using axles!
A cool design note about axles is the odd length axles almost always the ones in light grey, while the even length axles are either in black or red.
But, oh no! If I put an axle in a peg hole, it just falls right through! What can I do?
We’ve got two solutions: 1) Ended Axles
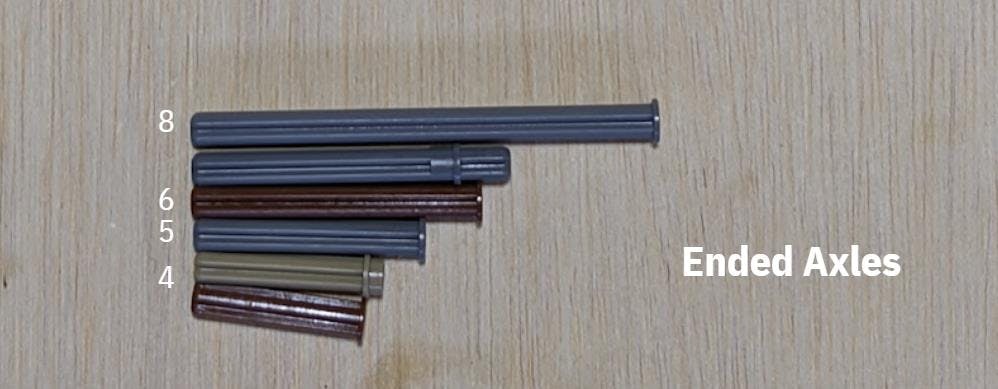
These are special versions of the axles that are blocked off on one side - use this to stop an axle from falling through a peg hole, or to create a flush axle to axle-hole connection.
2) Bushings

Sometimes you’ll want pieces at seemingly sporadic places along an axle - to make sure the pieces stay the right distance away from each other, use spacers (essentially a single peg hole) or bushings (a single axle hole). If you’re connecting axles through a peg hole and you want to secure it, add some bushings on to either side of the connection to hold it in place.
Ah now we’re getting fancy - what if we want to make more complicated structures, how can we add another level of complexity?
Use connectors and gear systems!
Gears
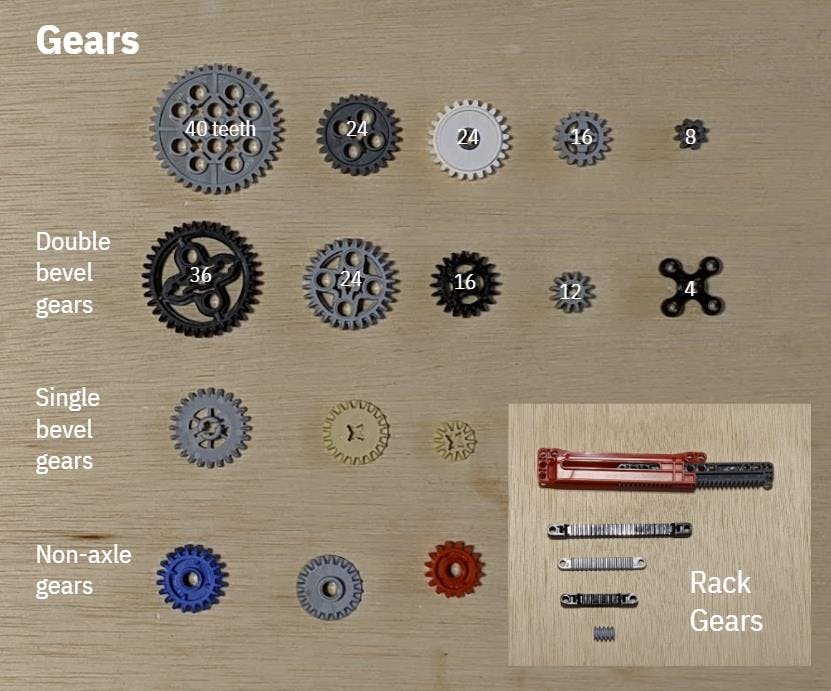
Gears, a piece necessary for making more complex moving attachments, are not as complicated as they seem. The hardest part is getting a chain of gears to line up with each other since they have varying radiuses. We use this tool to help us figure out what gears we can put next to each other and at what distance:
Beveled gears can almost always just be used as normal gears (although be careful with connecting bevel and non-beveled gears since the connections can be weak sometimes) but they also have the cool property of allowing your to connect gears at angles - a WAY fancy trick that you will need in only advanced FLL techniques.
The rack gears are the Lego version of a rack and pinion which allow you to build easy forklifts or systems with structured up/down and side/side movement.
If you want to get more complicated with gears, look out for our newsletters on torque and gear systems in the future!
Wheels
In FLL we can’t really do anything if we’re stuck in base - so let’s use wheels to make our robot move!
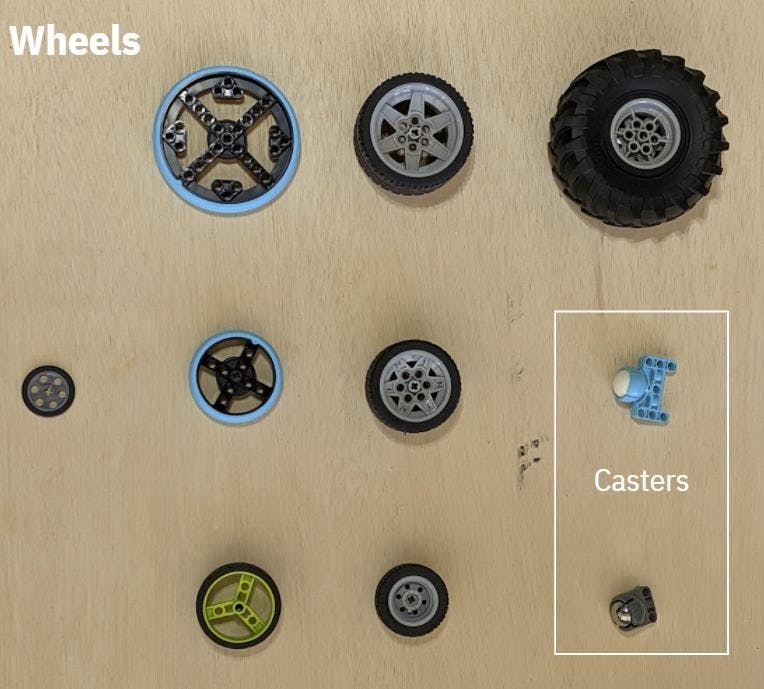
There are three main types of wheels: those with compression, those without compression, and caster wheels. They each have their own pros, cons, and different use cases, so let’s go over a few of the most basic components of wheels.
The difference between a compression and non-compression wheel is the amount of squish the tire has around the wheel rim. If you can pick up a wheel and squish it, it is a compression wheel (standard wheels from the EV3 kit are compression wheels and standard wheels from the Spike Prime kit are non-compression). Compression wheels can sometimes be risky to use since as you put more pressure on them, their shape can become more oblong, changing how your robot drives on an inconsistent basis. However, a draw back to non-compression wheels is that they are often a bit heavier and are thinner so you have less surface area on the mat. A way to combat that would be to stack two wheels next to each other.
Caster wheels are great for the back of your robot so that you can turn smoothly!
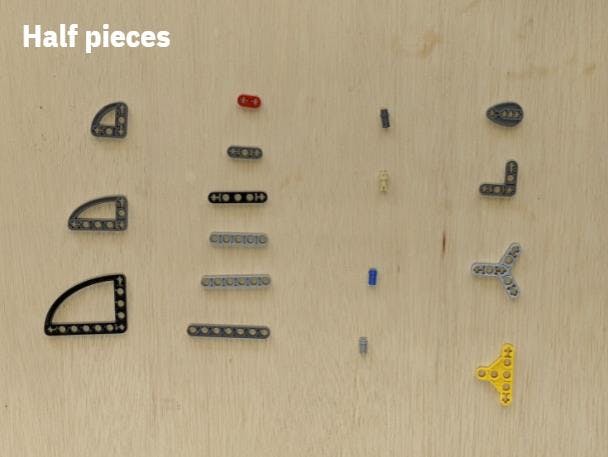
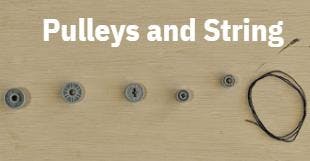
Category 4: Advanced Pieces:
The rest of the pieces either have very niche use cases or are just associated with generally more advanced concepts. The most important of the pieces here (that you might actually end up using) are the counterweights and the flags.

Counterweights are just abnormally heavy Lego bricks (~50g) that we use mostly for balancing big structures or making attachments move heavy and therefore more secure. A fun use of the counterweights is making a machine that uses gravity to create energy.
Flags are great for counting the number of rotations of a wheel so that you can measure distances in rotations easier. Attach a flag to the same wheel you use on your robot and roll that around the table to estimate how far your robot needs to drive. Flags are also great for getting under flat pieces in case you need to flip them (like the tires from last season).
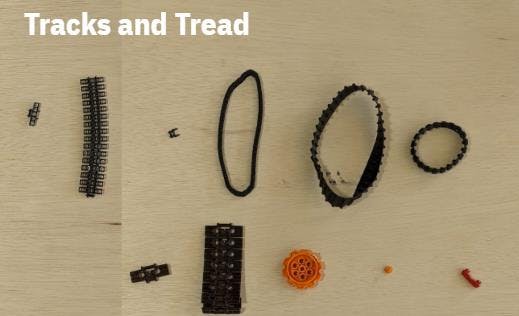

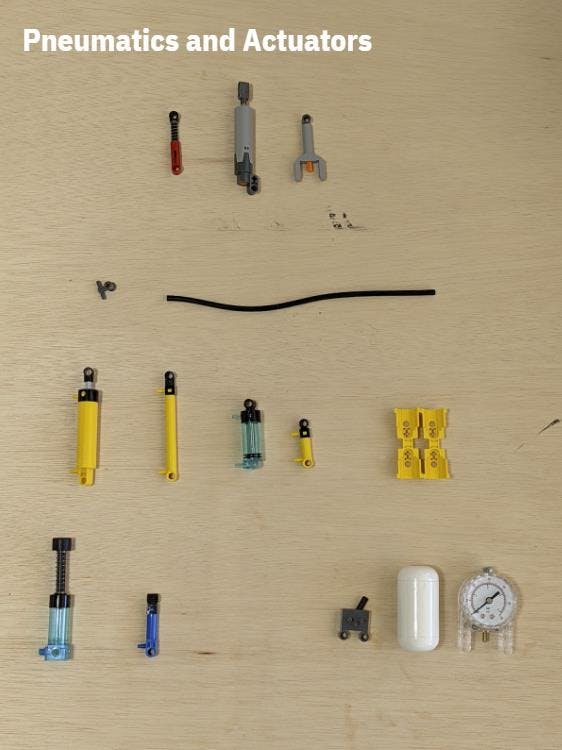
Pneumatics, using air power to create energy, is super fun and comes with very strong pieces to work with - look out for our future newsletter on pneumatics to learn more about how to use them!
Exercises!
Here’s a few quick ideas for exercises:
In the next post, we’ll build on these exercises to build strong structures!
Want to print your doc?
This is not the way.
This is not the way.

Try clicking the ··· in the right corner or using a keyboard shortcut (
CtrlP
) instead.