Share
Explore

 How to build a team hub in Confluence and Coda (Comparison)
Comparing Confluence and Coda for creating a team hub to share knowledge, track projects, and work quickly with your team.
Intro
Click on the table of contents to the right to skip to a specific section of the tutorial. Each section for building a team hub has a pros/cons list for Confluence and Coda.
A well built team hub contains all the tools and information you and your team need to get work done, make decisions, and hit deadlines in one place. In general, everyone in your team/company should have access to view the team hub. The number of people who can edit the team hub may only be a small group of administrators or managers.
In this tutorial, I will walk through building a team hub in Confluence and Coda with the following sections: Team, Vision/mission/values, Initiatives, Calendar, Meetings, and Resources. The structure of the team hub will look like this:


Your team hub or team hub may have many more sections than what’s shown in the diagram above. Most team hubs contain the sections in the diagram so this is what a bare bones team hub would look like if you wanted to get started today. As I build out the team hub in both Confluence and Coda, I will highlight some of the features in both platforms that are useful for creating a team hub. Caveat: I work at Coda, and will aim to make this guide as objective as possible.
If you are building your team hub along with this tutorial, the big difference you’ll see between Confluence and Coda is the way you publish and edit pages. In Confluence, you need to hit the pencil icon in the top right of a page in Confluence and then hit the Publish button to “publish” the page.
Let’s get started by building out the Mission, team, and values of a team hub. It may be tempting to start with the “homepage” section first, but we will build that last since it will contain data from from the other parts of the team hub. The homepage should be like a summary of the rest of the team hub.
Vision, mission, and values in Confluence and Coda
Confluence Pros
Confluence Cons
Coda Pros
Coda Cons
Watch a video tutorial on building this section in Confluence and Coda:
Creating a section in your team hub that details your teams’s vision, mission, and values lets everyone else in the company know what your team is working towards. It’s your team’s north star. In both Coda and Confluence, you create pages where you can format text, add images, and embed content from other websites (e.g. YouTube).
Confluence
You’ll notice that Confluence has a Publish button in the top-right. The screenshot above is in edit mode. Once you’re done making changes, you hit Publish to make your page “live.”


As you write your Vision, mission, and values, headers can help break up the content. This makes it easy to scroll to a specific section on the page that interests you. Emojis also make your team hub feel a little more engaging than a page of text. Emojis are supposed in both Confluence and Coda:


Once you’ve finished writing your Vision, mission and values, you’ll most likely want to make sure your teammates have read it! Some ways you could do this now include telling everyone in a meeting to read the page or send the page in Slack and get people’s reactions through an emoji on the Slack message. Using emoji reactions in your content is a quick way to see which teammates have read the page through a “Done Reading” button.
This is actually a screenshot from the add-on in the Atlassian marketplace. This add-on is not available for the Cloud version of Confluence, unfortunately. Another option is to use the add-on, but it’s not available for Cloud either and not interactive as the emoji reaction.


As your pages grows and more headers and text gets added to the page, you may want to include a table of contents. Your colleagues can click on one of these links in the table of contents to automatically scroll to that section on the page.
Confluence Macros are like mini add-ons you can include in your page. In edit mode, you can insert a which comes with a variety of settings in the right side panel. Once you hit publish, you can see the table of contents and click on one of the links to go that specific header on the page.

Another way of structuring your Vision, mission, and values is putting each section into its own page. You might have a really long mission or vision and you may want to put these sections on their own pages so your teammates don’t have to scroll a lot on one page. After you create a nested sub-page in Confluence or Coda, you can view those sub-pages in a table of contents as well.
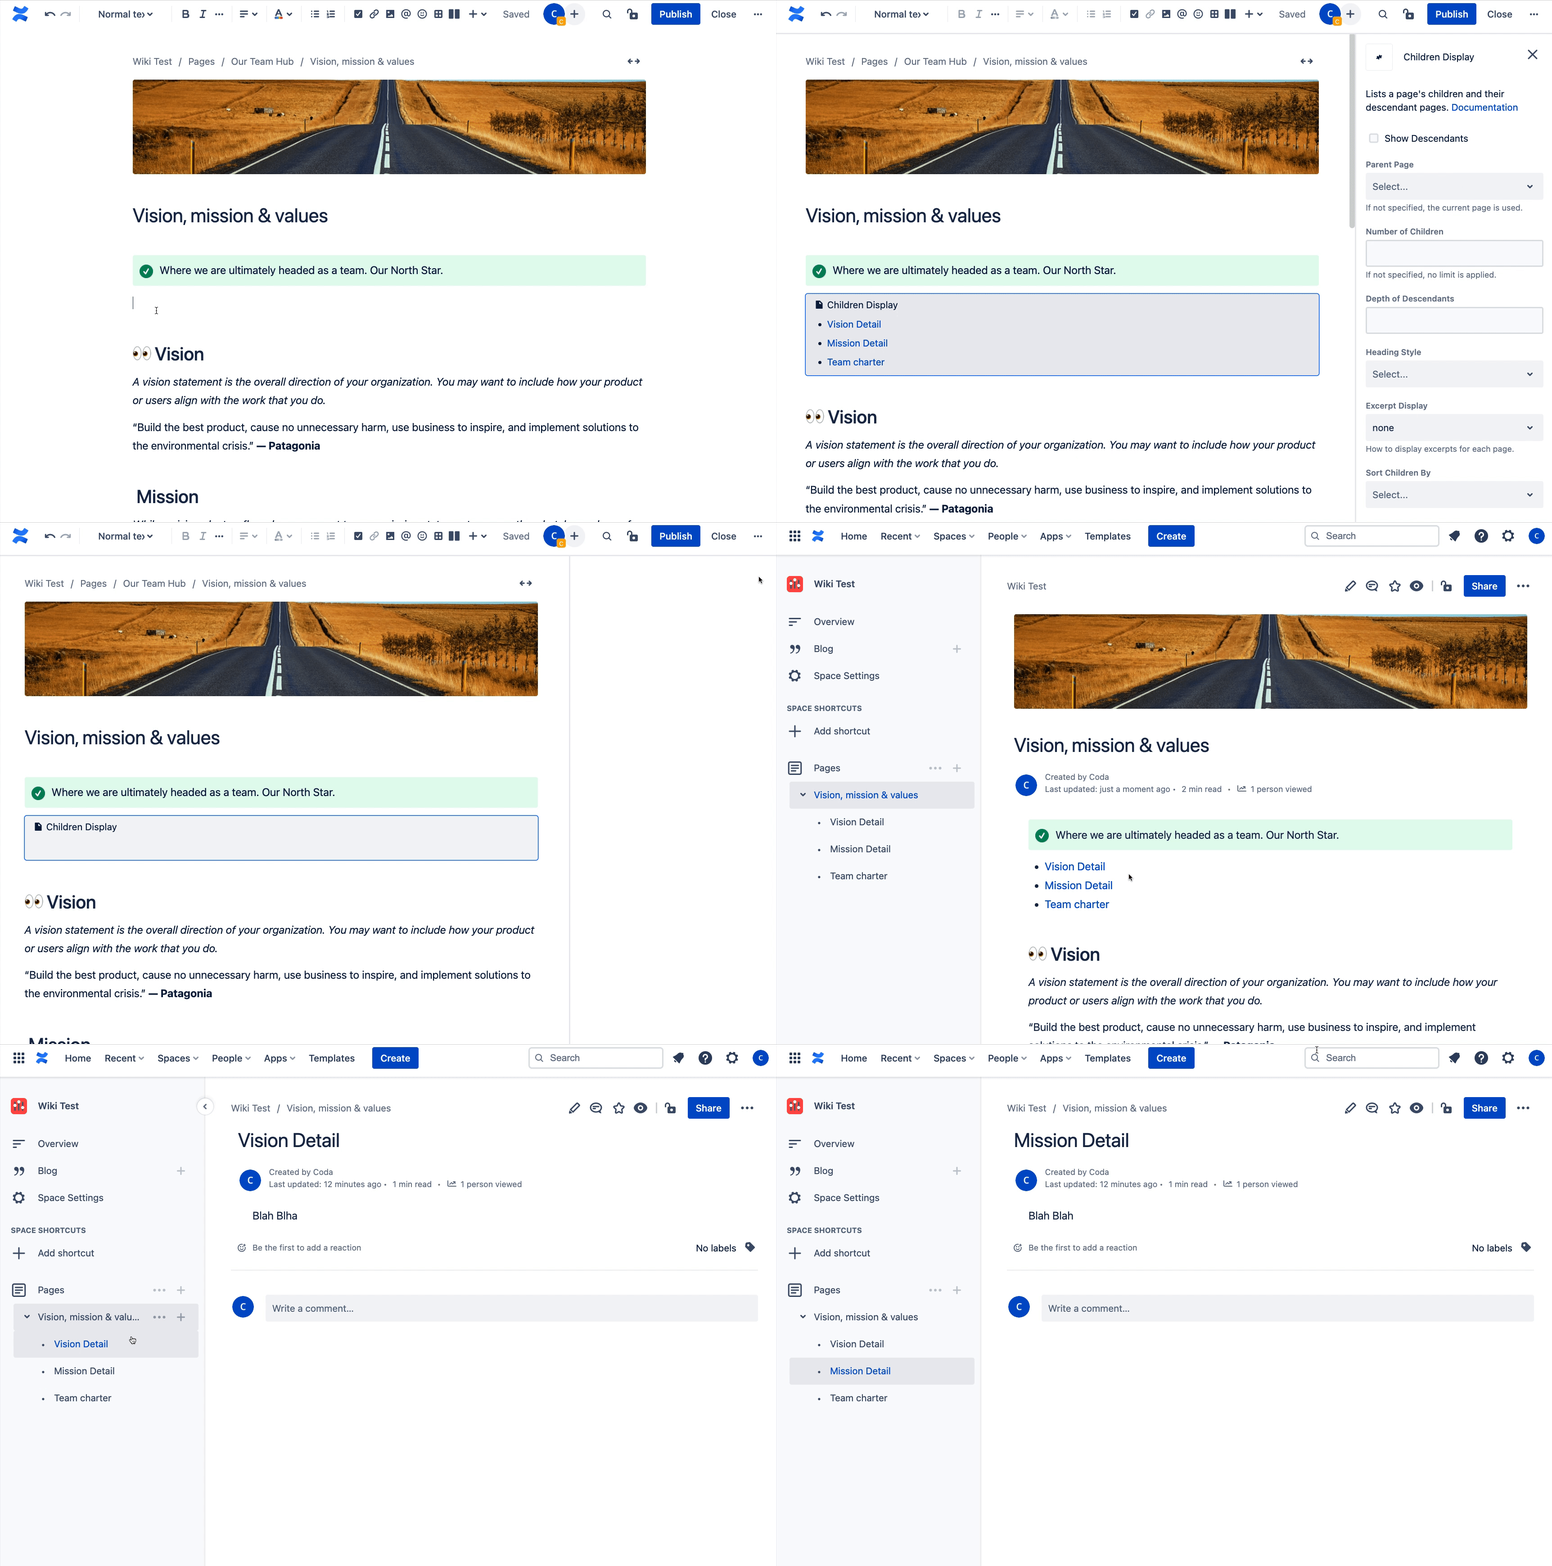
After you click the plus-sign next to the “Vision, mission, and values” text in the left sidebar, you create nested sub-pages. You have to then publish them in order to see them show up under the “Vision, mission, and values” parent page.


To get the nested sub-pages to show up, you can use the Children Display macro.

Coda
Coda is a real-time doc, so the second you make changes, those changes are “live.” If you want to create a page in “draft” mode like in Confluence, you might create a separate page that is your “draft.” Once you’re happy with the draft, you can copy/paste that content into the main Vision page or simply rename your draft page to be the “main” Vision page.


Similar to Confluence, you can add headers, emojis, and more to structure the page any way you want:


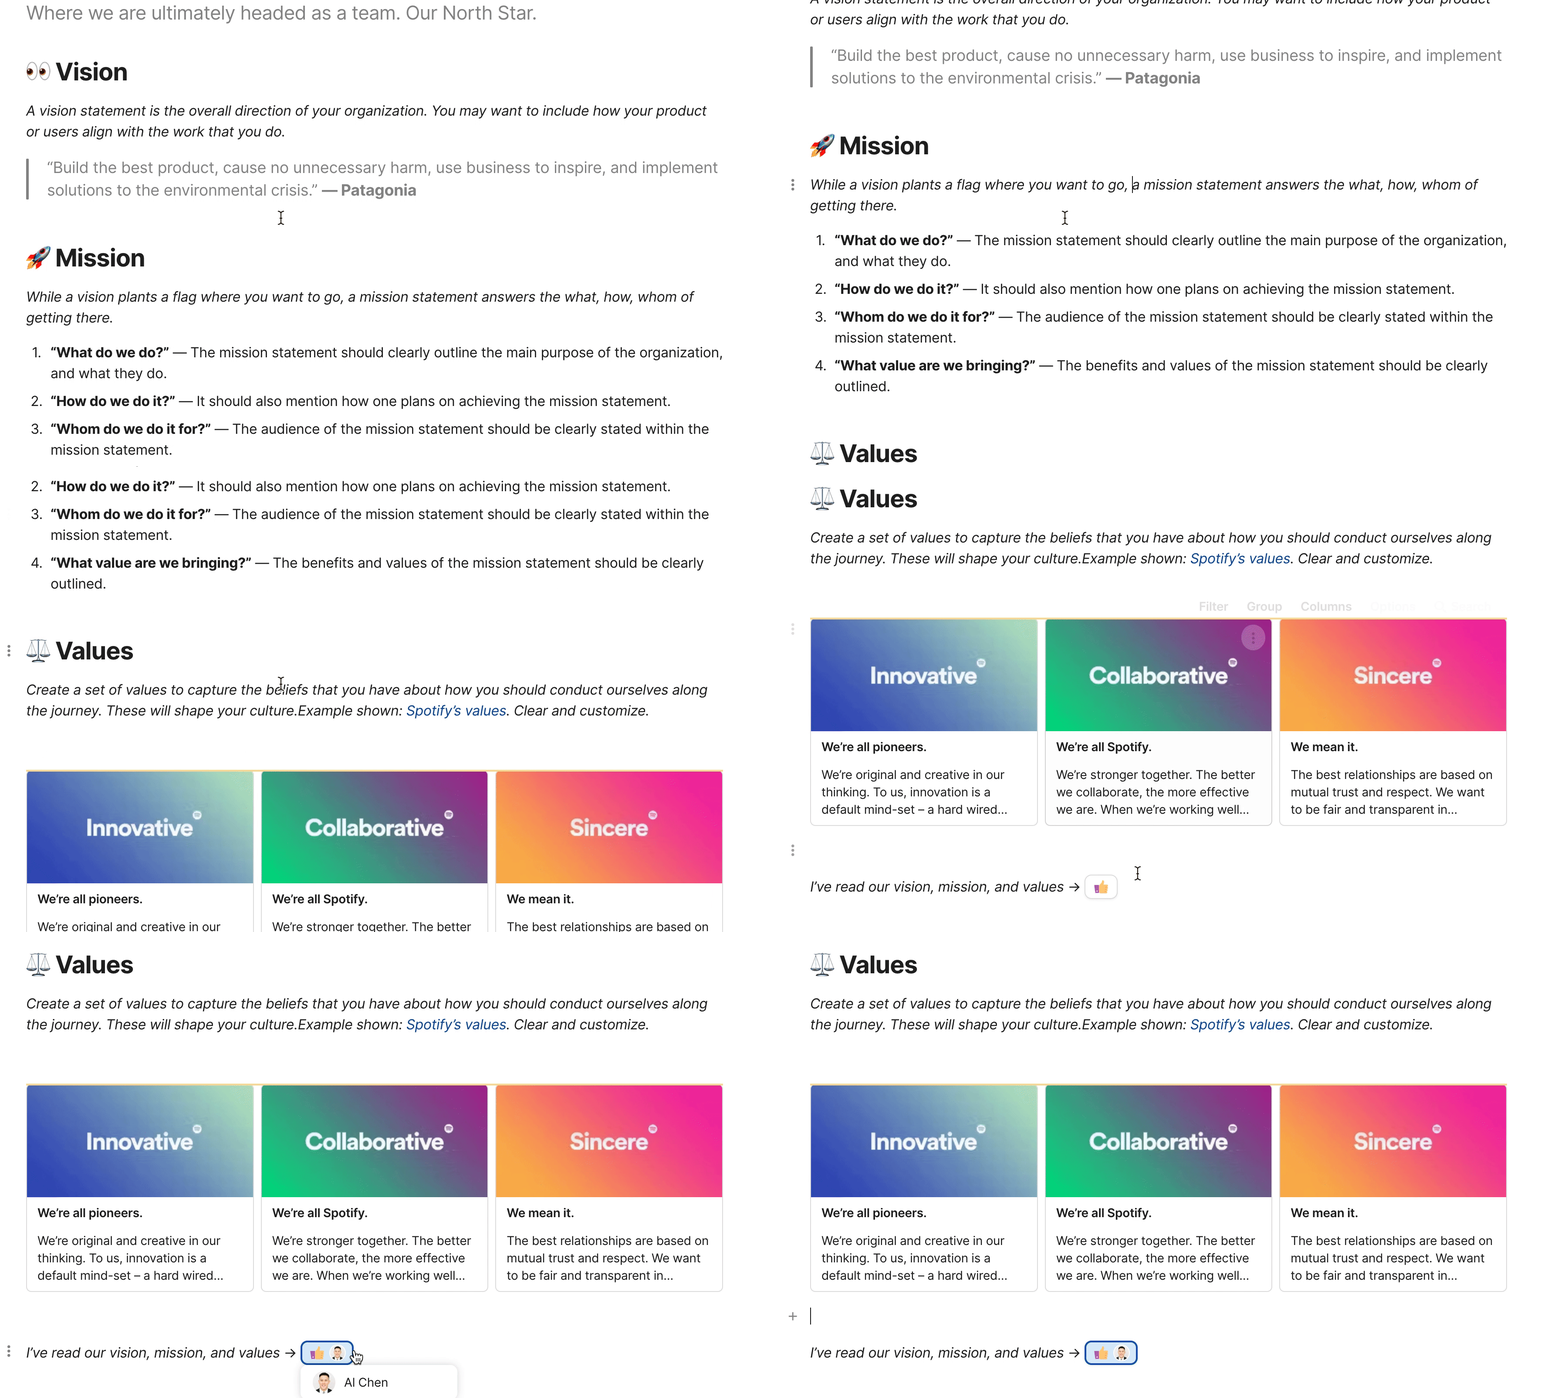
Emoji reactions are simply buttons you can put in-line with your content. When someone clicks on the reaction button, the person’s image will show up. You can also set it to show a number counter. See this reaction below:

1
Unlike Confluence, these reactions/buttons can be inserted anywhere in your page and encourages engagement from your teammates. In the gif below, the reaction at the bottom of the page encourages people to click the thumbs up button if they are done reading the page:

In the Page Options for a page in Coda, the “Outline” option turns all of your headers into a table of contents on the right side of your page. As you scroll up and down your page, the table of contents stays fixed on the right side of the page:

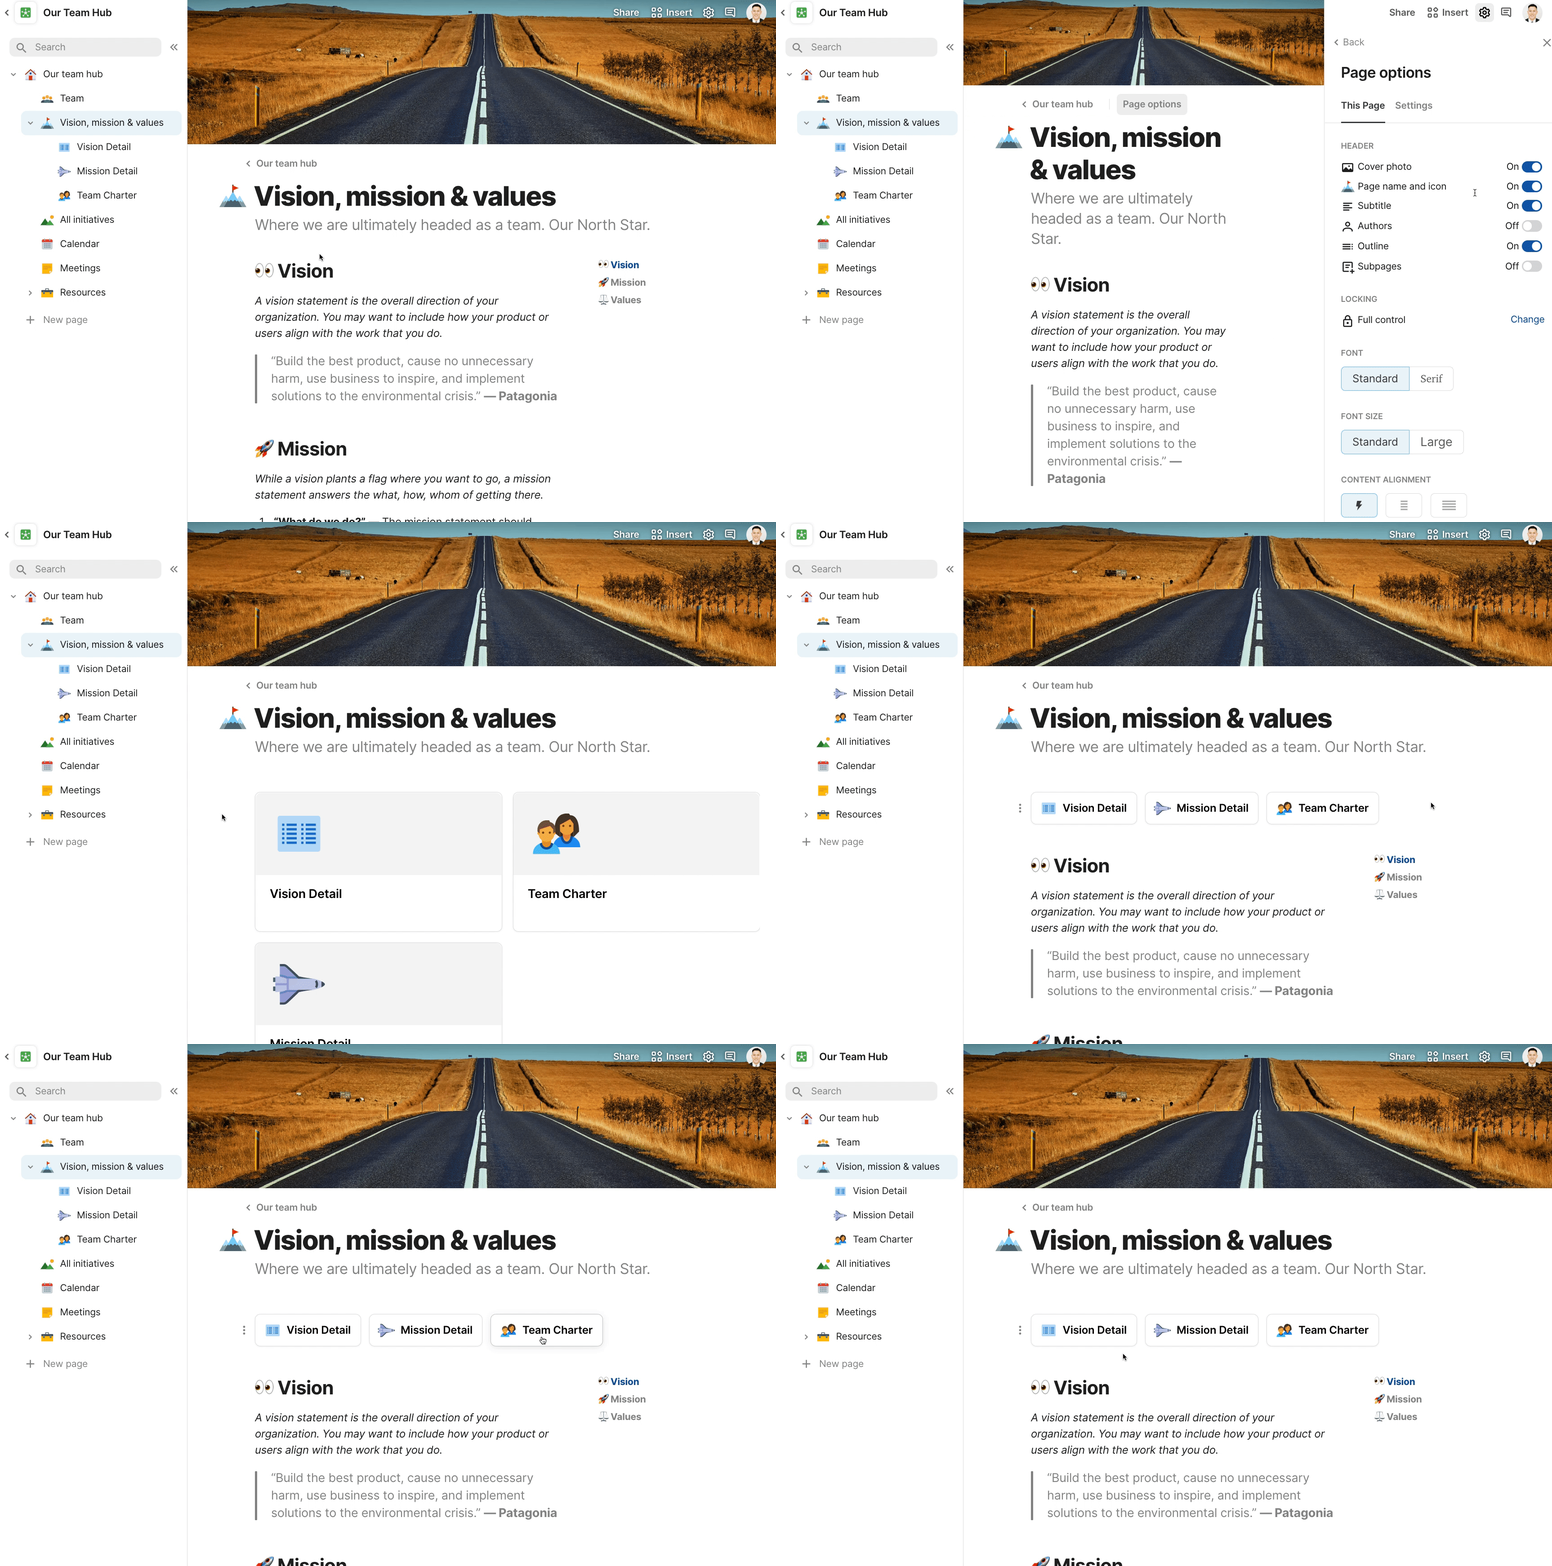
Nested sub-pages can be added by clicking the 3 dots next to the “Vision, mission, and values” parent page:


In the page options, you can click on the sub-pages toggle. The nested sub-pages show up as clickable icons on your parent page and you can adjust the size of these icons:

Structuring your space in Confluence or doc in Coda
Watch a video tutorial on building this section in Confluence and Coda:
When you’re just getting started with your team hub in Confluence or Coda, you’ll probably start small. This means you’ll create a team hub for your immediate team. The diagram at the top of this post shows some of those basic sections you will have in your team hub like the mission/values, meetings, and calendar.
As you build up your team hub, understanding how to structure your team hub in Confluence or Coda will be important. Your team hub should scale with your team or company as you add in more teams, more projects, and more knowledge. Here’s a diagram showing the main building blocks in Confluence and Coda you’ll use to structure your team hub:


When you first start building your team hub, you’ll probably start with one space in Confluence or one doc in Coda. When more teams join your Confluence or Coda workspace, you’ll probably start creating more spaces (Confluence) and docs (Coda).
Each new team that joins your workspace would most likely create a new space or doc. Then in each team’s space or doc, the team would create their own version of their team hub. You could also make each space or doc a specific project. I’ve seen teams use each space in Confluence as a specific product they are working on. The space kind of acts like a single place for anyone in the company to see what’s going on with that project.
The issue with this type of structure in Confluence or Coda for your team hub is this: teams have to look at multiple spaces or docs to see where they need to track their work and initiatives. This is why I’d recommend keeping your Confluence Space or Coda Doc at the organizational level. This means all the teams would be in the same space or doc. This also makes task tracking easier since you have one shared table of tasks or initiatives that can be shared in the same team hub. Here is what this structure might look like when each space or doc is an entire organization or department:


Notice how the marketing team hub and the engineering team hub are at the same “level” as the projects the organization is working on. For larger orgs, this might make the space or doc feel cluttered or bloated since you’ll have many team hubs, projects, and maybe other process-related sections in one space. If this is the case, you might consider moving a project or a team to its own space or doc. Here’s what spaces and pages look like in Confluence and Coda:
Confluence
Within a space, you have all the pages in your team hub in the bottom of the left sidebar. In the Space Settings, you can specify detailed permissions like who has access to create and edit pages, edit the look and feel of the space, etc.


Going to the space level in Confluence, you can see all the spaces in your workspace. Once more teams create team hubs, each hub might be its own space. Or each project might be its own space.


Coda
In Coda, a doc can also contain many nested pages in the left sidebar. Sharing a doc is similar to sharing a Google Doc. You can give certain people or groups edit access and others viewer access. The doc can be as lightweight as a simple writeup or a little more complex like a team hub.


In your Coda workspace, you can see all your docs in one place. Docs can be organized into folders and folders can have specific permissions as well. You can filter your list of docs to the ones you’ve created, the ones you’ve been shared with, etc. This interface will feel similar to you if you are used to using Google Drive.


Team roster page in Confluence and Coda
Confluence Pros
Confluence Cons
Coda Pros
Coda Cons
Watch a video tutorial on building this section in Confluence and Coda:
Adding a team roster page in your team hub is great for onboarding new people to the team. This section of the team hub also lets people from other teams at your organization know who is on the team and what their roles are. This section should contain photos, job titles, and other related information about each member of the team.
Confluence
The most basic way to create a team roster page in Confluence is to create a table with columns for the name, job title, photo, etc. I created a page for our Team, gave it a nice emoji, and inserted a table:


If new people get added to the team, you simply add more rows to the table. An alternative to the table is the . The issue with this solution is that you can’t create a structured table so you’ll have to align the images side by side on the page and it may not look as neat and tidy as a table.
At the moment, you cannot sort or filter the table in Confluence Cloud according to this community question on . The community thread references this you can pay for. It appears the macro is available for Confluence Cloud, but you can’t sort while in edit mode in Confluence Cloud. This functionality only appears to work in Cloud Server. Another add-on to try is this from StillSoft.
Coda
The team roster page in Coda also starts with a table. Similar to Confluence, you can add images and text to tables. Notice how the Role and Team columns are dropdowns (which I’ll address later):


In Coda, a table can be viewed in different ways. These are simply called . We can make our team roster table look a little more polished by changing the layout of the table into a :
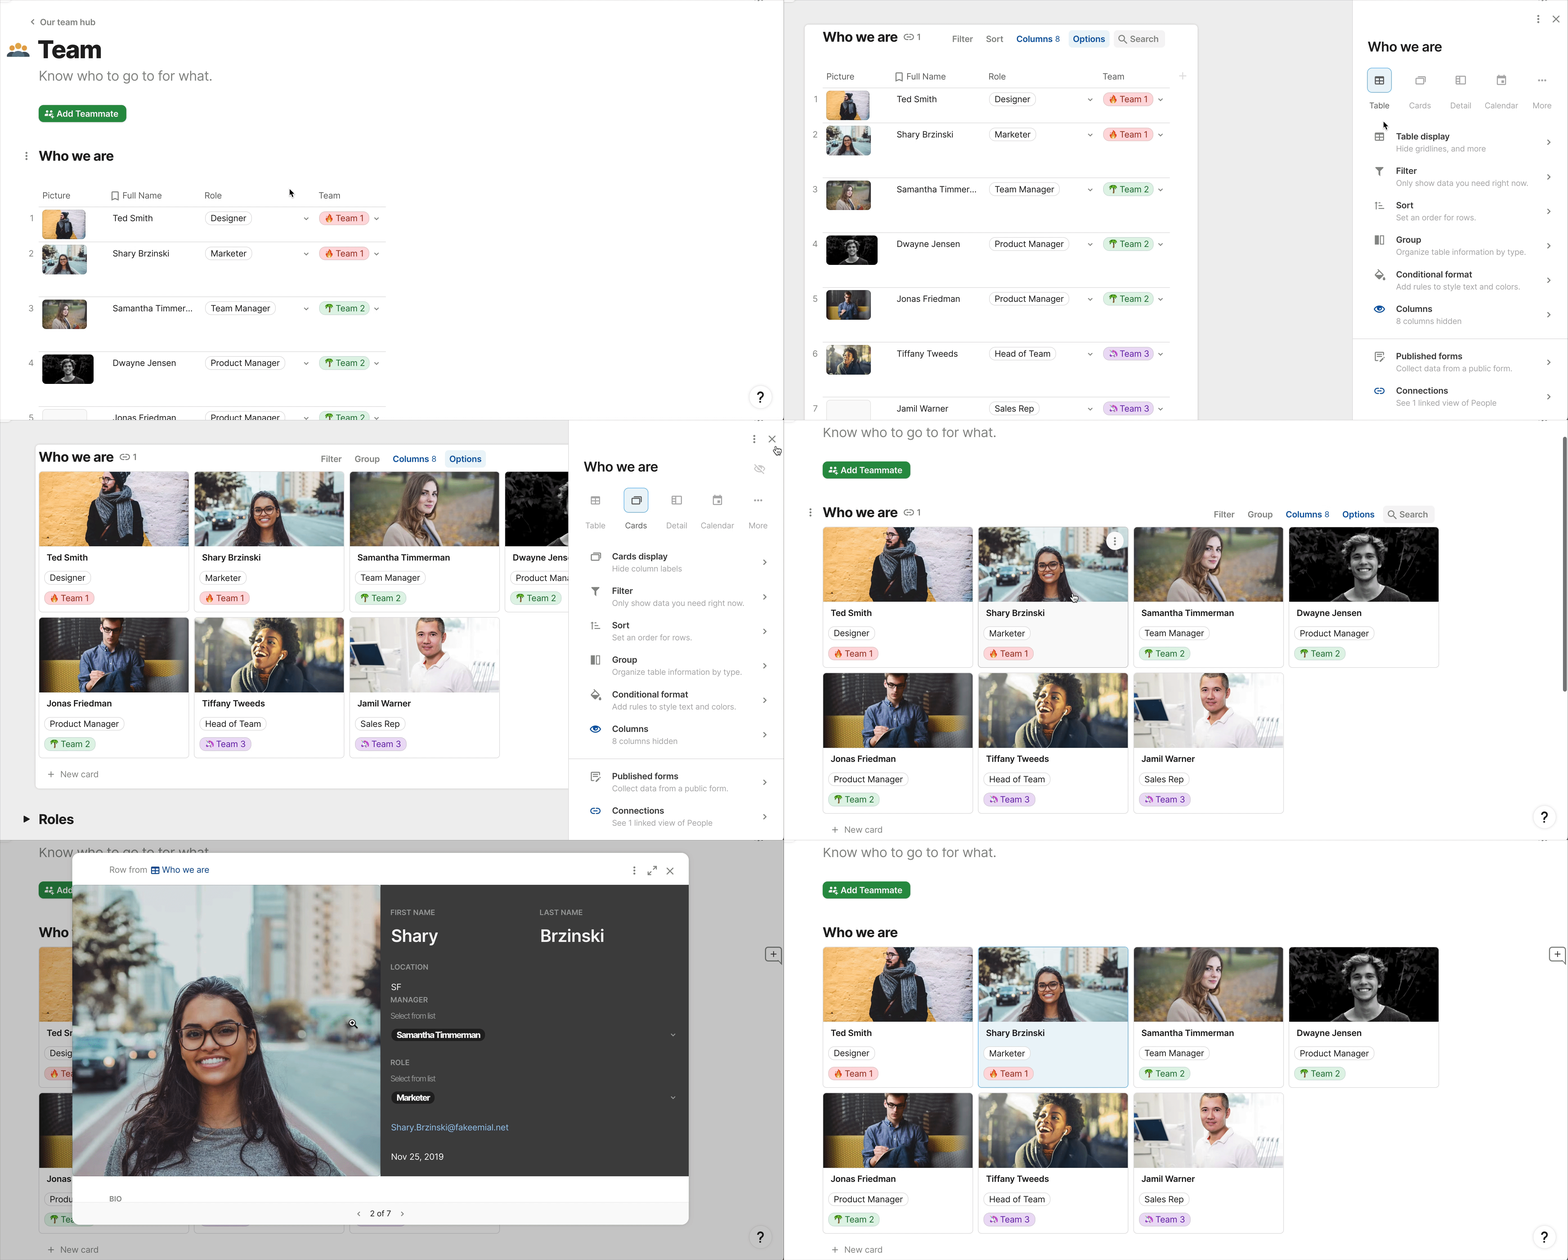

Tables and layouts (like the Card layout shown above) can be sorted and filtered on any column. The dropdown columns for Role and Team come from other tables on our Team page which we define right below our main roster table:


This way, if a team name changes, you only have to change the spelling of the team name in one place (in the “Teams” table in the above screenshot). Dropdowns can be done in Confluence as well through this paid , but it doesn’t look like you can reference other tables in the dropdown (you have to hard-code the values in the dropdown).
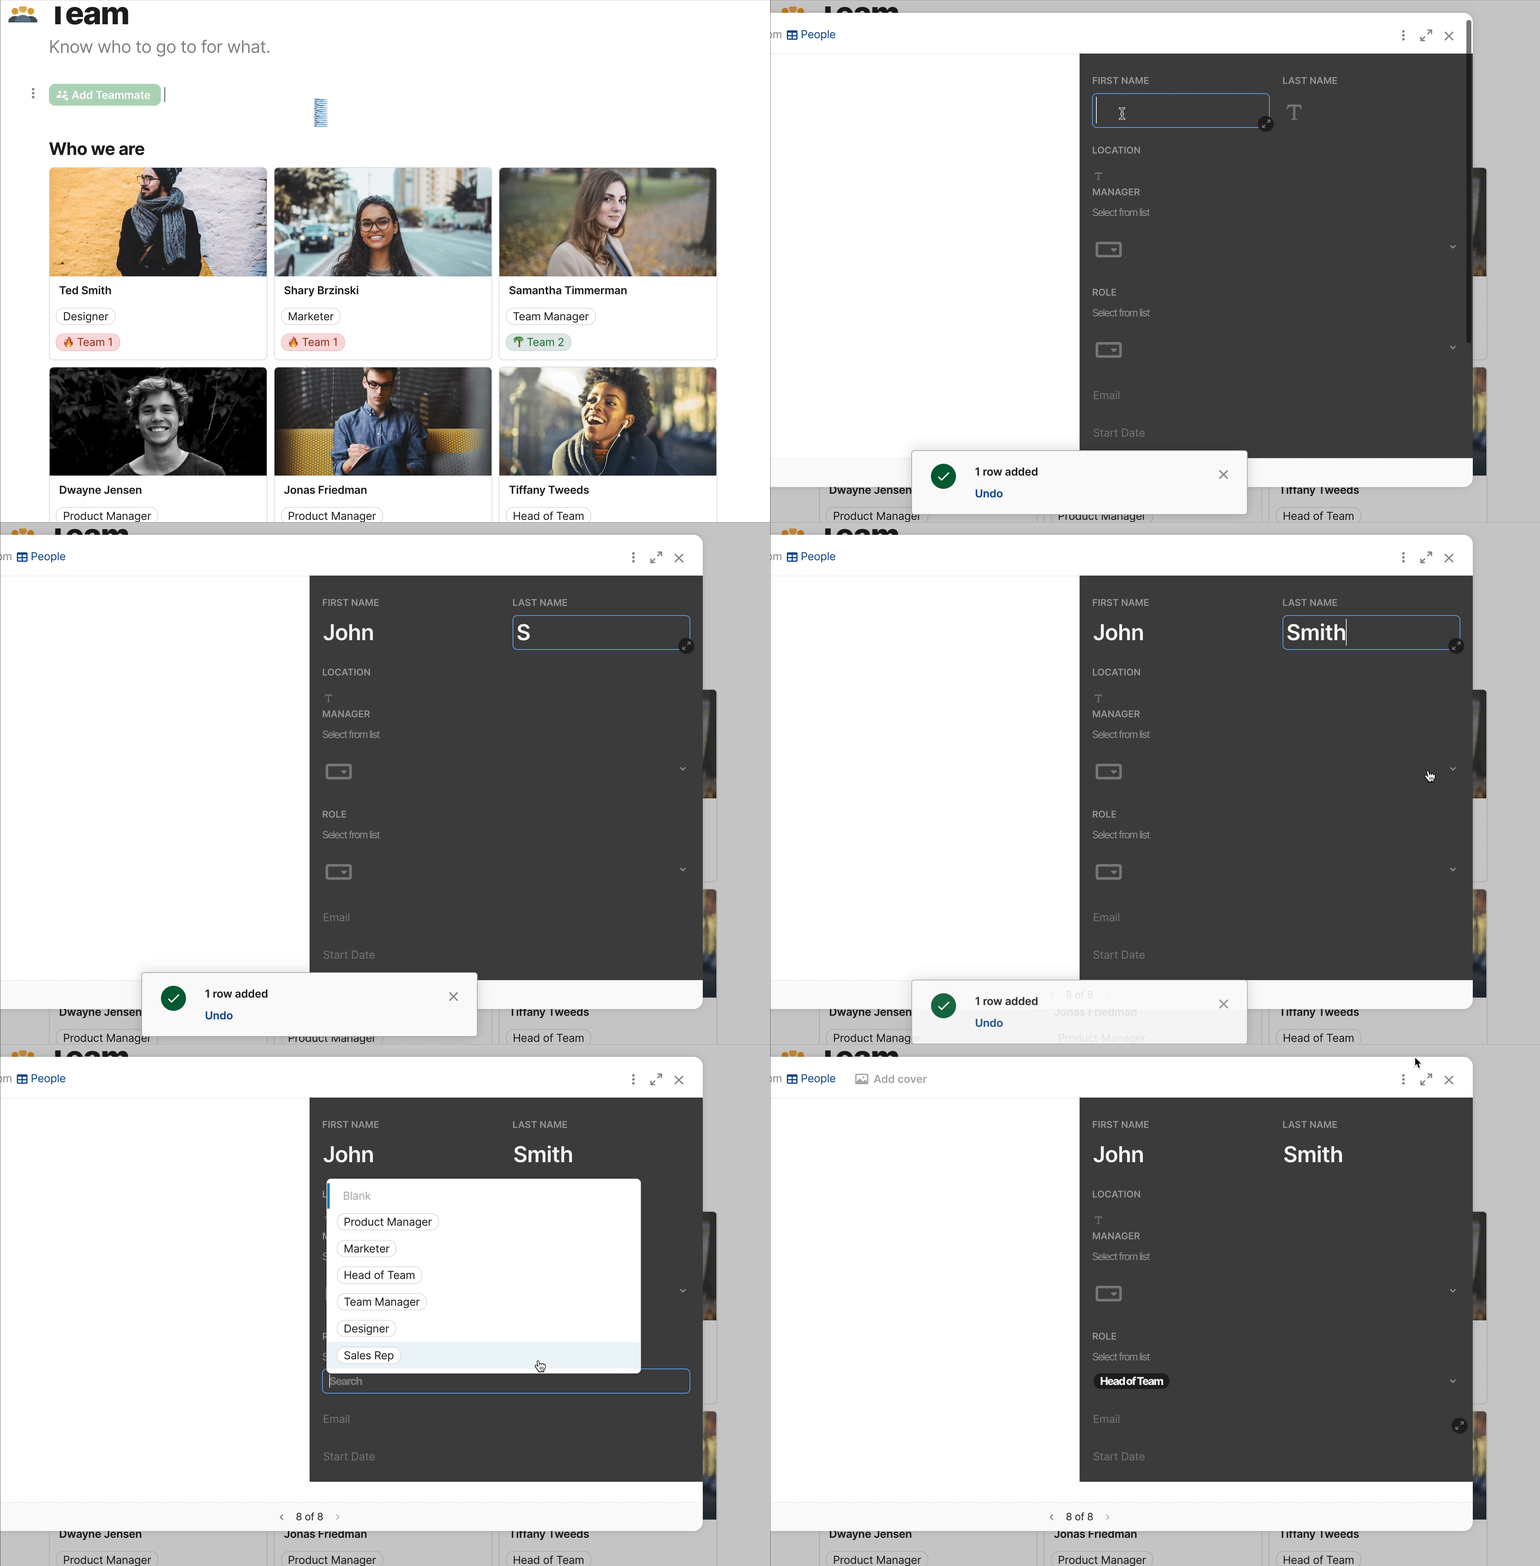
One final call-out on this team roster page is this Add Teammate button at the top of the page. This button allows you to quickly add teammates to the roster table. You can further customize the pop-up that shows up when your teammates click on the button so that it’s easy to fill out:

Meeting log with meeting notes in Confluence and Coda
Confluence Pros
Confluence Cons
Coda Pros
Coda Cons
Watch a video tutorial on building this section in Confluence and Coda:
Meeting notes are pretty common in a team hub to keep a record of key topics and decisions discussed within your team. The most important part of your meeting log is to keep a standard template for your meeting notes. By having a meeting notes template that your teammates and re-use, it ensures your meetings follow a similar format and agenda. This also makes it easy for others to review what was discussed during the meeting.
In Confluence and Coda, I’ll show you how to create a meeting notes template that is copyable each time someone starts a meeting.
Confluence
You can create page templates at various levels of visibility in Confluence. A can be used only within that space, and a can be used in any space in your account. Let’s say your team has a ritual of giving out kudos to team members at the beginning of the meeting. In your Space Settings, you could create a template that looks like this:


Every time your team starts a meeting, you can re-use this page template for each meeting. I called this page template “My Cool Meeting Notes.” Now when I create a new page, I can search for “My Cool Meeting Notes” in the template section in the right sidebar:
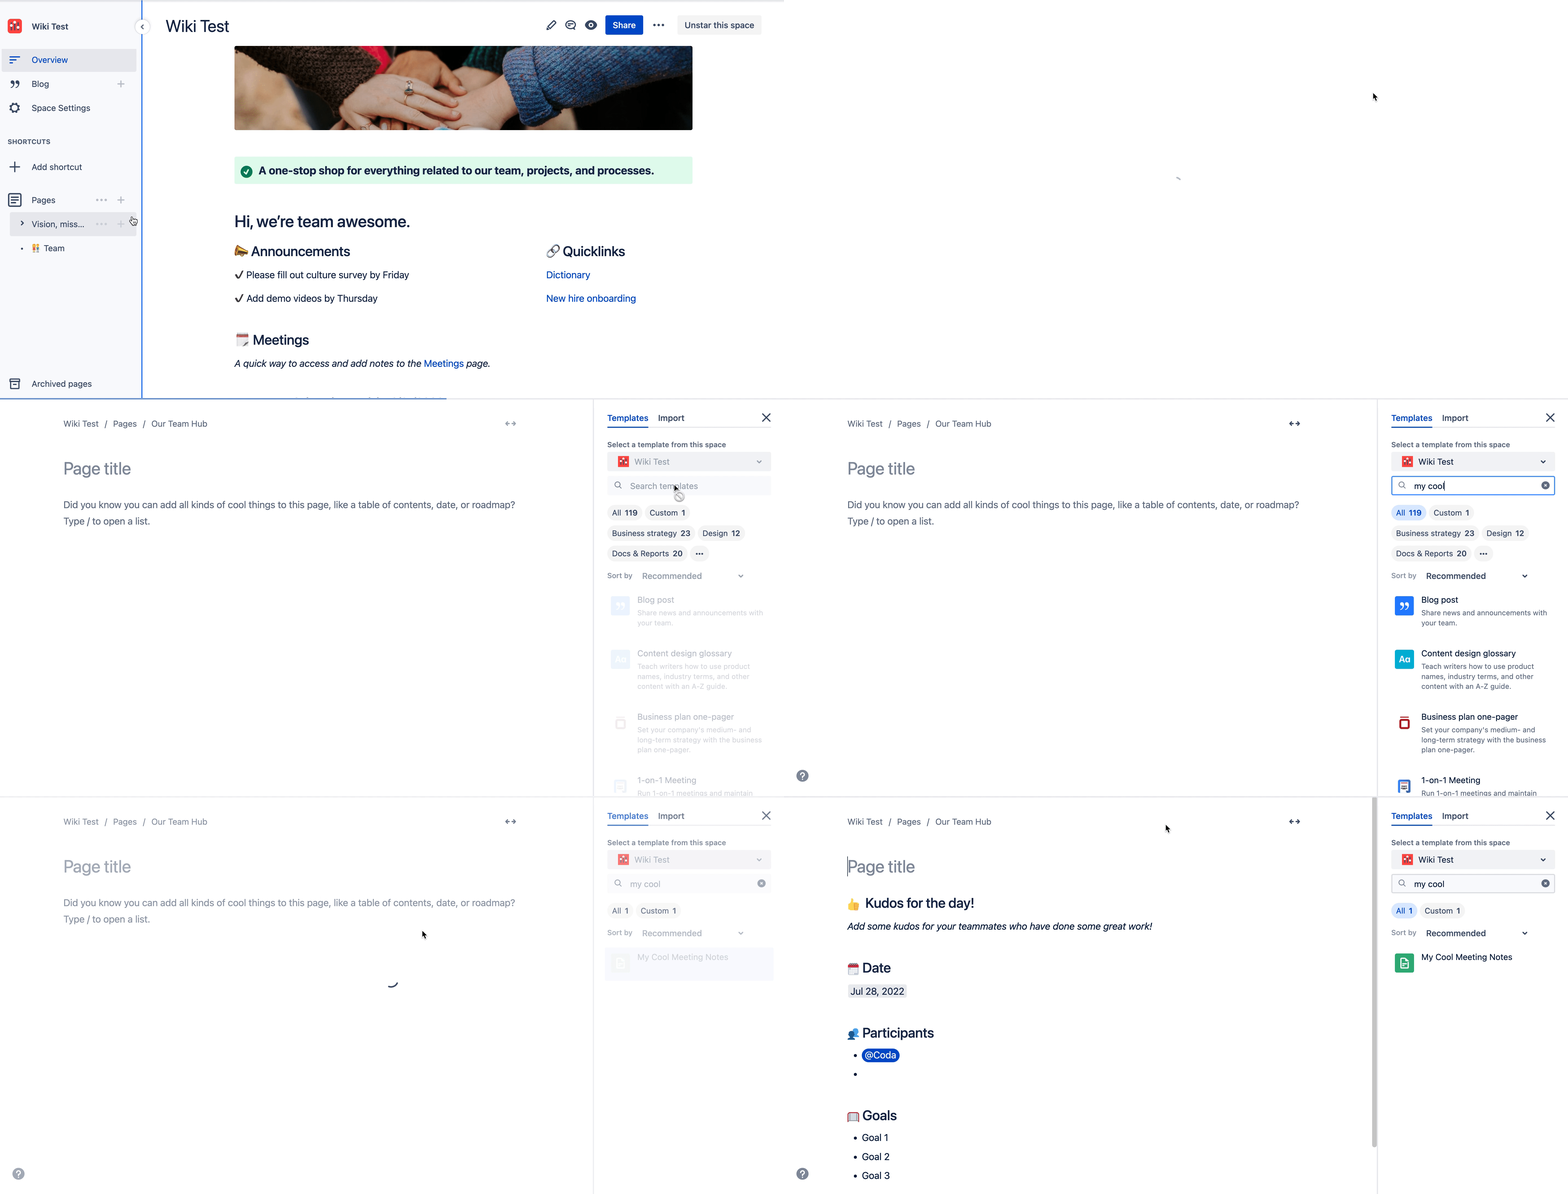

After you write your meeting notes, you can hit Publish and the page will show up in your left sidebar in your space:


The issue with this approach is that you’ll have to nest all these meeting notes within a Meeting Log page or something. The Meeting Log page will have to manually link to each meeting notes page which can get pretty tedious if your team runs a lot of meetings every week!
An alternative approach is to use in a new page. This automatically creates a “Meeting Log” page that includes tables to keep track of each of your meeting notes:


What’s happening behind the scenes (visible once you hit the edit page icon) is a is created for you:


You’ll also notice the Create meeting note button in the top-right. We can re-assign this button to create a new meeting note based on the “My Cool Meeting Notes” template we created earlier.
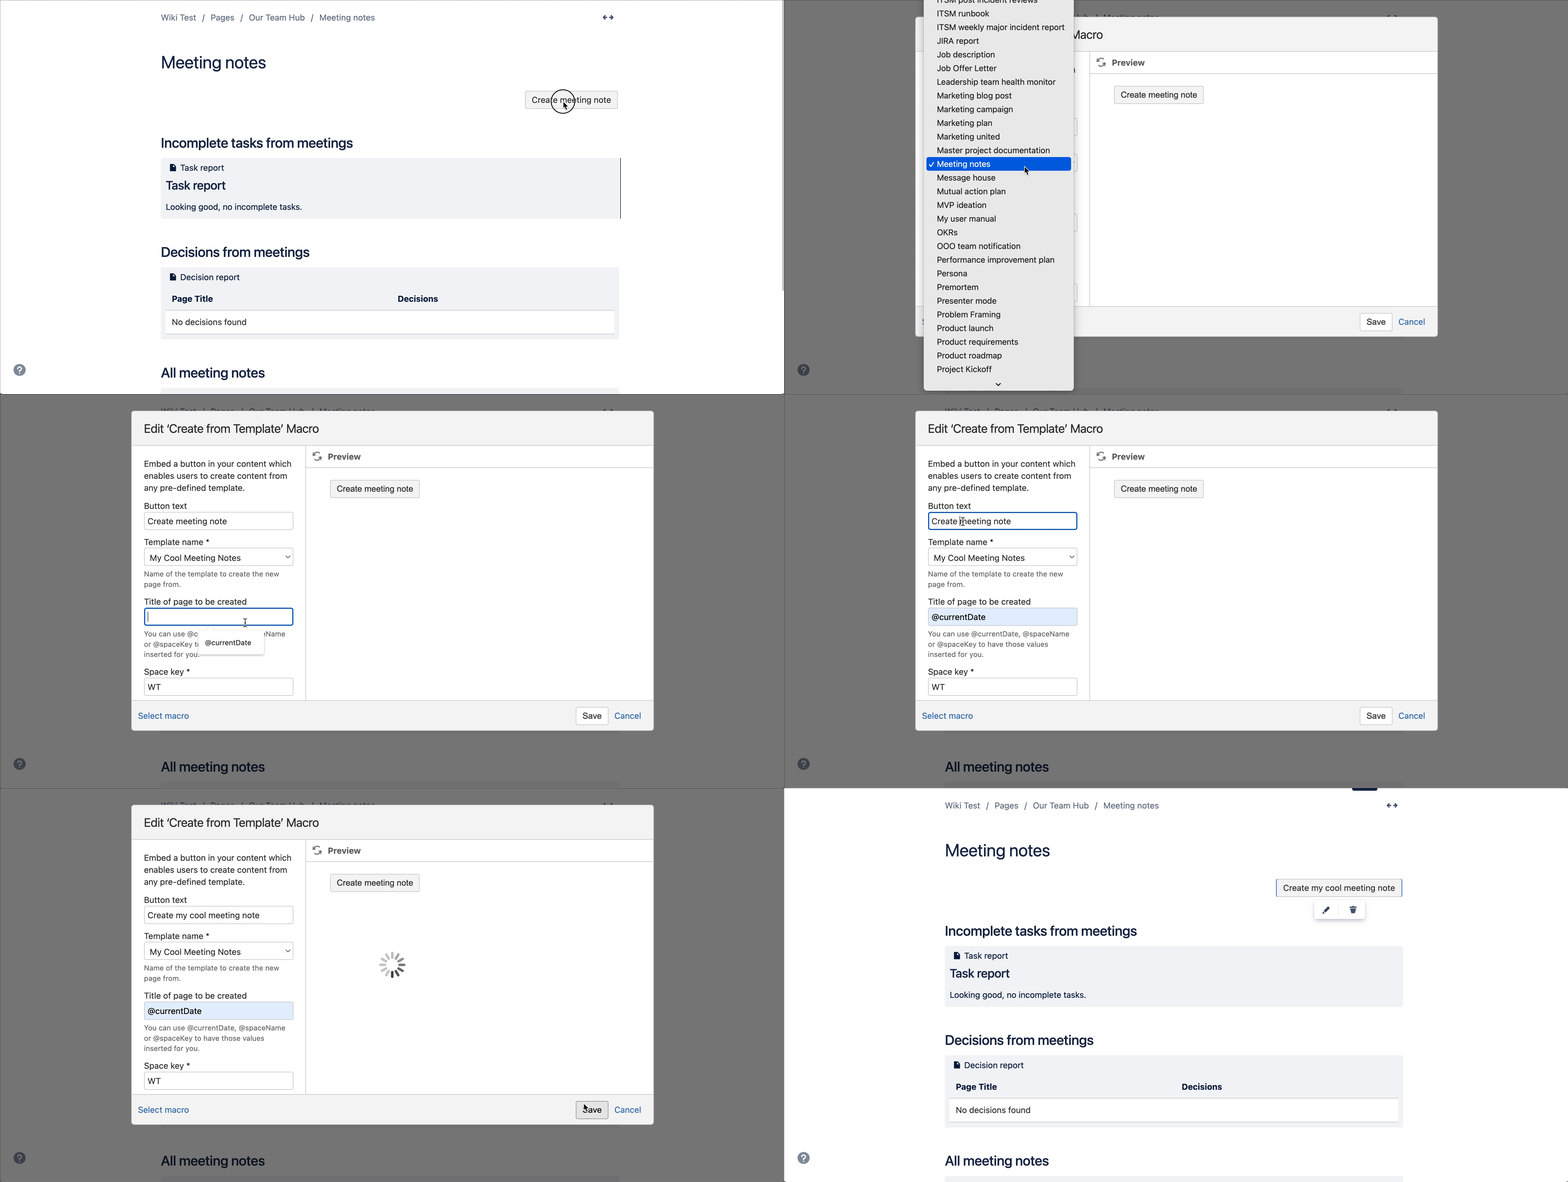

After you publish this “Meeting Log” page, you can click the Create my cool meeting note button to automatically create a meeting note with today’s date as the title. This meeting note then gets nested in the “Meeting notes” page in the left sidebar:
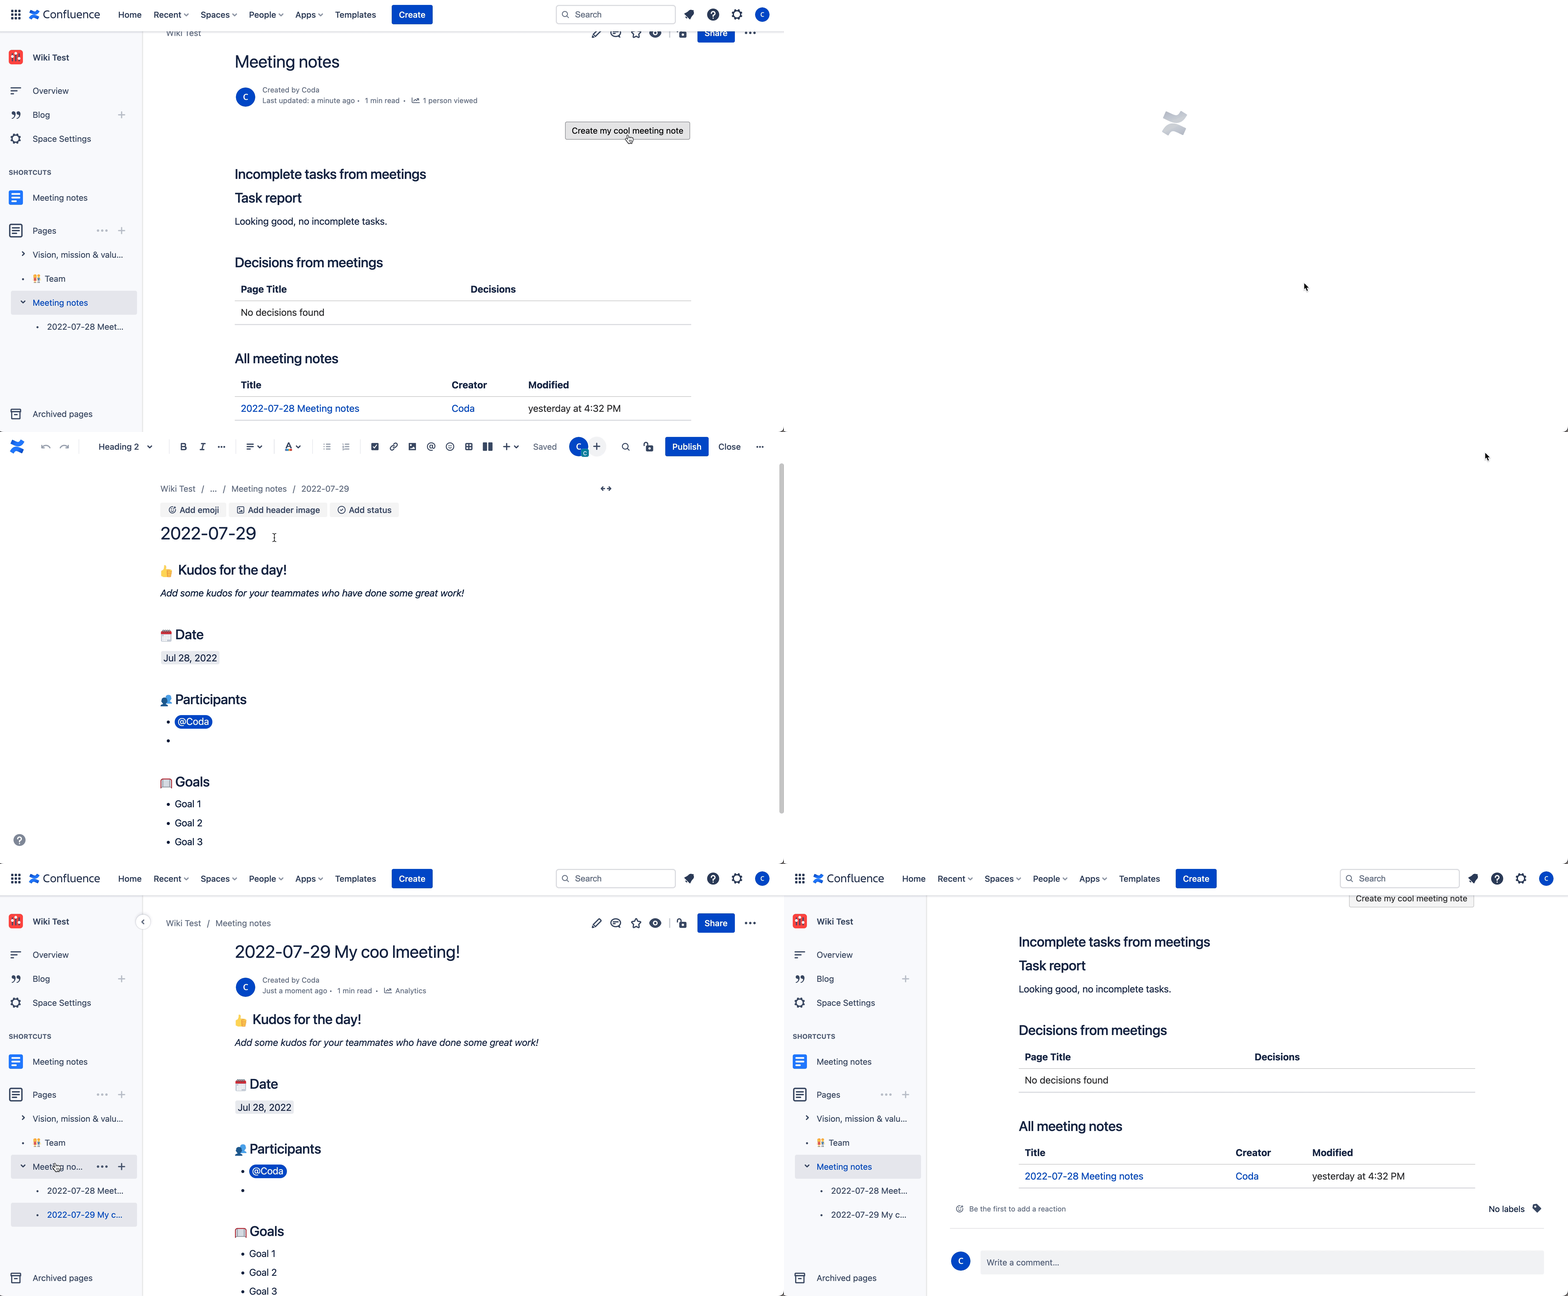

While the new meeting note shows up on the left sidebar, it doesn’t show up in the Meeting Log. The reason for this is because the content report table macro only shows pages that have a specific label. Back in your Space settings, you need to go back to the “My Cool Meeting Notes” template and (in this case, the label is “meeting-notes”). Then when you click the button, new meeting note pages will get added to the table.
Coda
Most teams capture their meeting notes in a table. The meeting log in Confluence can’t be sorted and filtered unless you install another macro. Tables in Coda can be sorted and filtered as you please. Here is what a meeting log table looks like in Coda. You can click on the Notes icon to open up a pop-up where you can take detailed meeting notes:
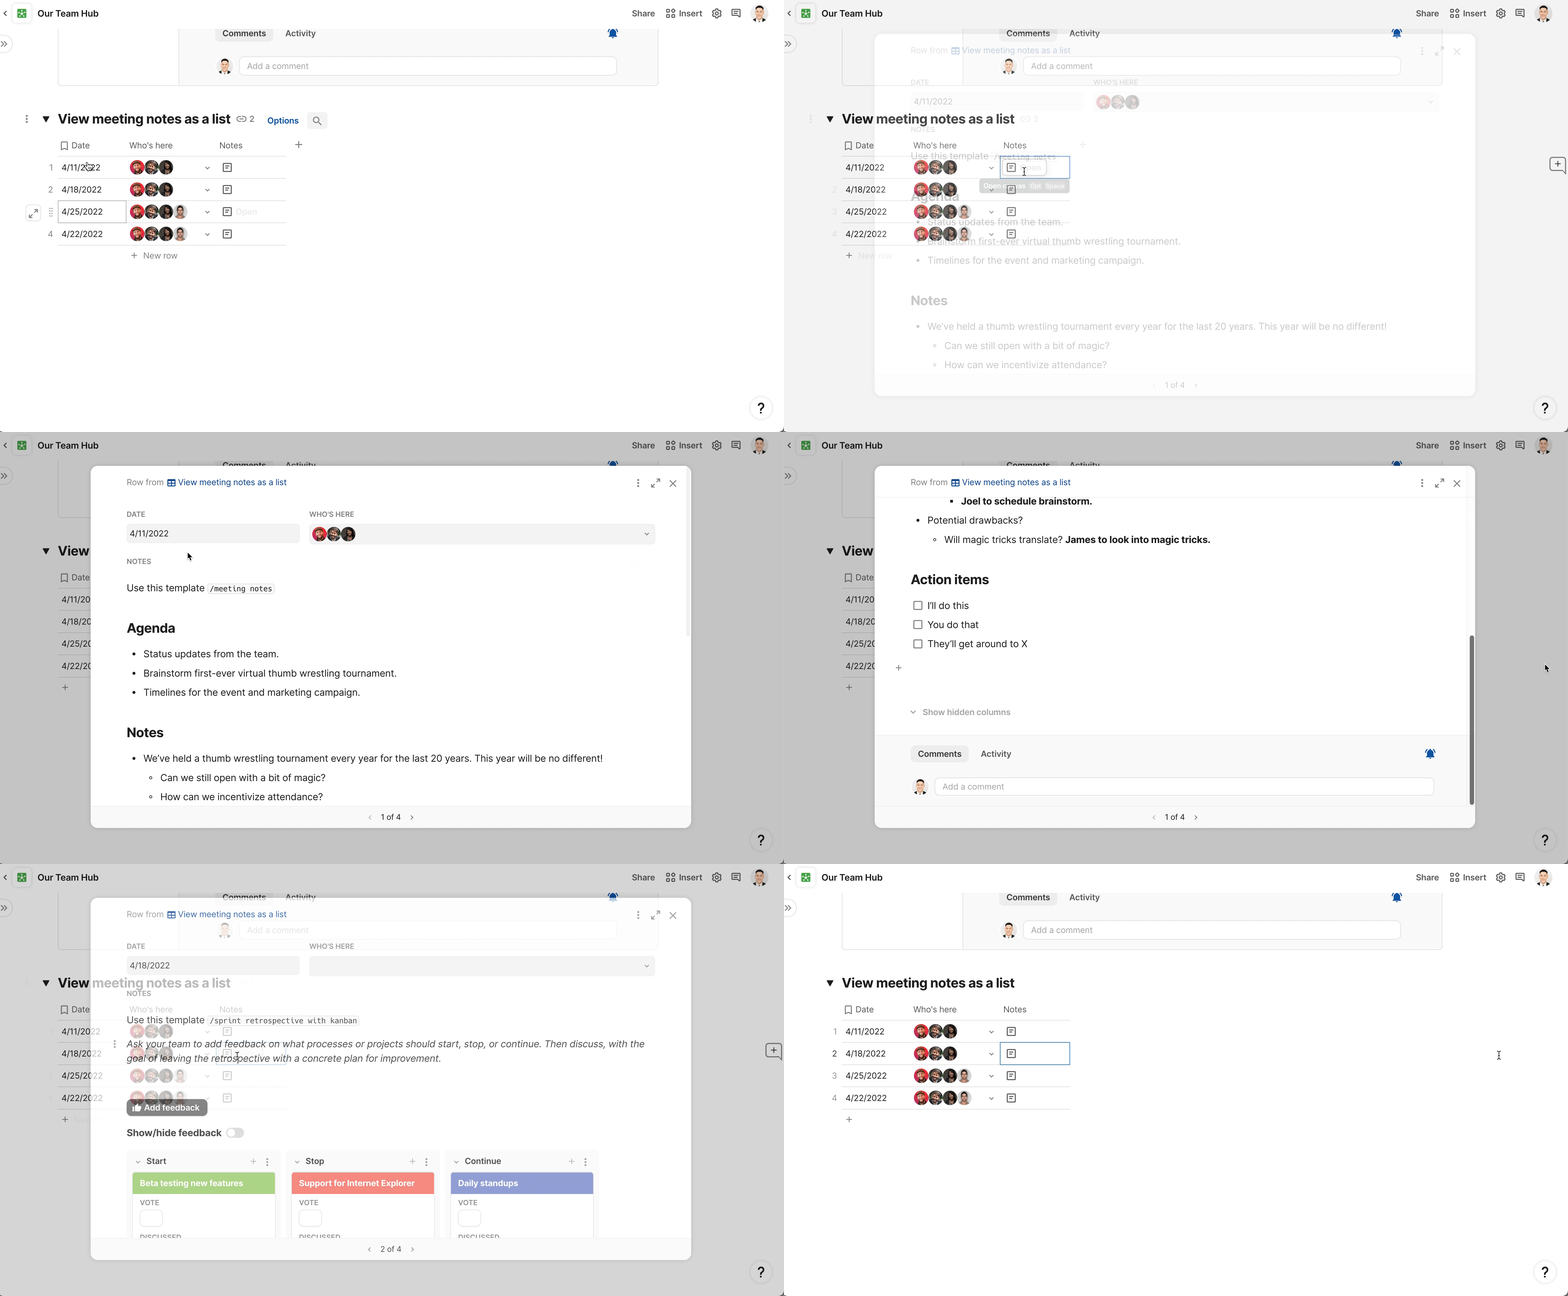

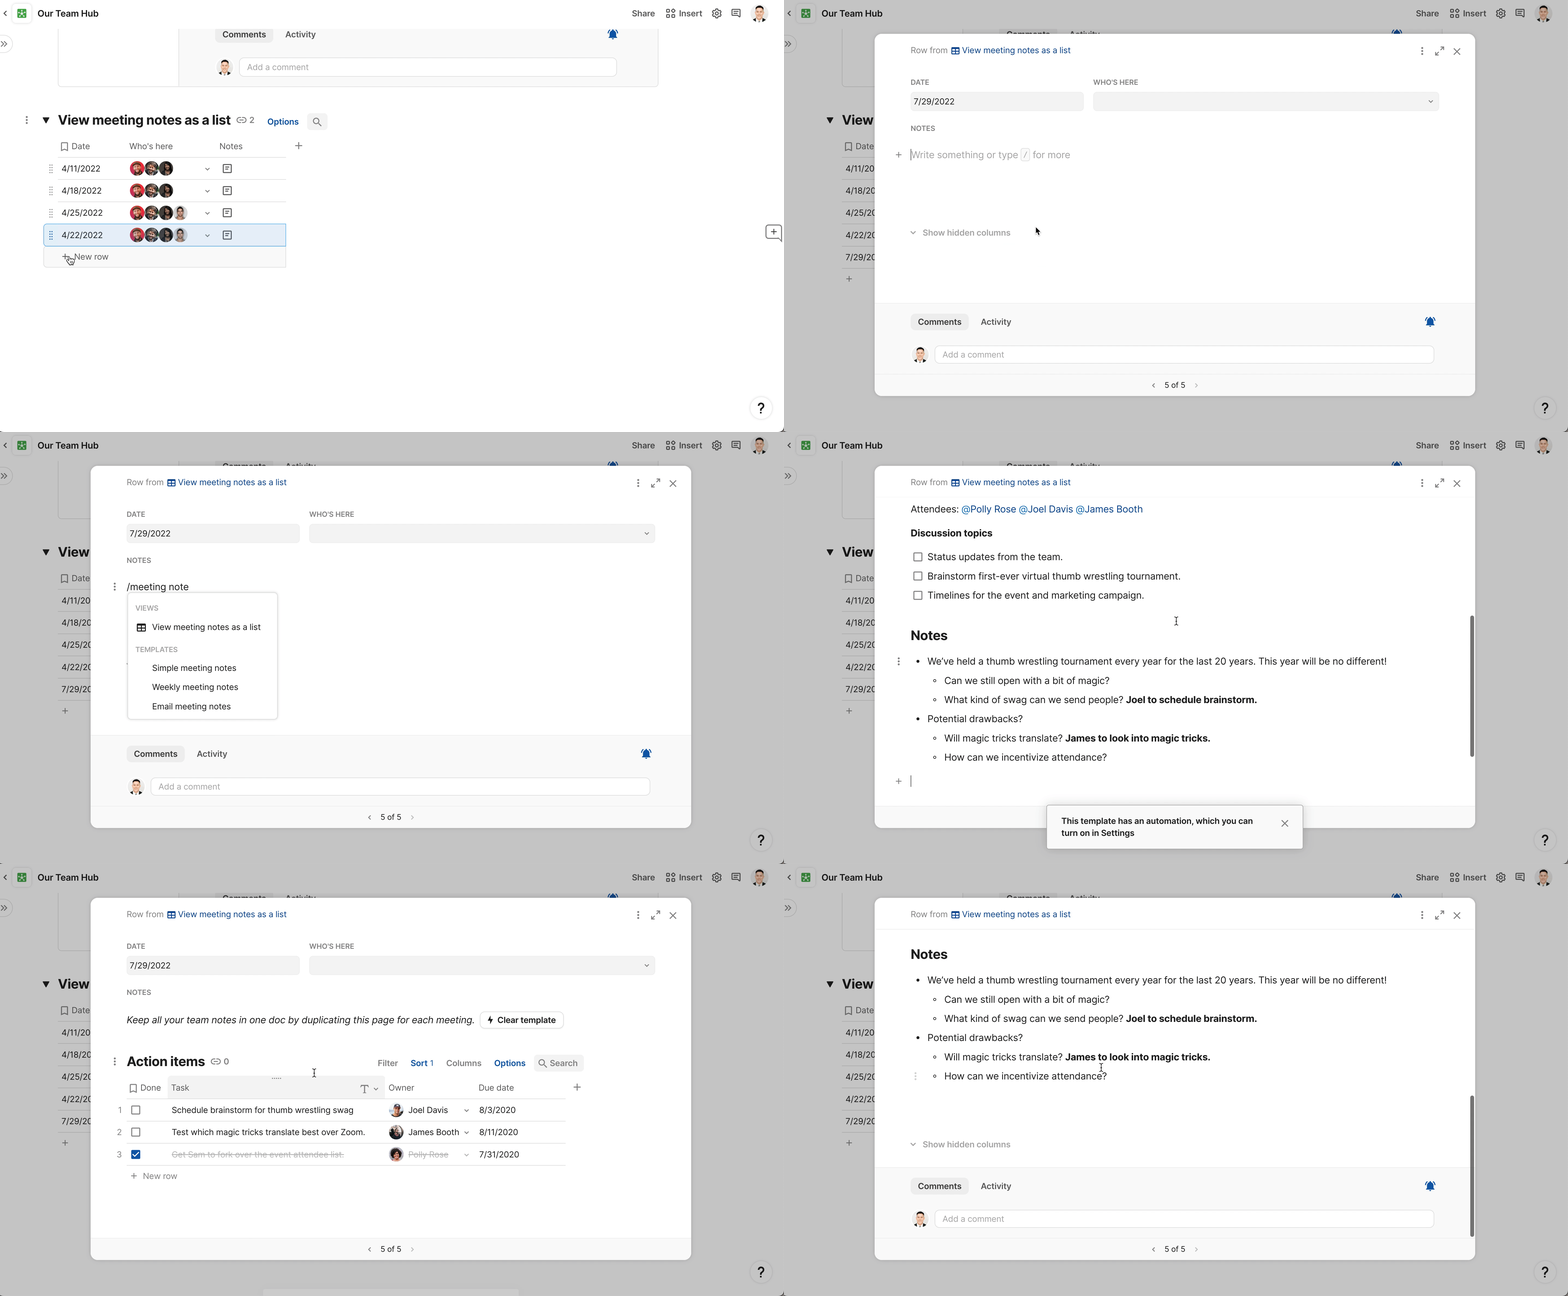
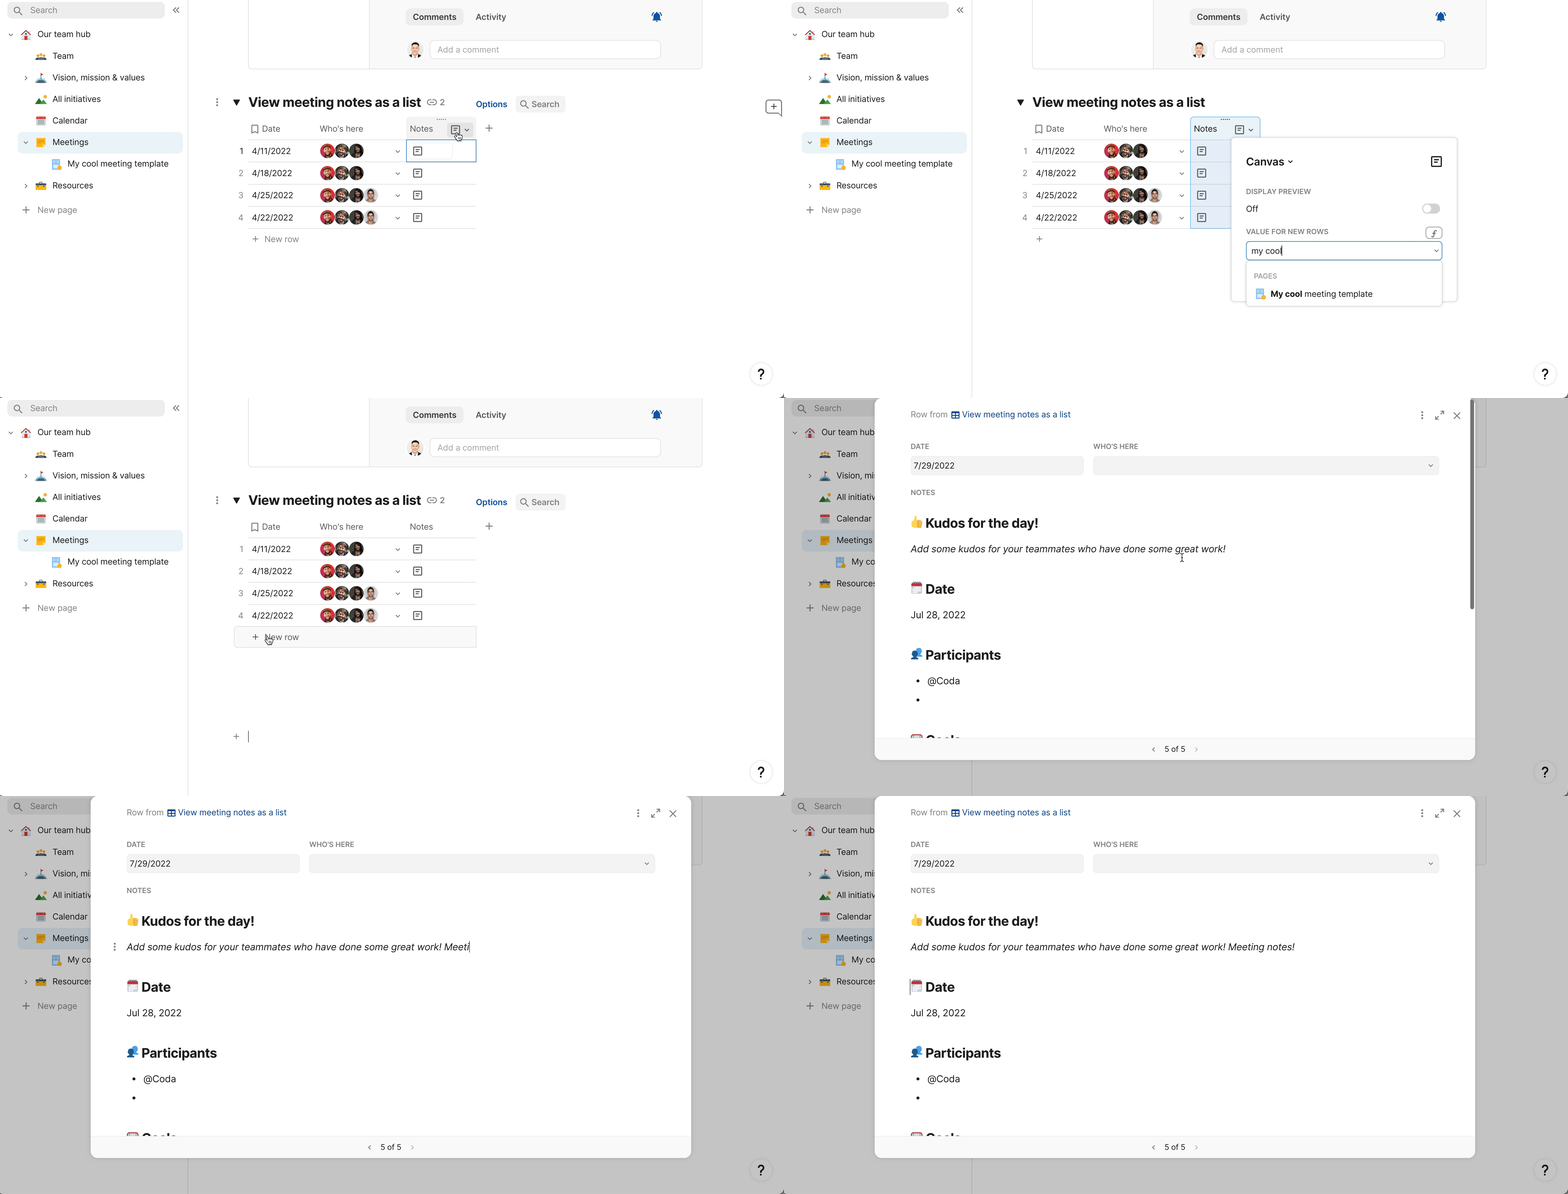
Two common ways to define your meeting note template is to use a drag-and-drop template or to create a page that contains the template (similar to the Space templates in Confluence). Let’s go over the first method. This is called a . The easiest way is to publish an existing Coda doc that has the exact format for your meeting notes. In the example below, I create a new row in my meeting notes table, click on the Notes icon, and can type /meeting notes to get a custom template that I’ve defined for my team:

The other method is to create a page that contains the template you would like to use for each meeting note. In the screenshot below, I created a sub-page in my “Meetings” page called “My cool meeting template.” This page contains the meeting note format I want to use for all my meeting notes:


Back on the “Meetings” page, I can set this “My cool meeting template” page as the default value for new rows that get added to the table. Now every time my teammates add a new row to this meeting log, the meeting template automatically shows up in the Notes column:

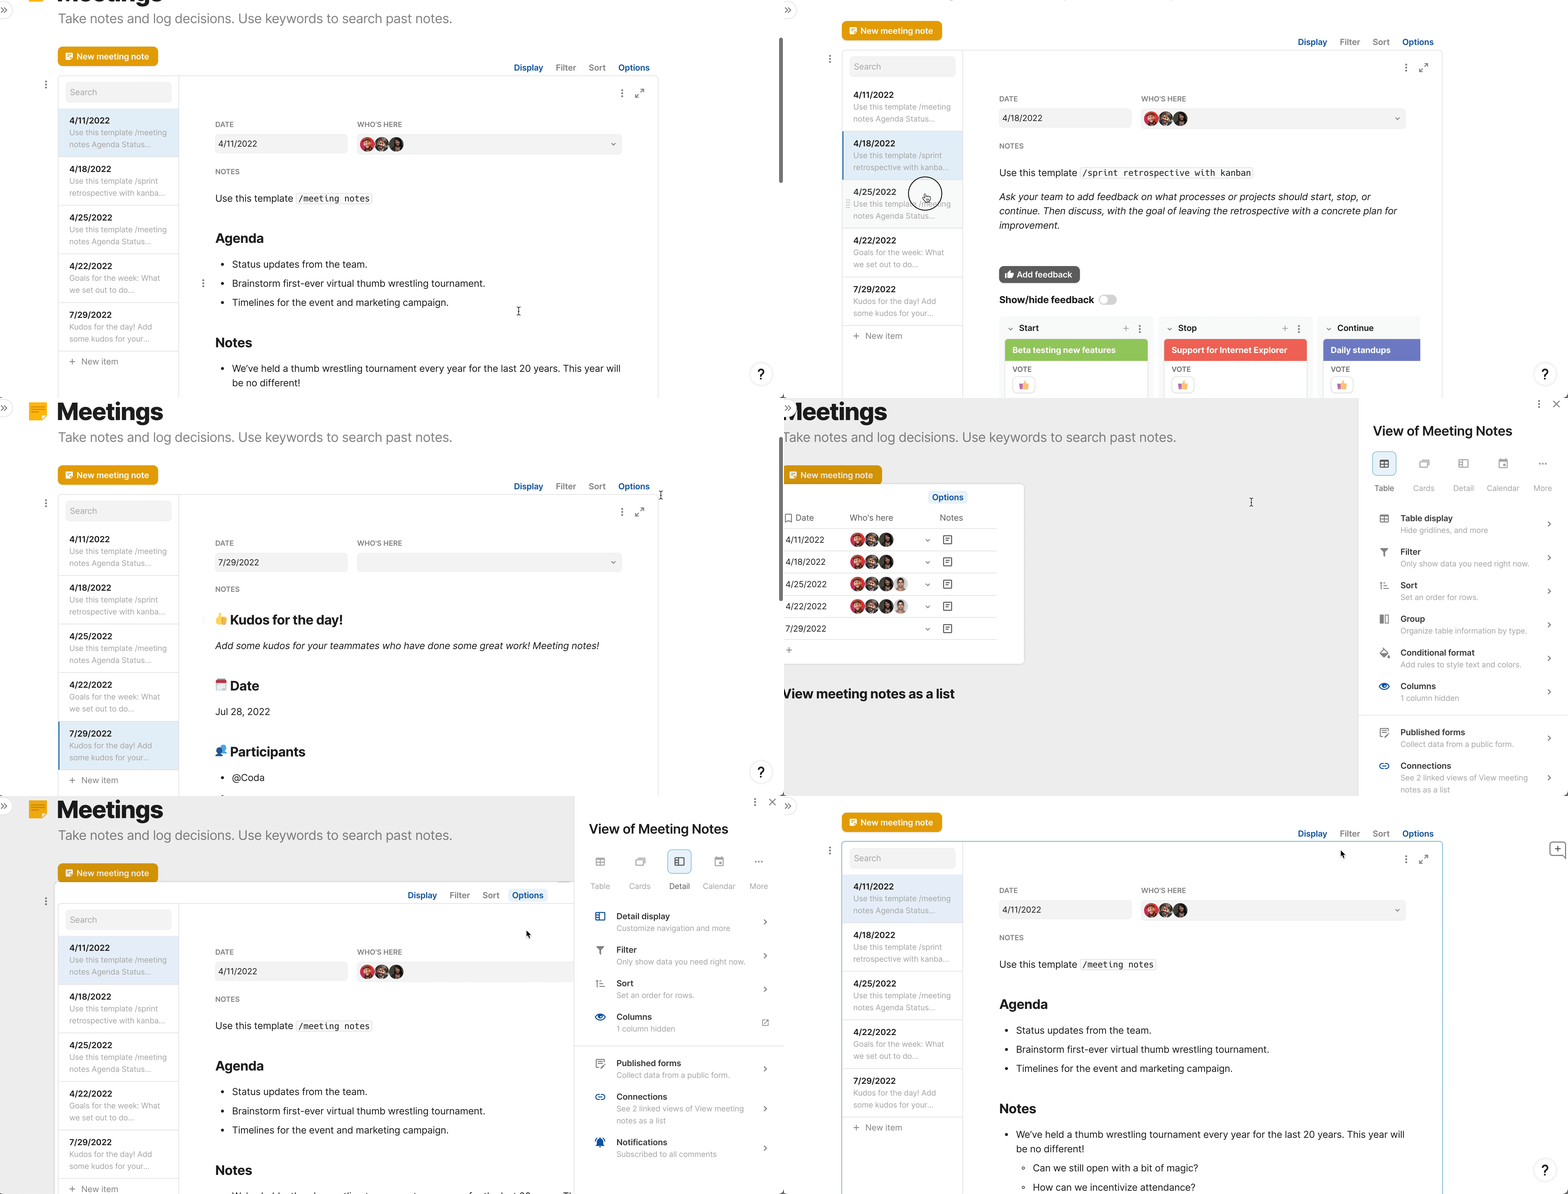
Since all our meeting notes are in a table, we can change the layout of the table to something that is easier to browse. Other teammates can quickly search for meeting notes in the . As I mentioned before, we could sort this table and layout by any column. Perhaps we want to sort the meeting notes by Date in ascending order or the Who’s here column in descending order. Maybe we only show the meeting notes where a certain person was in attendance. These are all super easy to do with Coda tables.

Initiative tracker in Confluence and Coda
Confluence Pros
Confluence Cons
Coda Pros
Coda Cons
Watch a video tutorial on building this section in Confluence and Coda:
Now that some of your team’s key information is in the team hub, what about tracking the projects your team is working on? I’m talking about going beyond the project brief or summary, but that actual task tracking or initiative tracking. Instead of going to a separate task tracking tool, what if your team hub could also be the home base for everyone to track their tasks as well? If we go one step higher, the tasks and initiatives your team works on should also roll up to parent projects as well.
There are several ways to do task tracking in Confluence and Coda. At a high level, there are some basic track tracking capabilities in Confluence, but you’re more likely going to use other dedicated tools in the Atlassian product portfolio to do more robust task tracking. In Coda, task tracking is handled through tables and views. Let’s take a look at how we would build a task or initiative tracker with some basic properties like the task owner, stage, progress, and description.
Confluence
A really popular product for task tracking in the Atlassian product portfolio is Trello. If you don’t want to switch back and forth between Trello and Confluence (where your team hub lives), you can add . Your engineering team may also be using Jira for issue or bug tracking, and you can display page as well.
While you can update your Trello cards and Jira issues right inside Confluence, Trello and Jira have their own licensing models. If some of your team members don’t have the proper permissions in Trello, they may not be able to take actions in the embedded Trello board. There may also be premium Trello features that you’ll need to pay for separately as your initiatives and projects expand.
For now, let’s try focus on building an initiative tracker natively in Confluence. You could start by creating a simple table with tasks and columns that look like this:


We have ourselves a basic initiative tracker, but it’s very manual to update. Each person has to come to this table and manually update each “cell” in the table as they are working on the initiative. Your teammates may also want to filter this table to only show tasks where they are the assigned owner. As I’ve shown in previous sections, you can’t filter tables in Confluence unless you install a separate add-on or macro.
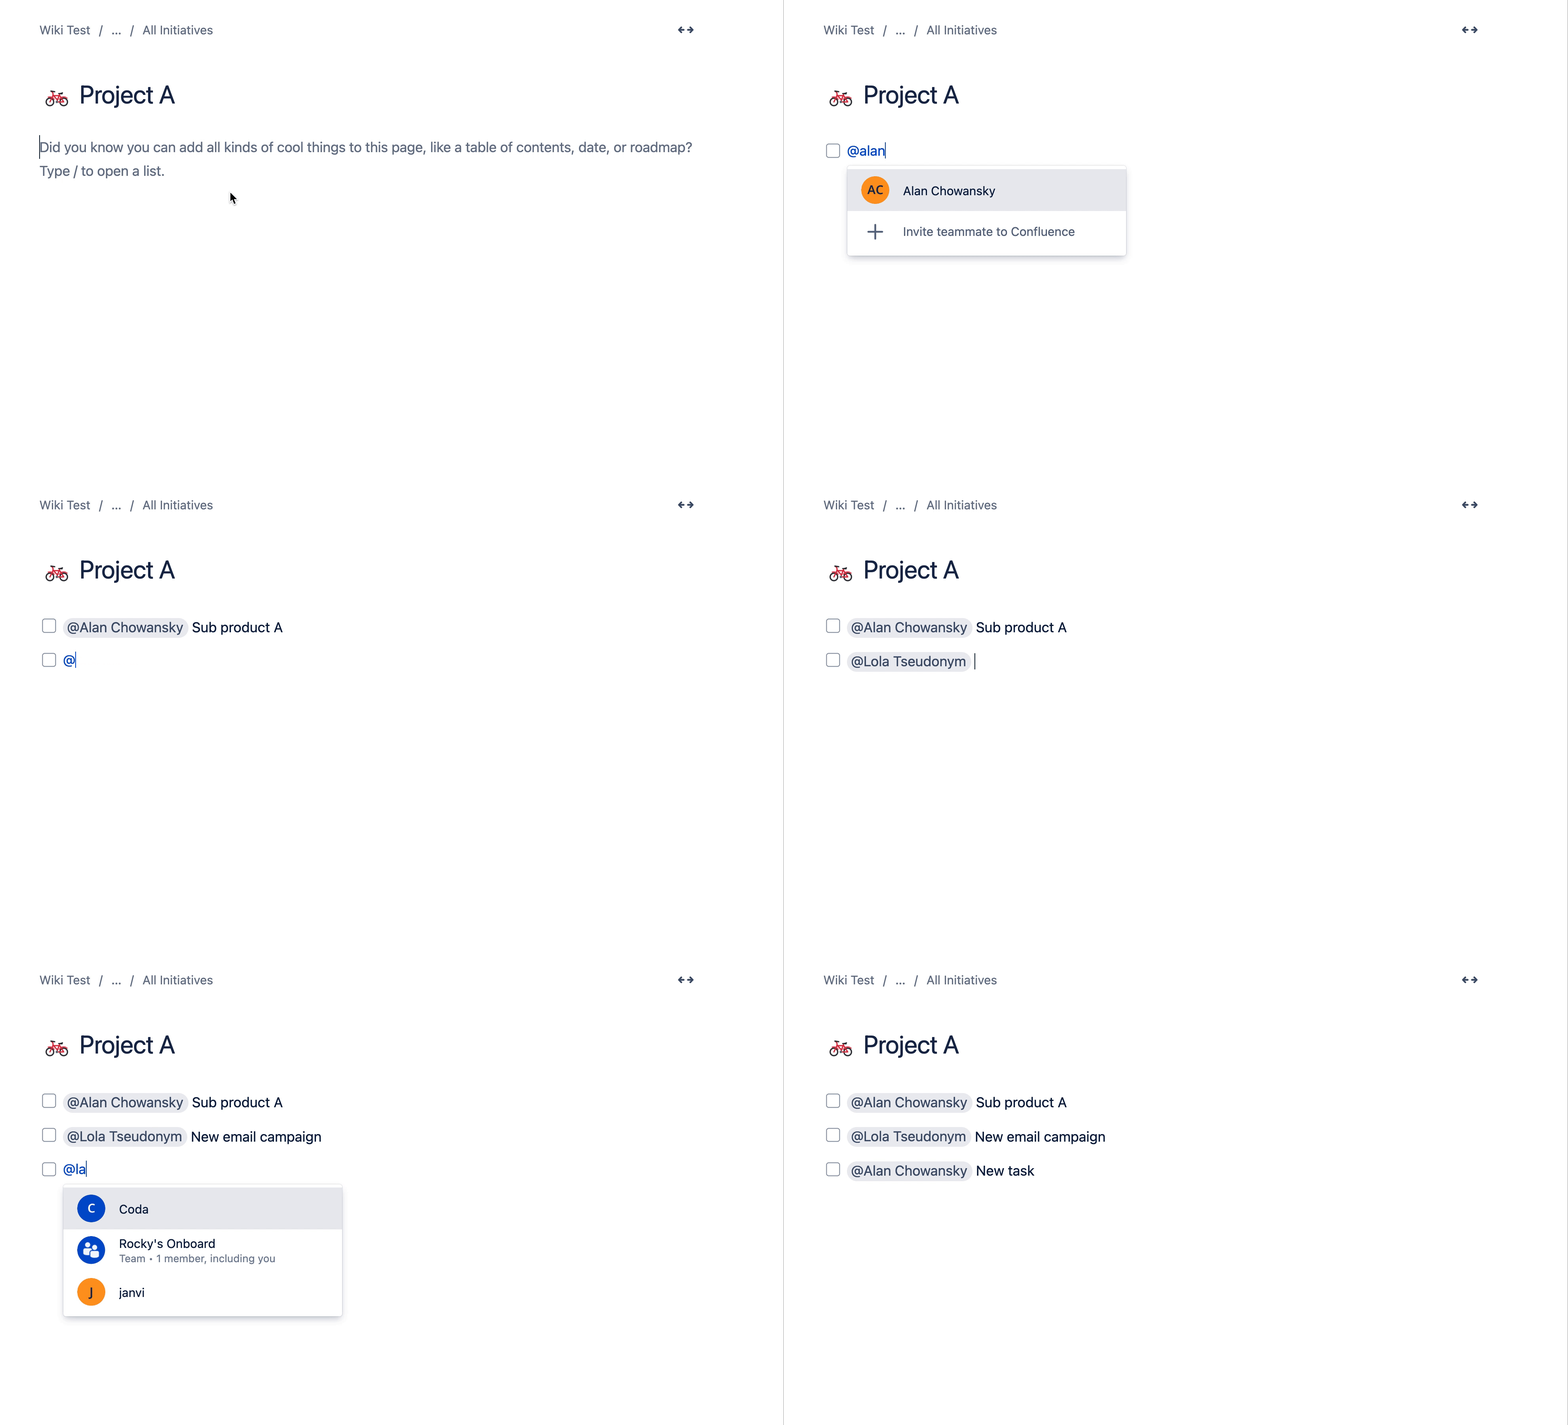
The preferred way is to hit the Task List button or type []. Let’s create a nested project page within the “All Initiatives” page I created in the screenshot above called “Project A.” In this page, we’ll start adding some tasks form the manual table we initially created:

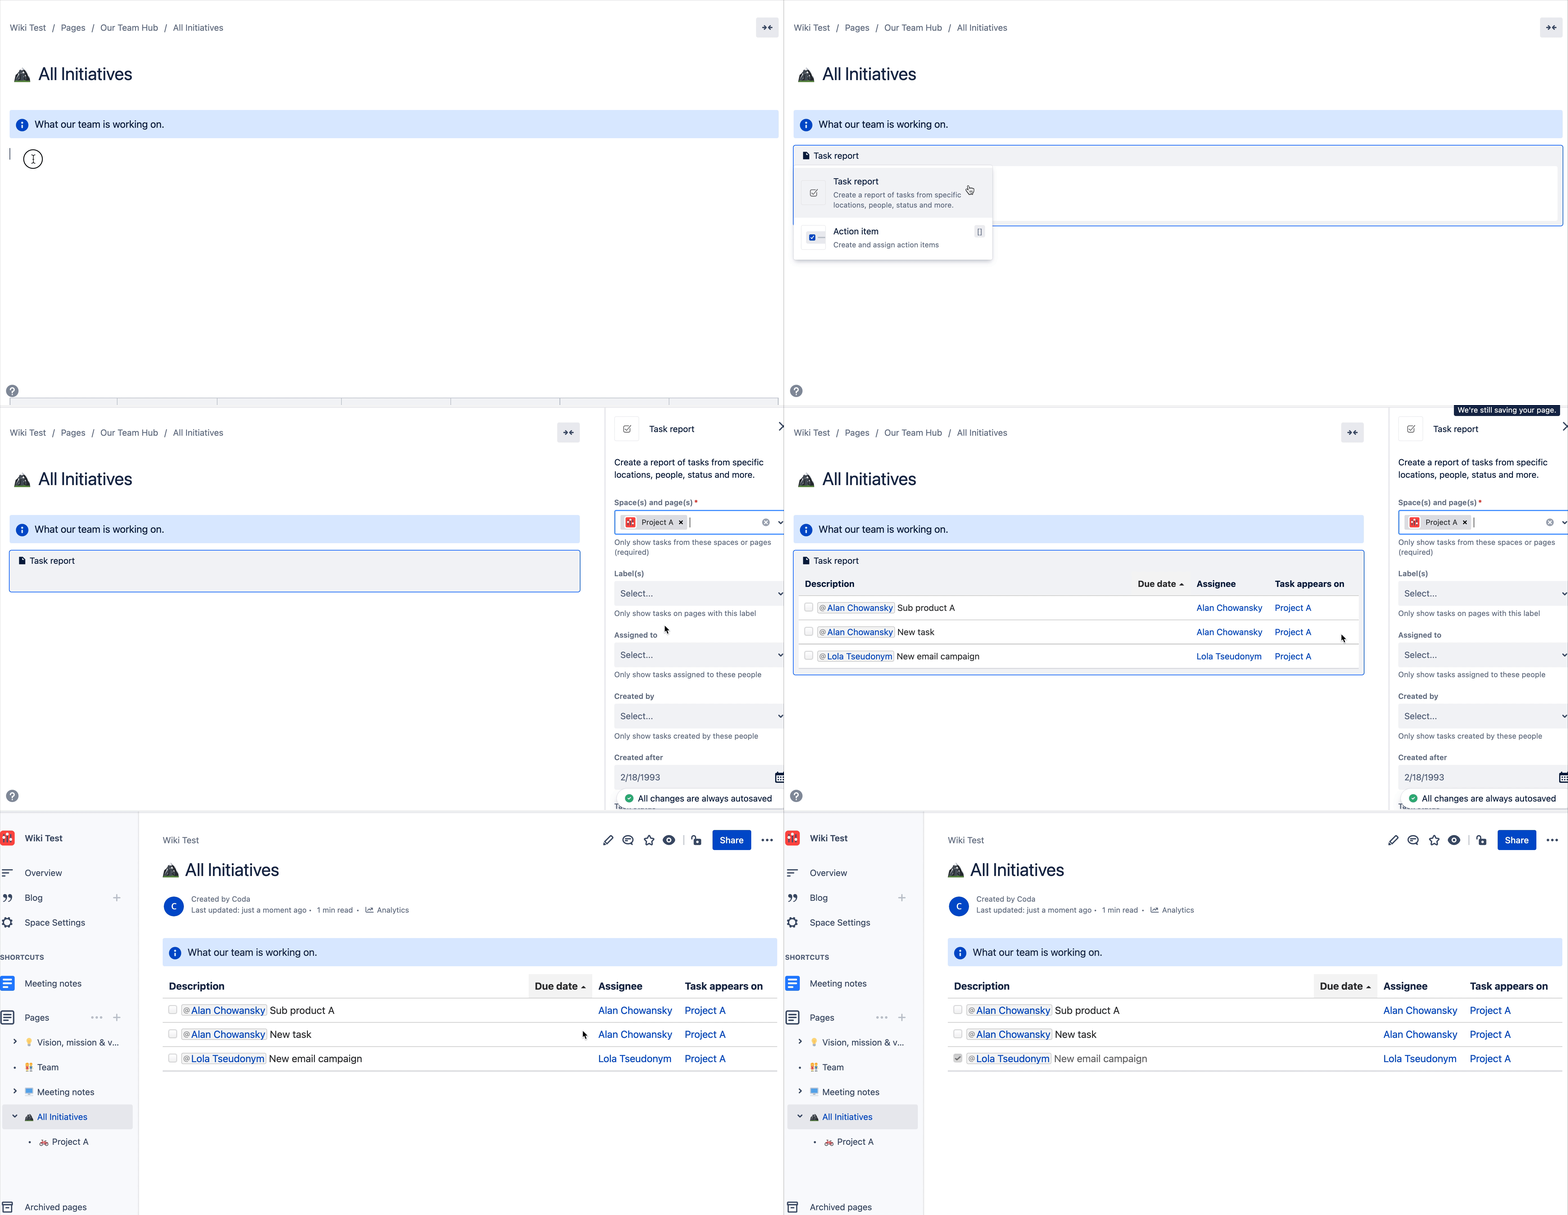
Now back on the “All Initiatives” parent page, I’m going to add the and select the “Project A” page the main page for Confluence to search for tasks. Now when I publish the “All Initiatives” page, it will show the three tasks I added to “Project A.” I didn’t add due dates to the tasks, but if I did those dates would show up in the Due date column:

If you wanted to add tasks from multiple projects, you would probably create a structure like this in your page list:


Each project page is a sub-page of the “All Projects” parent page. In each project page, you’ll have action items listed with owners and due dates, if applicable. So each page kind of acts like the home base for the project. The main reason you would organize your projects and tasks/initiatives/action items this way is so that the Task Report Macro can reference this “All Projects” page. The task report will now “pick up” all the tasks on each sub-page and aggregate them into a table:


The task report allows for some basic sorting and you can build out more pages that filter the task report to just a specific Assignee. It’s still a pretty bare bones initiative tracker and nowhere near as robust as Trello or Jira.
Speaking of Jira, you can add a Jira project as a shortcut in Confluence. This is helpful if you have a page in Confluence called “Project A” and you have a project in Jira with the same name that contains all the issues or tickets for that project. You can view by seeing Jira issues right in your team hub (if Jira happens to be the system your team uses for tracking tasks and initiatives). You just need to insert the into your page followed by a JQL query if you want to pull a specific set of issues from your Jira workspace:
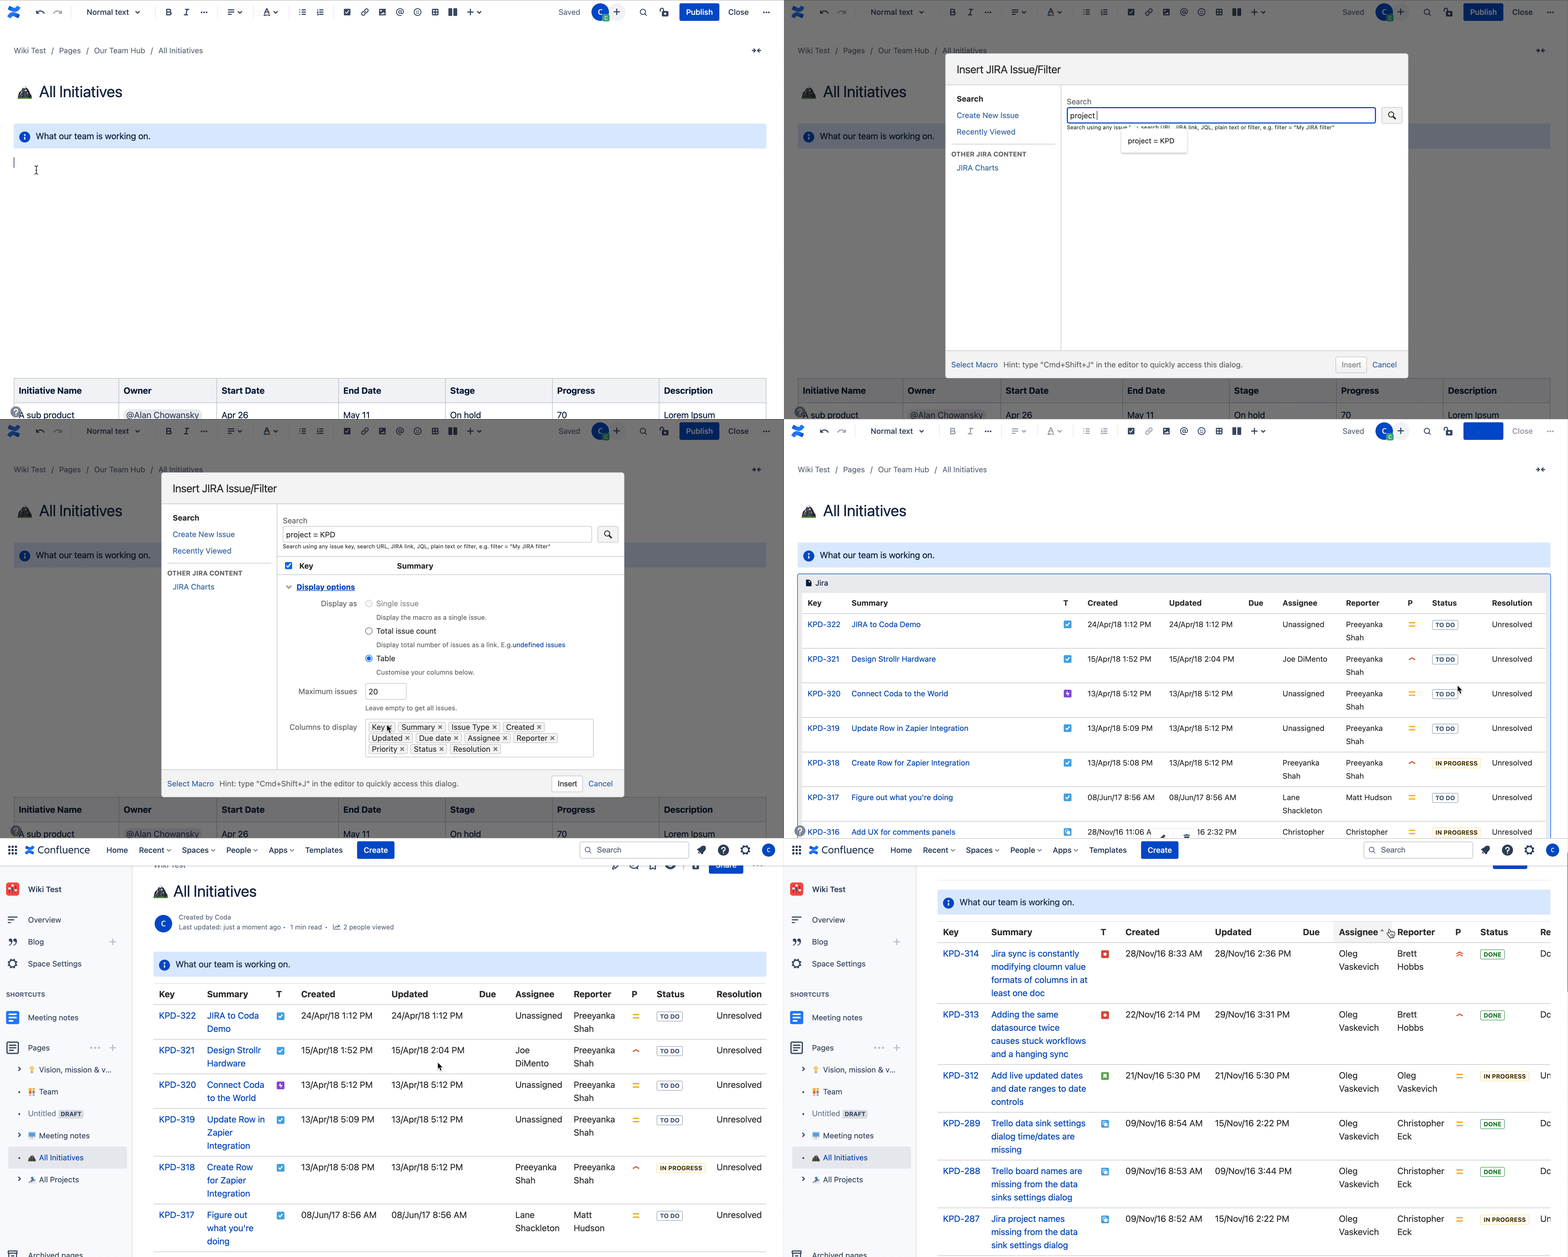

After inserting the macro, you have to put in a Jira link or JQL query to pull specific issues into your confluence page. I happen to have a Jira project called KPD so I enter the query project = KPD to get all the issues from that project into a list on my page. The nice thing about this Jira list is that you can click on the columns and the list sorts by that column (unlike regular tables in Confluence).
If you want to add custom columns to this initiative tracker in Jira, you have to do it in Jira. So it’s not as flexible as a regular table in Confluence, but at least it’s one step closer to doing initiative tracking right in Confluence (via Jira). One downside to having your initiative tracker in Jira is that your teammates in Confluence in Confluence. Your teammates would also need a license in Jira to see the issues in the Jira project. So managing the licenses and permissions between Confluence and Jira could be cumbersome as your team hub grows.
Coda
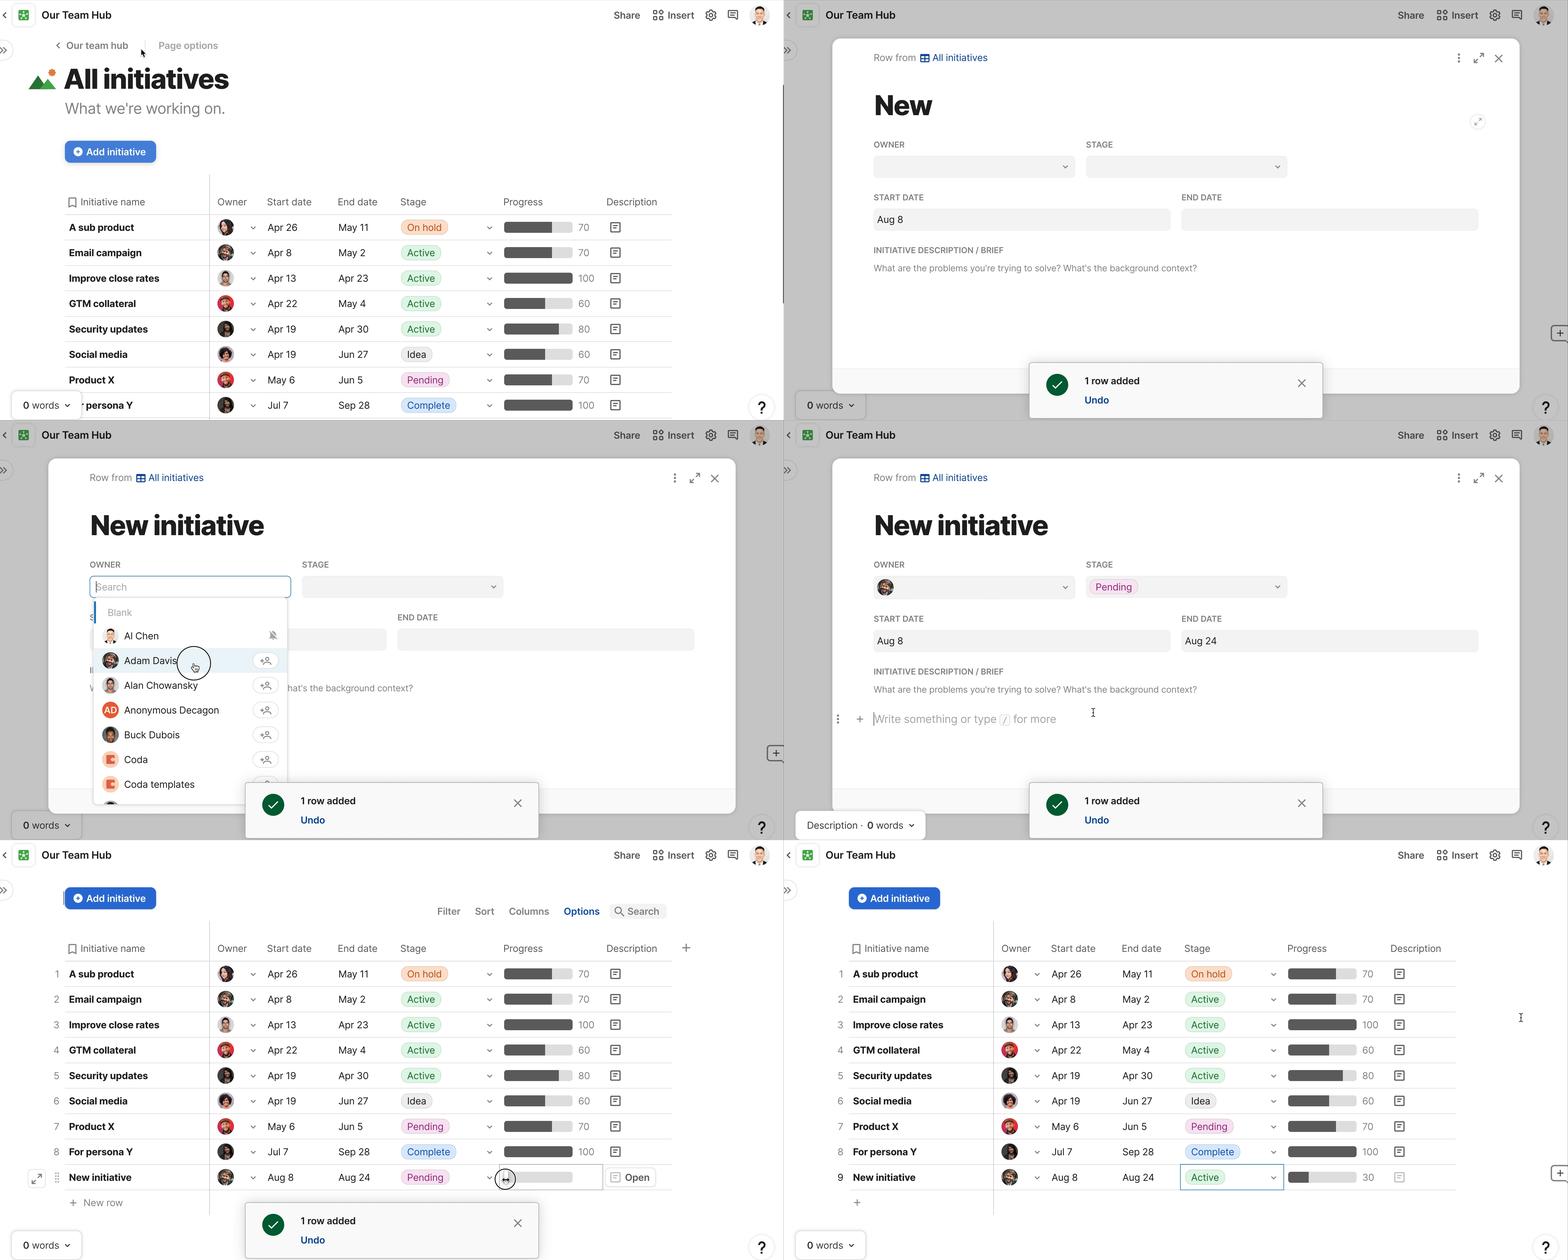
As you might expect, building an initiative tracker in Coda starts with a table. The table will look similar to the table we tried creating in Confluence, except we’ll have customer column formats that make the initiative tracker look and feel like a modern initiative tracker. We’ve seen before how tables in Coda can be sorted and filtered on any column.

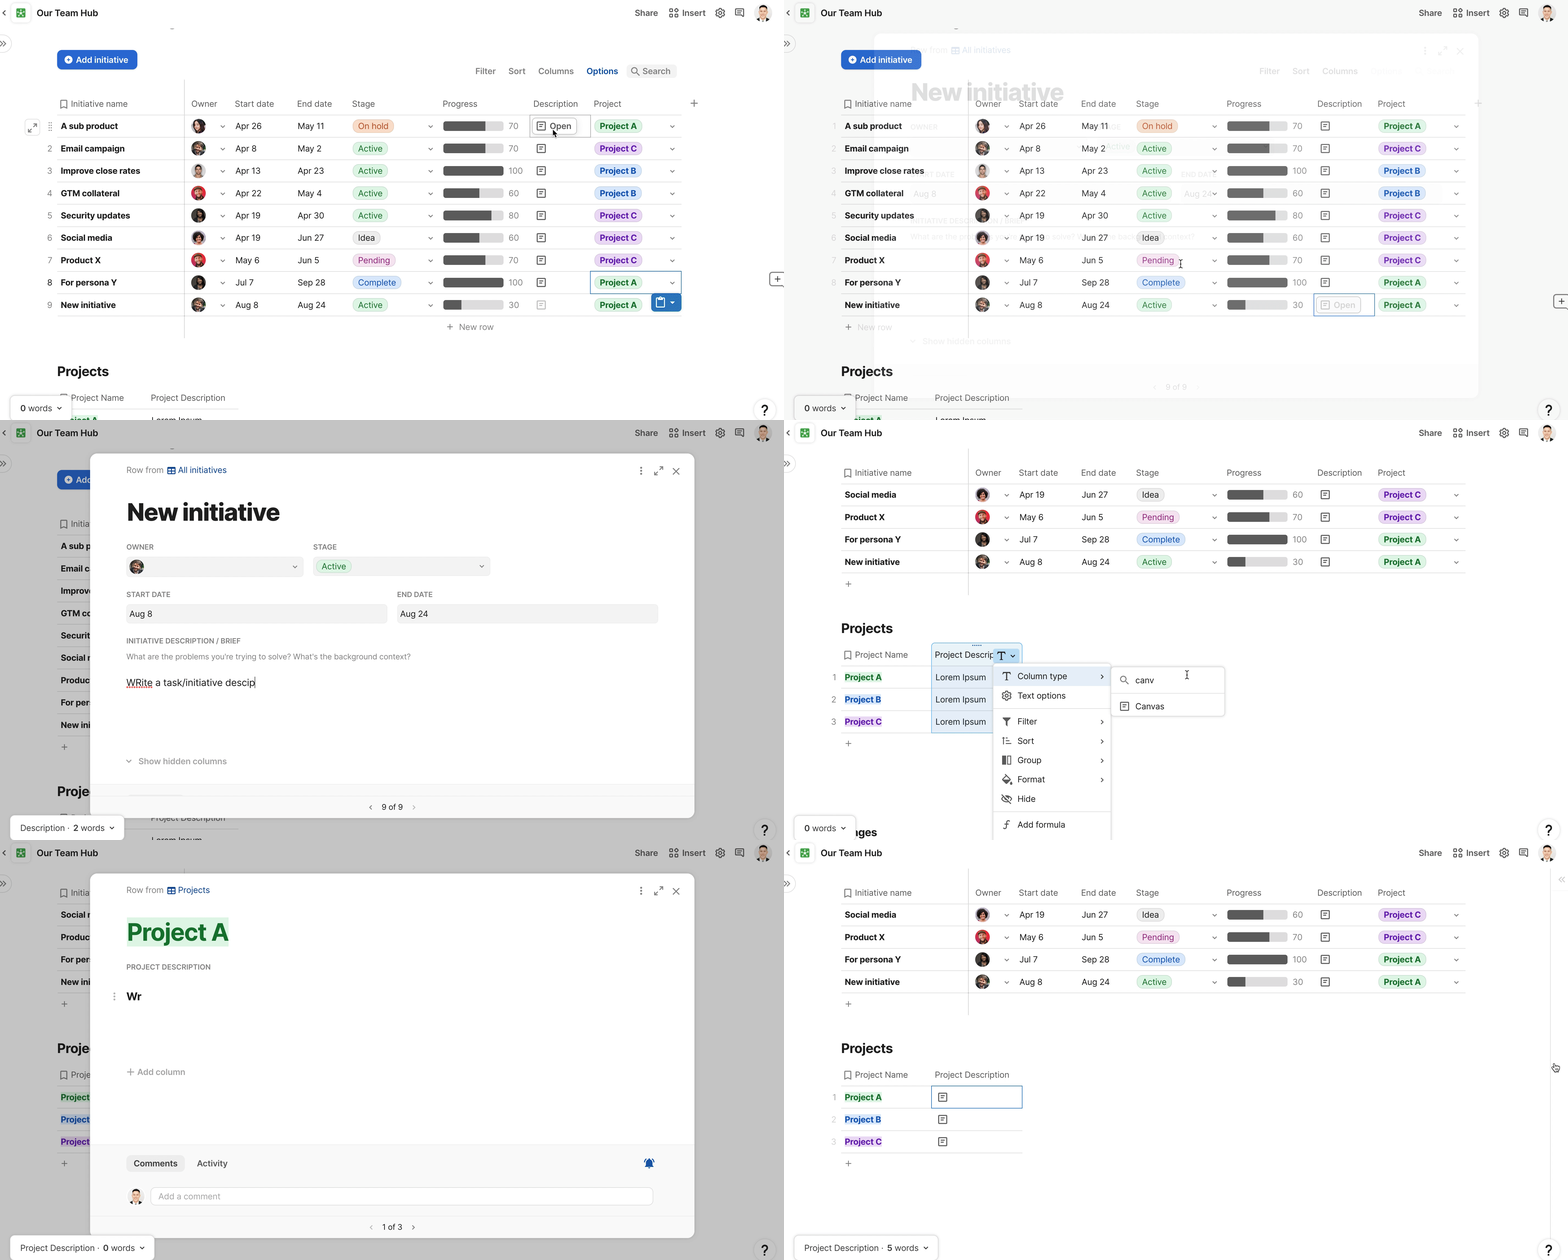
In Confluence, we created separate pages for each project and then had one unified “table” for tracking all of our initiatives. We can do something similar in Coda, but it won’t involve creating a bunch of new pages. We can just add a column to our main initiatives tracker table called Project. We will create a separate table called “Projects,” and the new Project column in our initiatives tracker will reference this “Projects” table. This is called a . We can now change the name of the project in the “Projects” table, and this will change the name of a project anywhere it’s referenced (including the Project column in our initiatives tracker table).

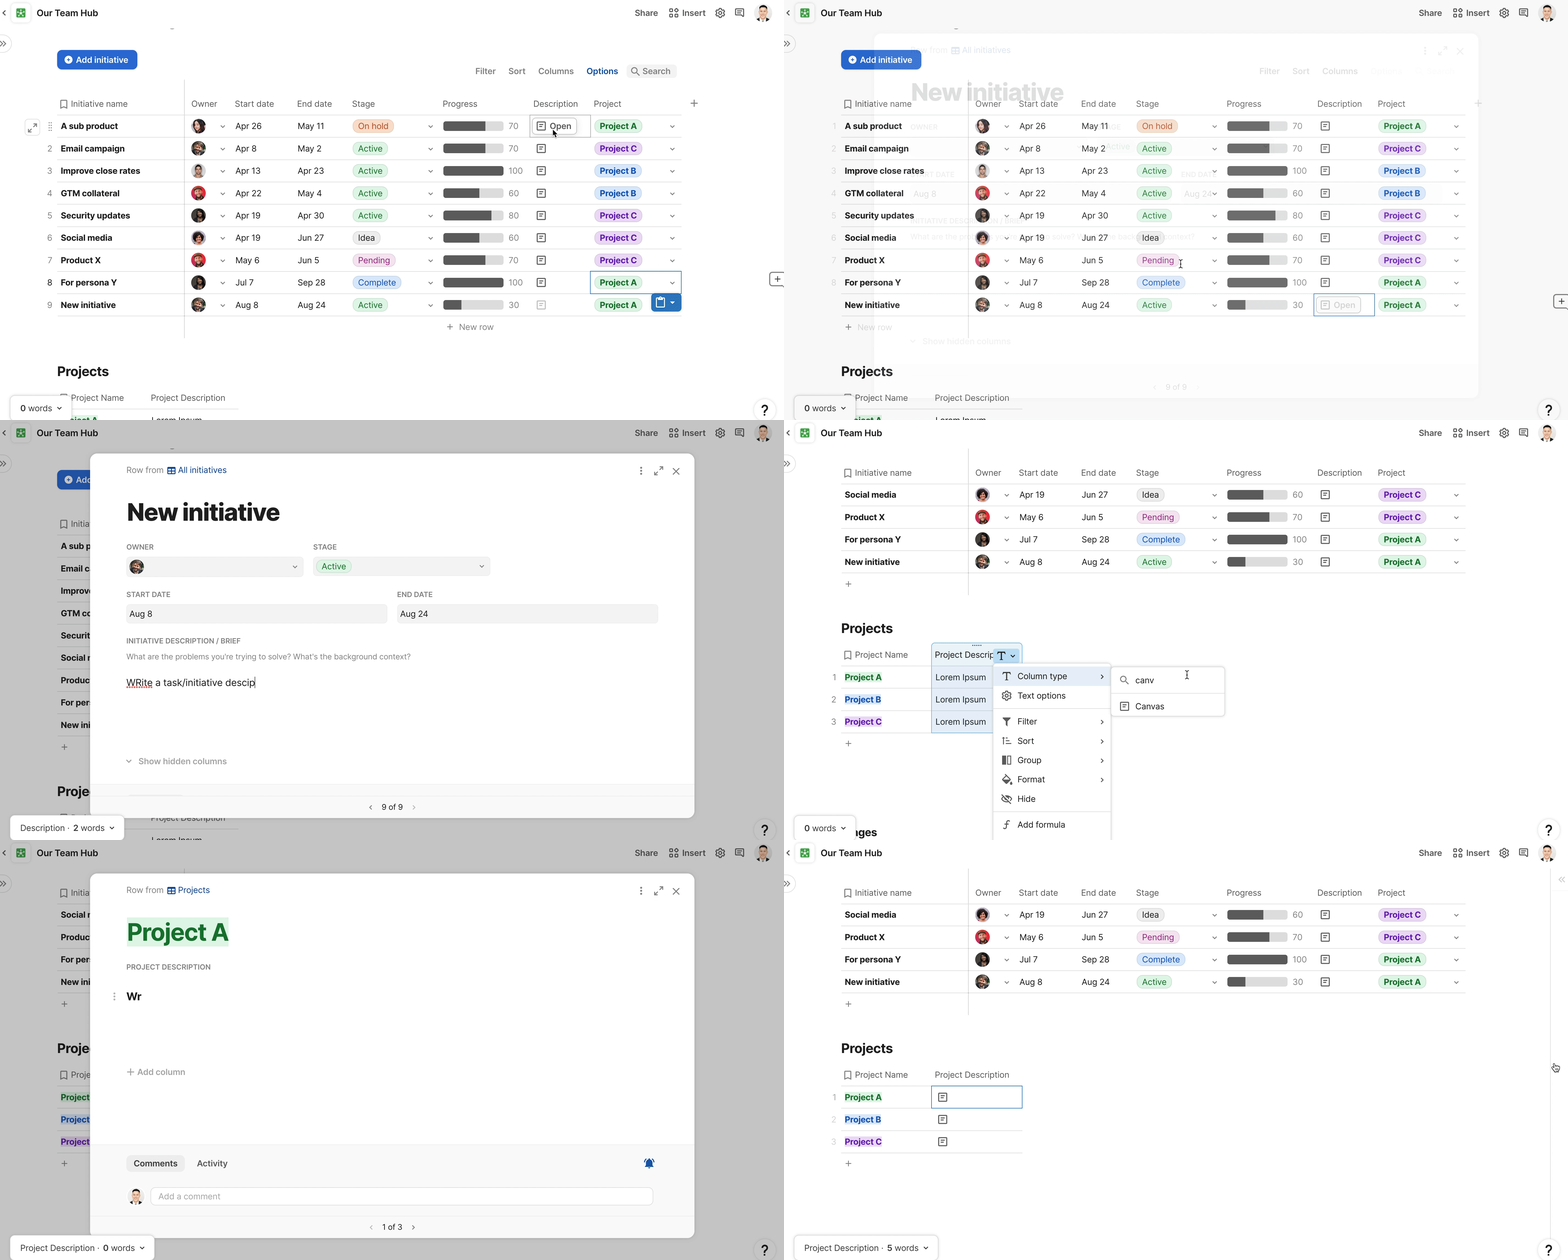
Instead of creating a separate page for the initiative writeup, we can use the Description column in our initiatives tracker to do the writeup. You can insert headers, images, embeds, and all the usual type of content you would put in a writeup. We can also change the Description column in the “Projects” table to be a as well. This prevents the need for having separate pages for the project writeup like we have in Confluence.

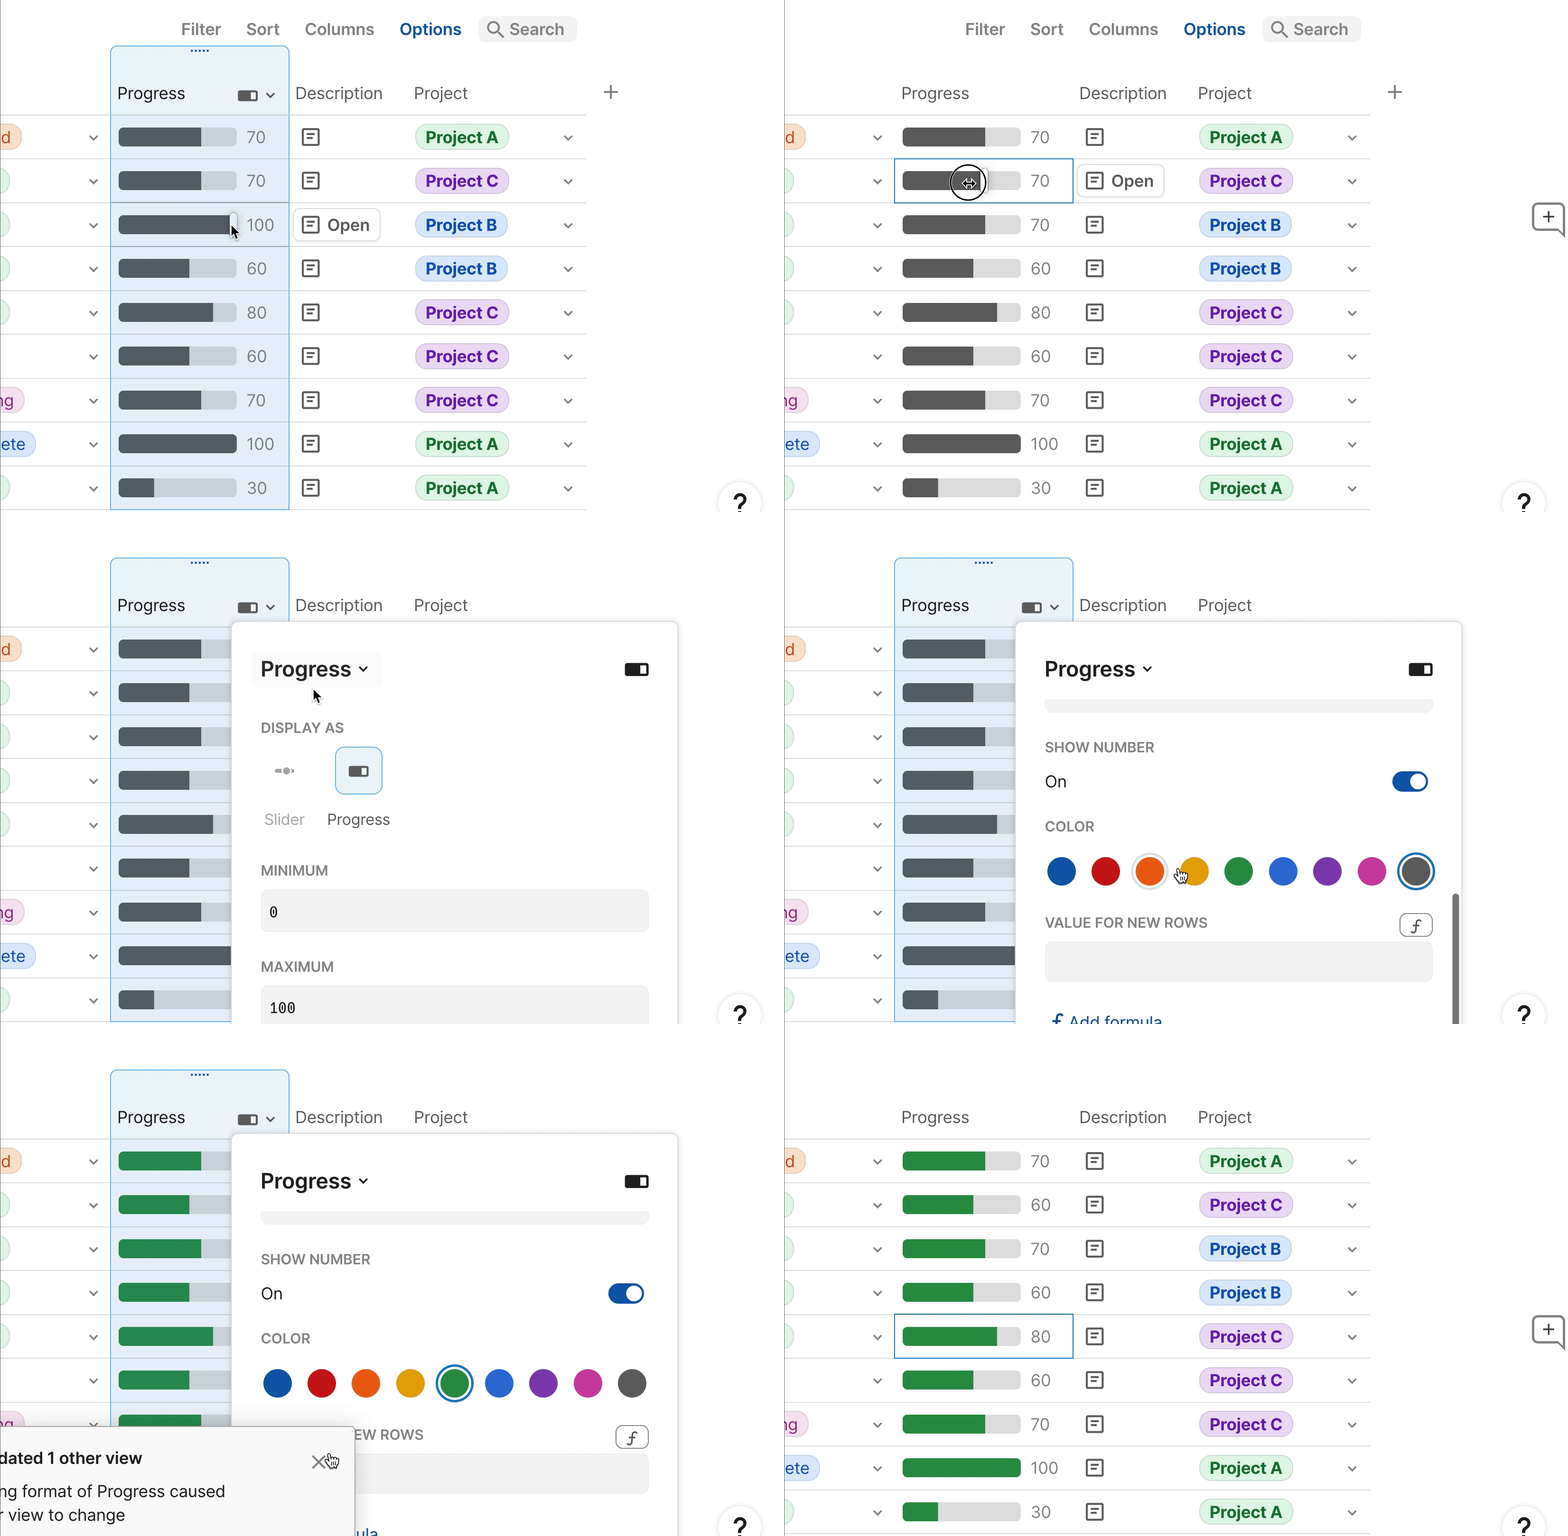
One last feature about the initiatives tracker table is that the Progress column is an interactive slider. To make your initiatives tracker in your team hub feel and act more like a task tracker, custom column formats can help make your tracker more engaging to your teammates. Even though this is a custom , there is still a numeric value behind the each row so that you can calculate formulas like what the average progress is across all your tasks. There are in Confluence but you can’t apply them to tables, and you’ll have to pay for these macros once your team gets to a cedtain size.

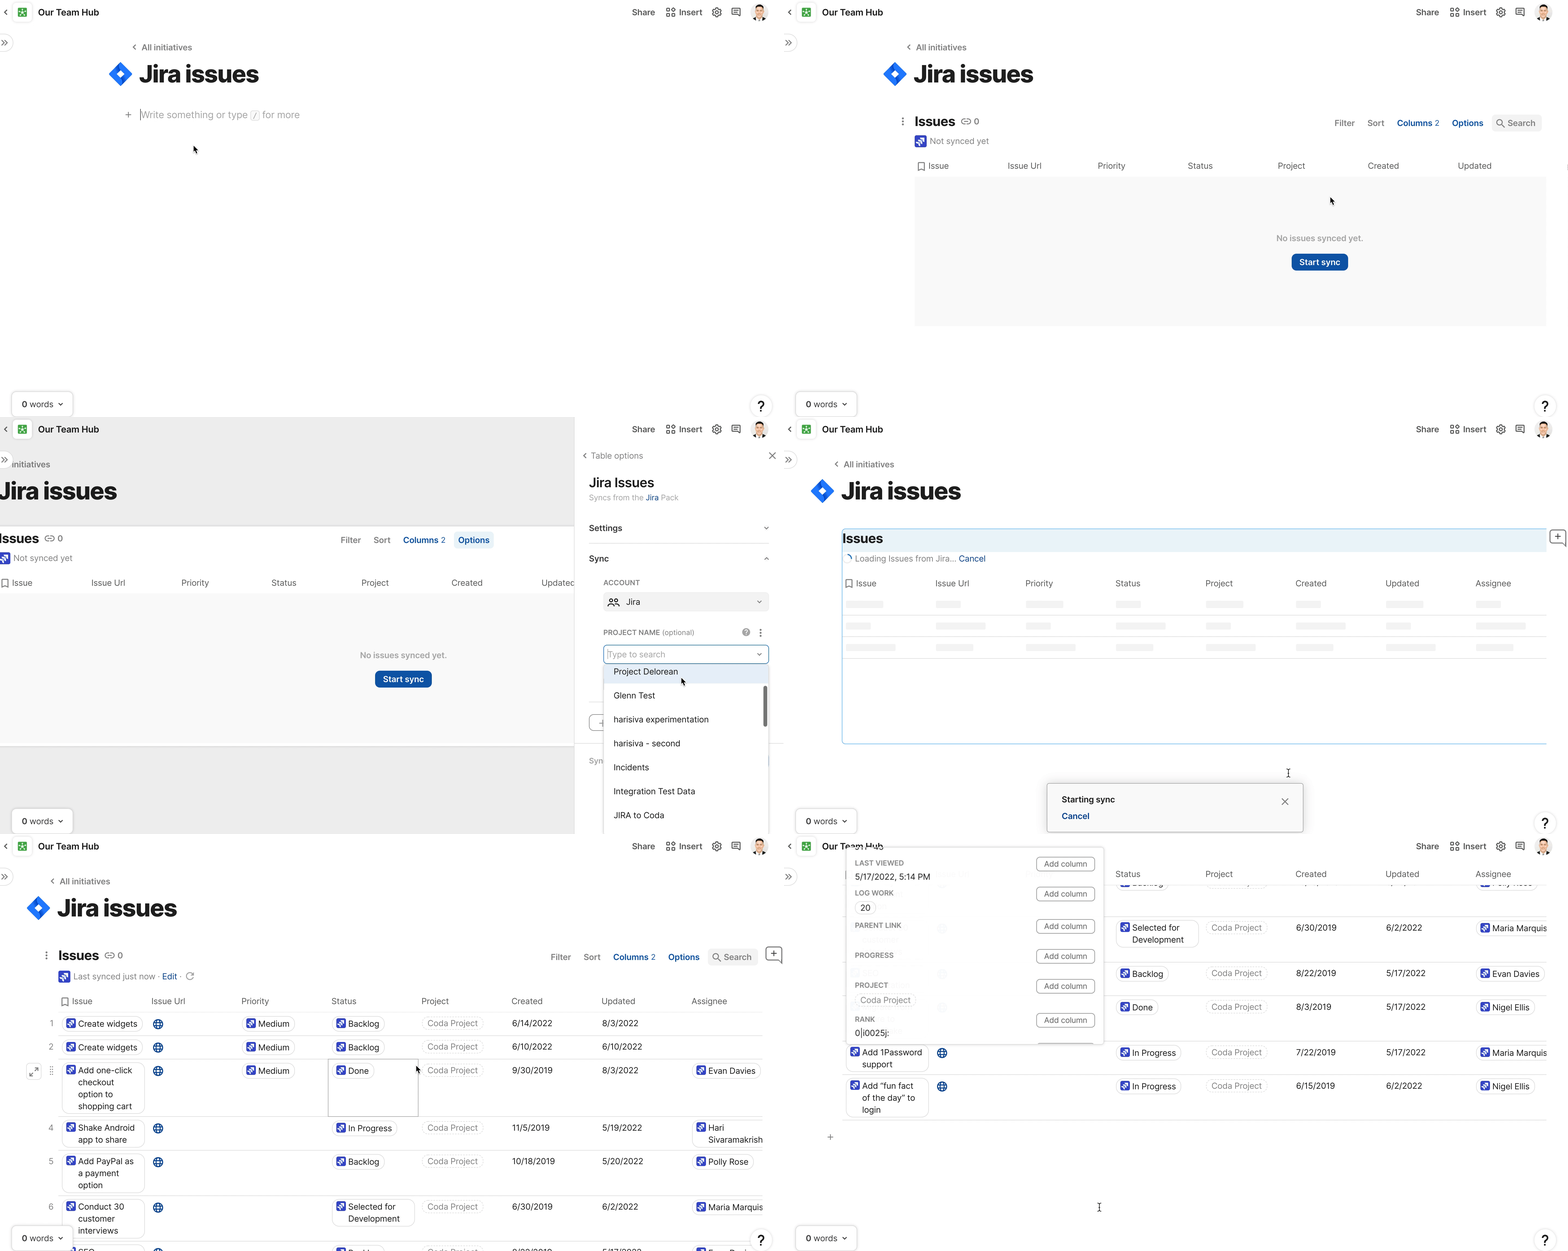
In the previous section, we showed how Jira issues can be displayed on a Confluence page. The only tricky thing is that you have to make sure your teammates all have the proper licenses to view the Jira issues once the Jira task report macro is published on a page. In Coda, you can add a Jira sync table to view all your project’s Jira issues in a table that you can sort and filter. The key difference: all your teammates don’t need to have a Jira license just to see the Jira issues. As long as one person with the proper permissions adds in the Jira table of issues, teammates can view, filter, and sort the issues as they please. Additionally, you can update issues right from the Jira sync table in Coda.

In Coda, the project writeup and initiative tracker are all in the same place (one Coda doc). This means you don’t have to change your workflows if you your team does track tracking in a different tool. Even if your team is using Jira for initiative tracking, you can still see your Jira issues right in Coda and take advantage of all the features of Coda’s tables that are not present in Confluence.
Calendar with important dates in Confluence and Coda
Confluence Pros
Confluence Cons
Coda Pros
Coda Cons
Watch a video tutorial on building this section in Confluence and Coda:
A team calendar inside your team hub gives your team a quick way to see what the key dates are for the team. This could be important meetings, people’s OOO or vacation, and upcoming product launches. Many teams typically use a shared Google or Outlook Calendar, but these calendar solutions mean you are using another tool to keep track of work for your team. Typically I’ll see people copying and pasting links to important docs and slides into their Google Calendar events to give others context about the meeting or event.
What if you can have a calendar in your team hub that is connected to the rest of your team hub? This means calendar events are tied to project write-ups, meeting notes, and more. If your team is still tied to Google Calendar or Outlook’s calendar, then you should at least be able to see those events inside Confluence and Coda (both are possible).
Confluence
The requires Confluence Premium, so I wasn’t able to add a team calendar to my team hub in Confluence Cloud. According to Confluence’s , there used to be a team calendar plugin that wasn’t officially supported by Atlassian (and it might’ve been free). There are some workarounds for and 3rd party plugins for , but none of them are officially supported by Atlassian and may require your team to pay to use the feature.


Team Calendars in Confluence let you create personal and team events. This means your teammates can add their individual OOO and vacation schedules, but the team lead can also add important events that the entire team should know about.
One of the benefits of the Team Calendar in Confluence is that you can link a calendar event to a page, space, and even custom date fields in Jira. The only issue is that your team has to have Confluence Premium to use this feature in the first place. Subscribing to a Google Calendar also requires Confluence Premium if your team is tied to Google Calendar for sharing team events.
Coda
A team calendar start with—you guessed it—a table. Let’s assume our team hub won’t be connecting with Google Calendar for now and we want to build our team calendar natively in Coda. Our teammates should be able to add events of any type. OOO/vacation, important meetings, and other events. If there are other event types that we want to give our teammates the ability to add, that customization should be available too. Here is our basic table of events in Coda:


The Start and End columns have date column formats, and the Duration (auto) column is a formula that automatically calculates the difference between the two dates. The Event Type column is a lookup column to this “Event Types” table.


Now if our teammates want to add additional event types, they can add it to this “Event Types” table. Then those new event types will show up in the main table with all our calendar events in the Event Type column. This is similar to what we did with the Project column in the previous section where we added this column to the initiatives table.
The key feature about Coda tables is that they can be laid out in different ways. There is a in Coda which requires your table to have a start and end date. Let’s see what the calendar layout looks like based on our simple table of calendar events:
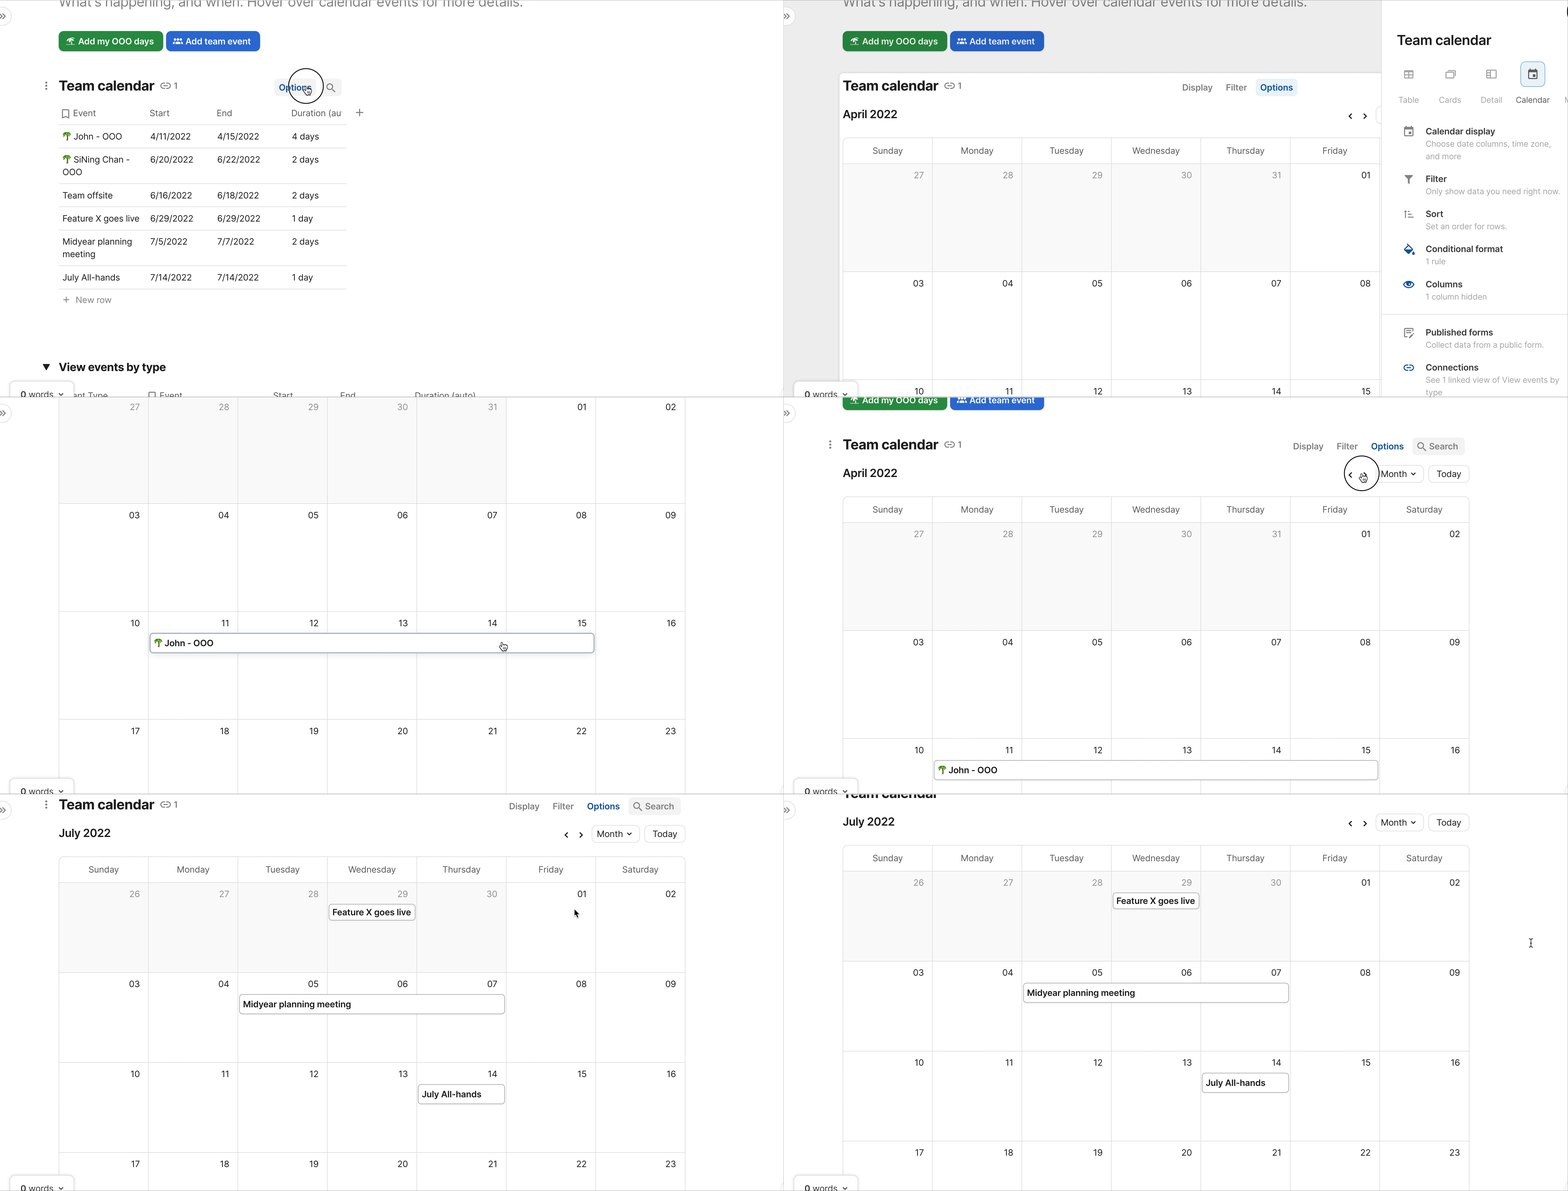

When you click on a specific event, all the columns you filled out in the original table show up in the pop up. You can hide certain columns from this pop up if you’d like. To make this calendar more engaging for your teammates who visit the team hub, these two buttons at the top of the calendar make it easy for anyone to add their OOO days or team events:
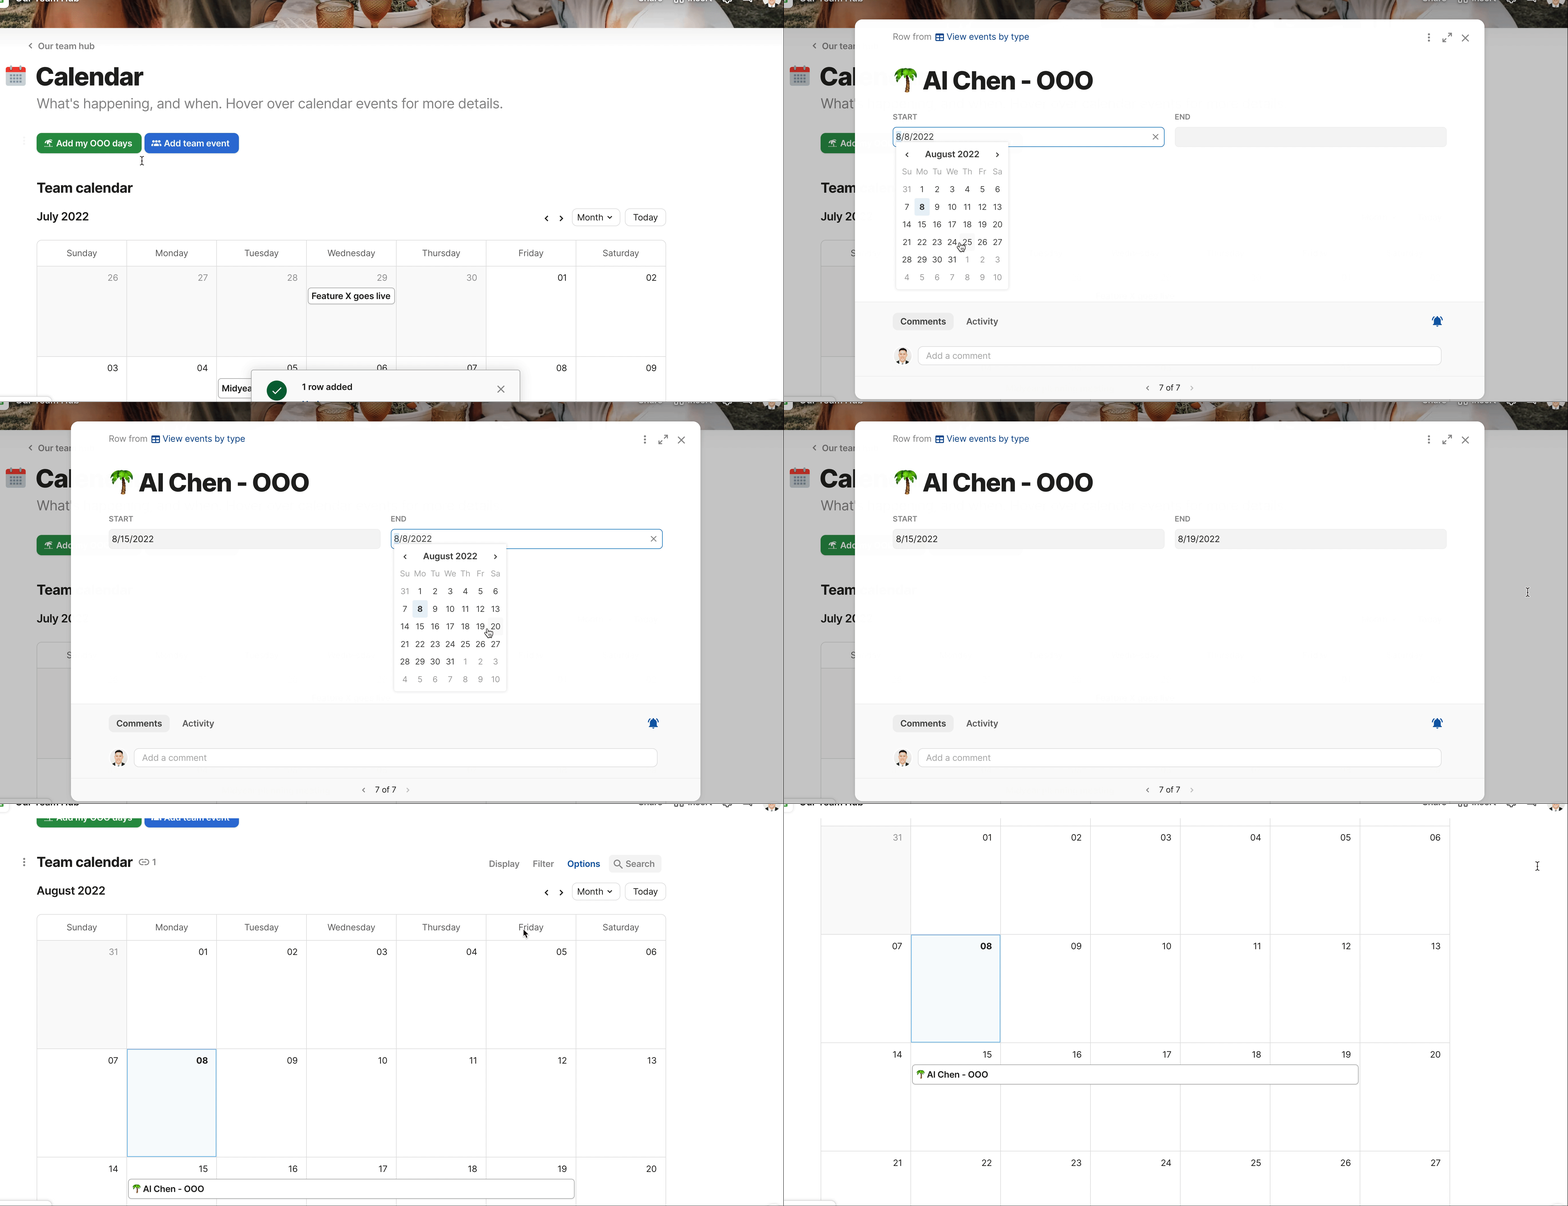

One final feature we can add to our team calendar is an automation that posts new added calendar events to our team’s Slack channel. This way, we get real-time updates on when new meetings and new OOO days are added to the team calendar. are like mini robots that will do stuff for you in Coda based on certain conditions. In this case, the condition is any new rows added to our Team Events table will trigger the Coda automation to send a Slack message.


You can customize what message actually shows up in your Slack channel, but I just put the text of the Event column as teh Slack message:


The key takeaway from consolidating your team calendar in Coda alongside your project briefs, initiative tracker, and other team resources is that everything is connected. Team events contain project-specific or initiative-specific dates since your initiative tracker is in the same team hub. Project write-ups are connected to the calendar so people not familiar with the project can get context about the upcoming meeting or event.
Creating the “homepage” in Confluence and Coda
Confluence Pros
Confluence Cons
Coda Pros
Coda Cons
Watch a video tutorial on building this section in Confluence and Coda:
Now that all the major sections of our team hub are completed, we should create a “homepage” for our team hub. This homepage is the first thing our teammates will see and should be engaging and well designed. This page is also the page that new hires will most likely go to as they look to learn more about your team and your team’s projects. Some common elements you might include on this homepage in your team hub:
Another common element to include on the homepage is a table of contents. Depending on how many pages and sub-pages your team hub has, you might omit the table of contents from this homepage to avoid cluttering the homepage. In both Confluence and Coda, the left sidebar can act as a good table of contents to help navigate around the team hub.
Confluence
The first thing we’ll add to our homepage in Confluence are columns that split out our team’s Announcements and Quicklinks. In Confluence, there’s a dedicated “Overview” page in the left sidebar that’s meant to act as the homepage for your team hub:


To get these columns to show up, you have to be in edit mode on the “Overview” page and start typing /layout in the page and you’ll see different options to layout your content. I’m just going with a basic 2-column layout where the 1st column is a bit wider than the 2nd column:

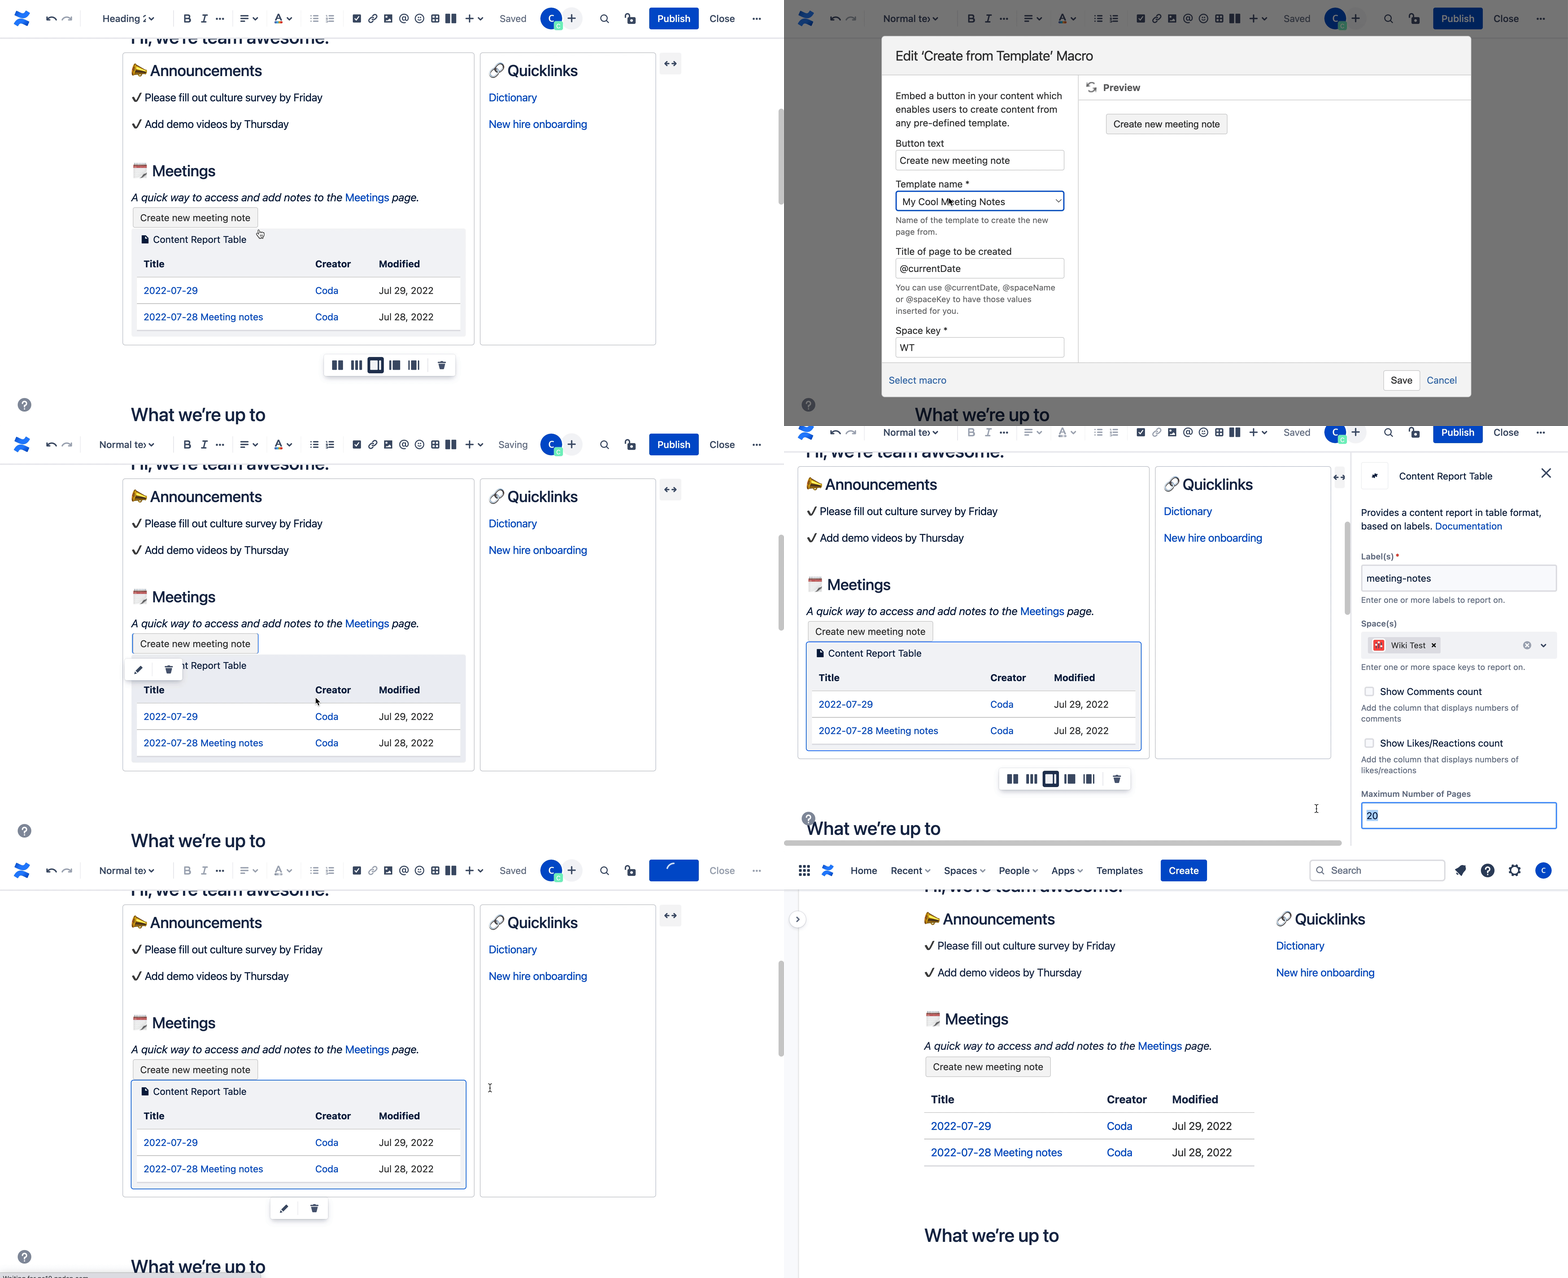
So we’ve added some Announcements and Quicklinks, now let’s add a summary of our meeting notes. When people come to your team hub, they probably want to read meeting notes and see what decisions were made during those meetings. We essentially want to add something similar to what we added in the previous section of this tutorial where created a Meeting Log section. In edit mode, we have a as well as a . The Create from Template macro button goes to the “My Cool Meeting notes” space template we created earlier in this post. The Content Report Table macro only looks at pages with the label meeting-notes to aggregate our meeting notes into a table:

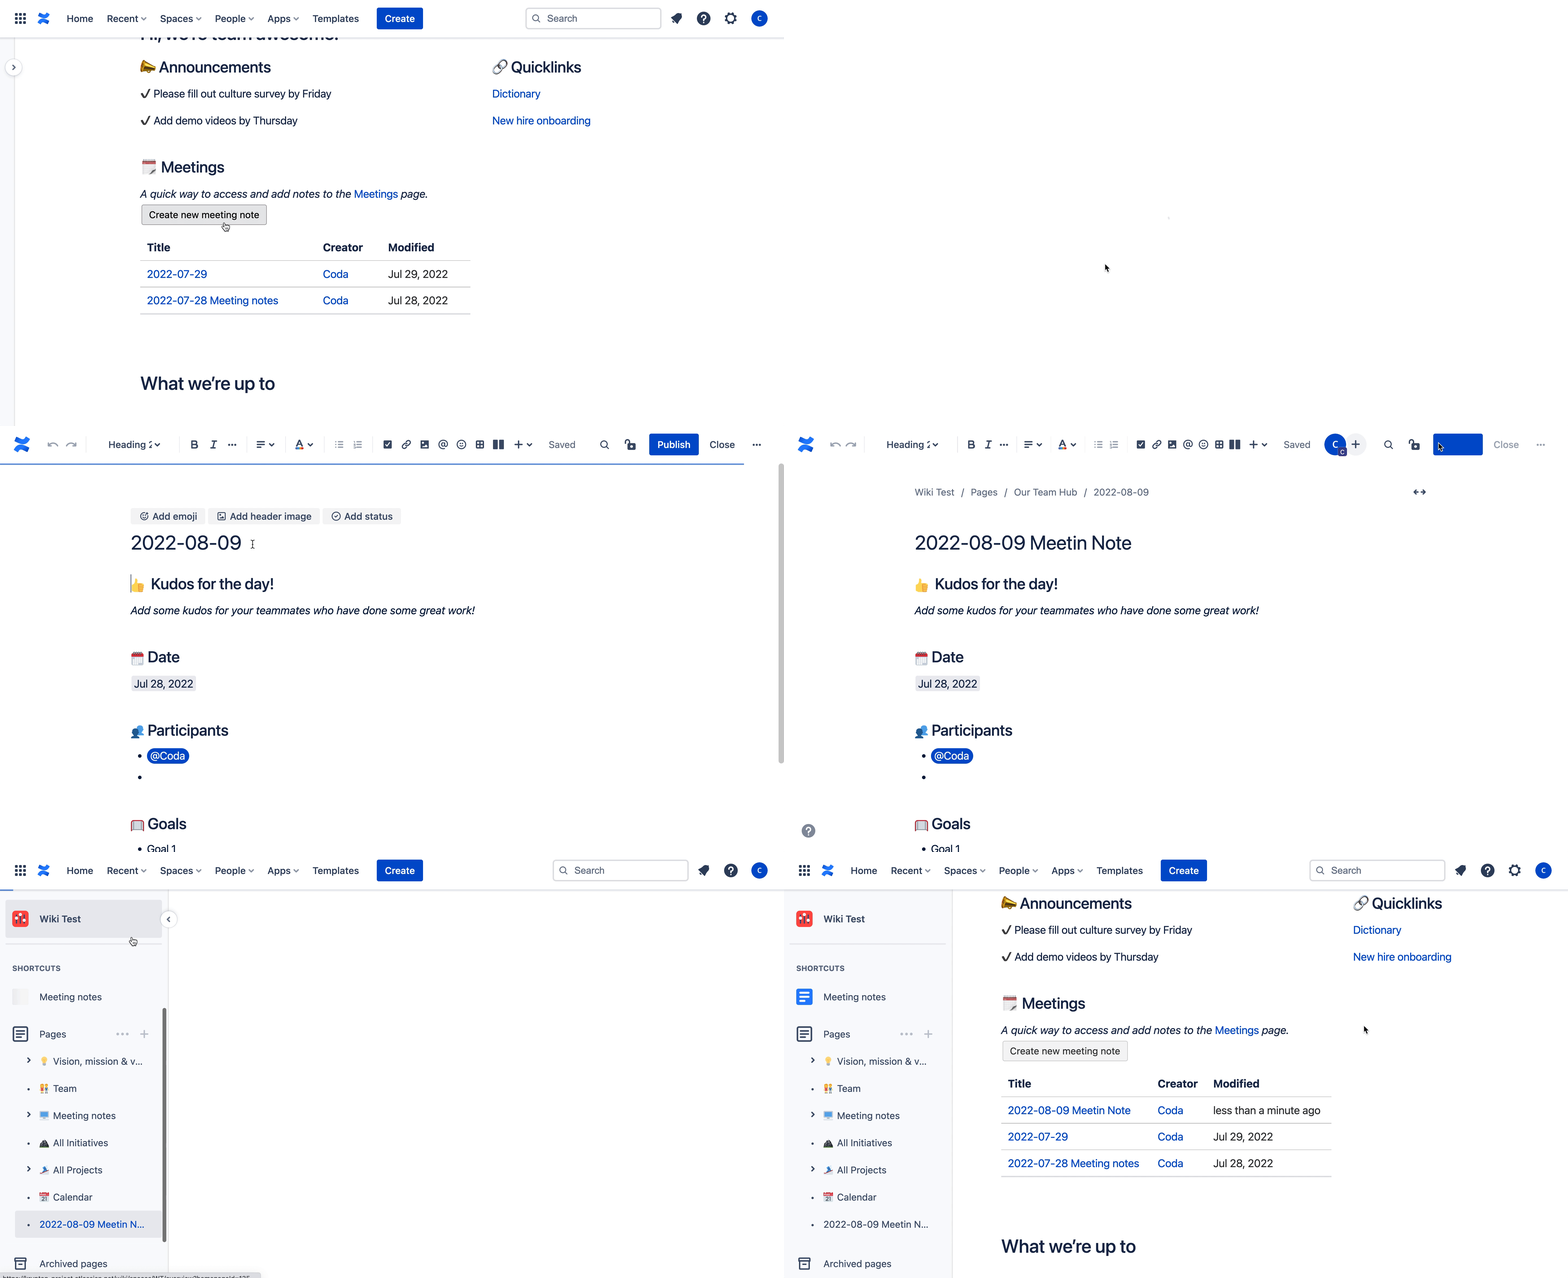
Now if I want to create a new meeting note from the homepage, I can just click on the Create new meeting note “button” to add a page with a meeting-note label. This meeting note has my “My Cool Meeting notes” template which I set up earlier:

The final section we want to add to our homepage is a chart that shows how our team is progressing on its projects. The easiest way to do this natively in Confluence is by creating a table with the percentages that represent how many tasks are in each project status. For instance, this table below on our homepage is the underlying data for the pie chart above it:


This is not a scalable solution since you’ll have to edit the Percentage column manually each time a task or initiatives changes status. Currently it’s not possible to create a summary . There are add-ons like the the , but you’ll have to pay for this add-on depending on your team size.
Coda
Similar to Confluence, you can layout your content with columns and re-size the columns as you wish:

The meeting notes log is actually just another view of the original Meetings page we created earlier in this tutorial. Notice how the main table has multiple “child” views connected to it. This means that anytime one of these views (or the main table) is updated, the data is updated in all the other locations:


Unlike Confluence, we can filter this table to show only the meeting notes for a certain date range, for instance. We can bring up the meeting note by just clicking the icon in the Notes column. This shows us a pop-up with the meeting note versus taking us to a separate page in our team hub:
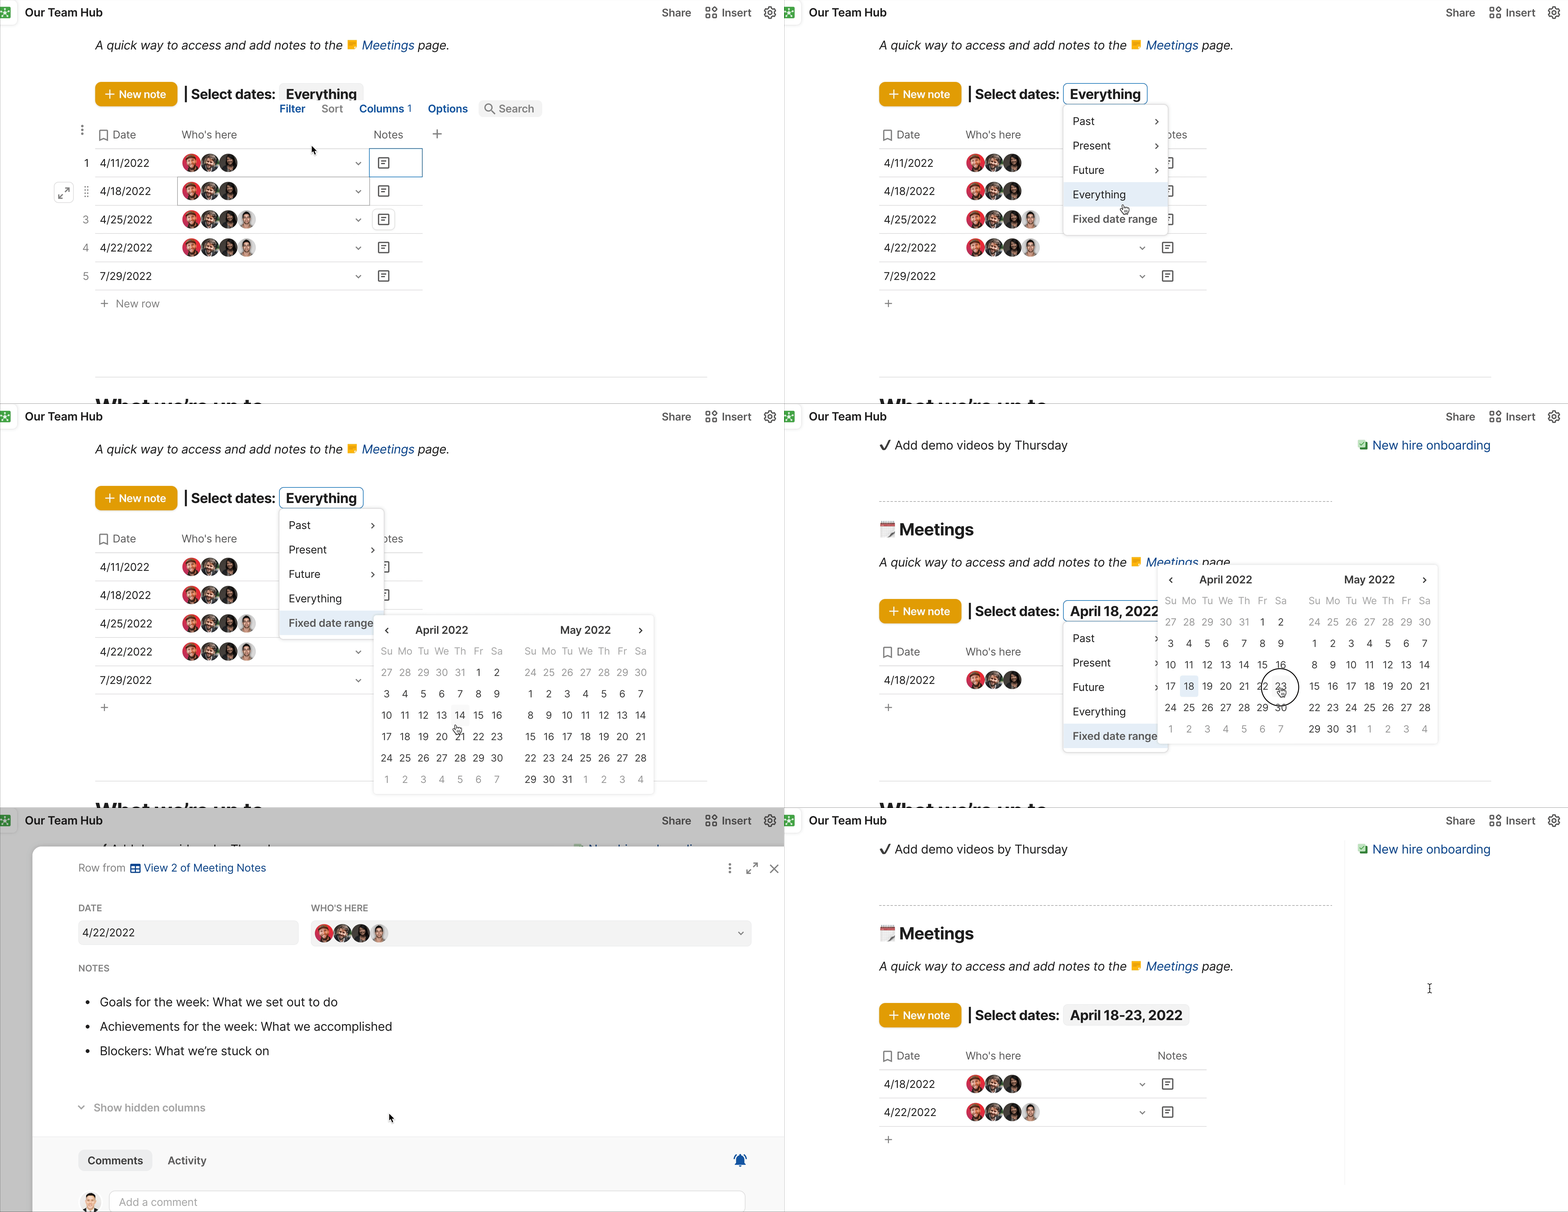

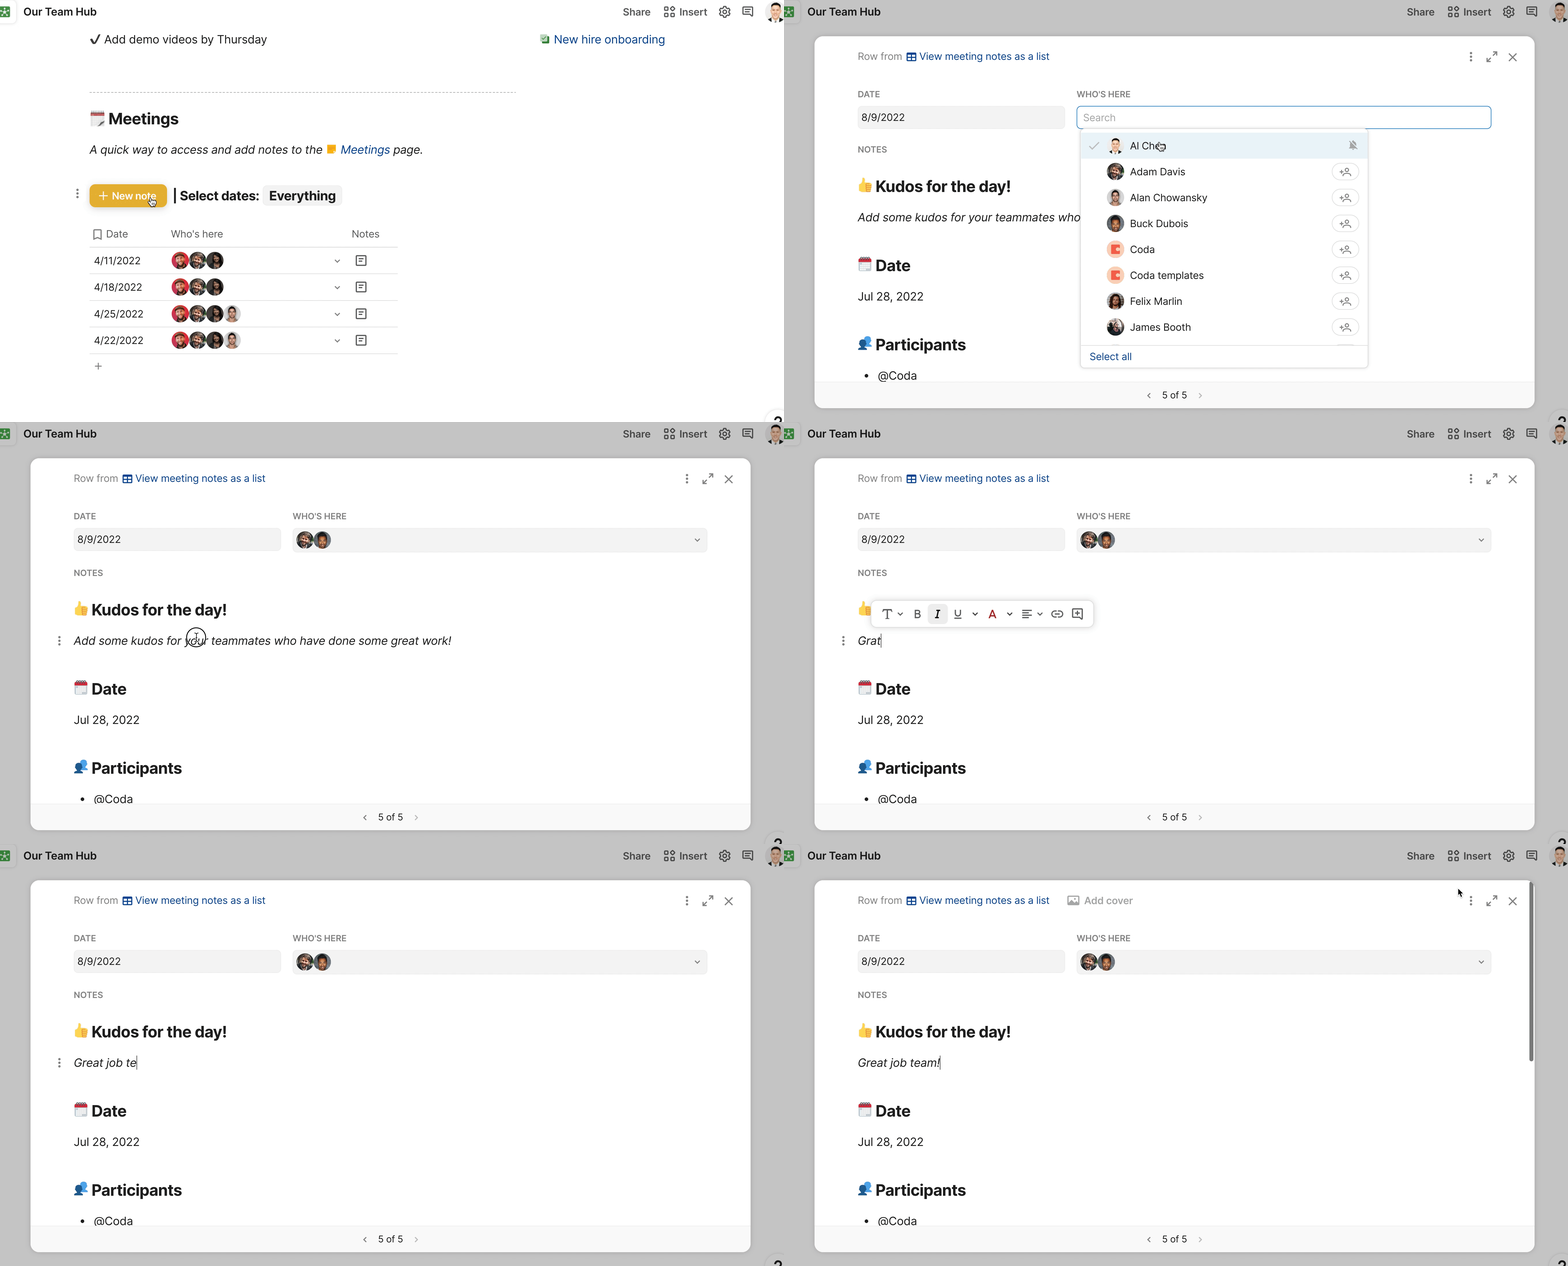
Finally, the New note button simply launches a pop-up where we can fill in all the relevant details about our meeting. This is a quick way to start taking meeting notes when you have the homepage open and the meeting is about to start. The fields in the pop-up are simply the columns in our main meeting notes table:

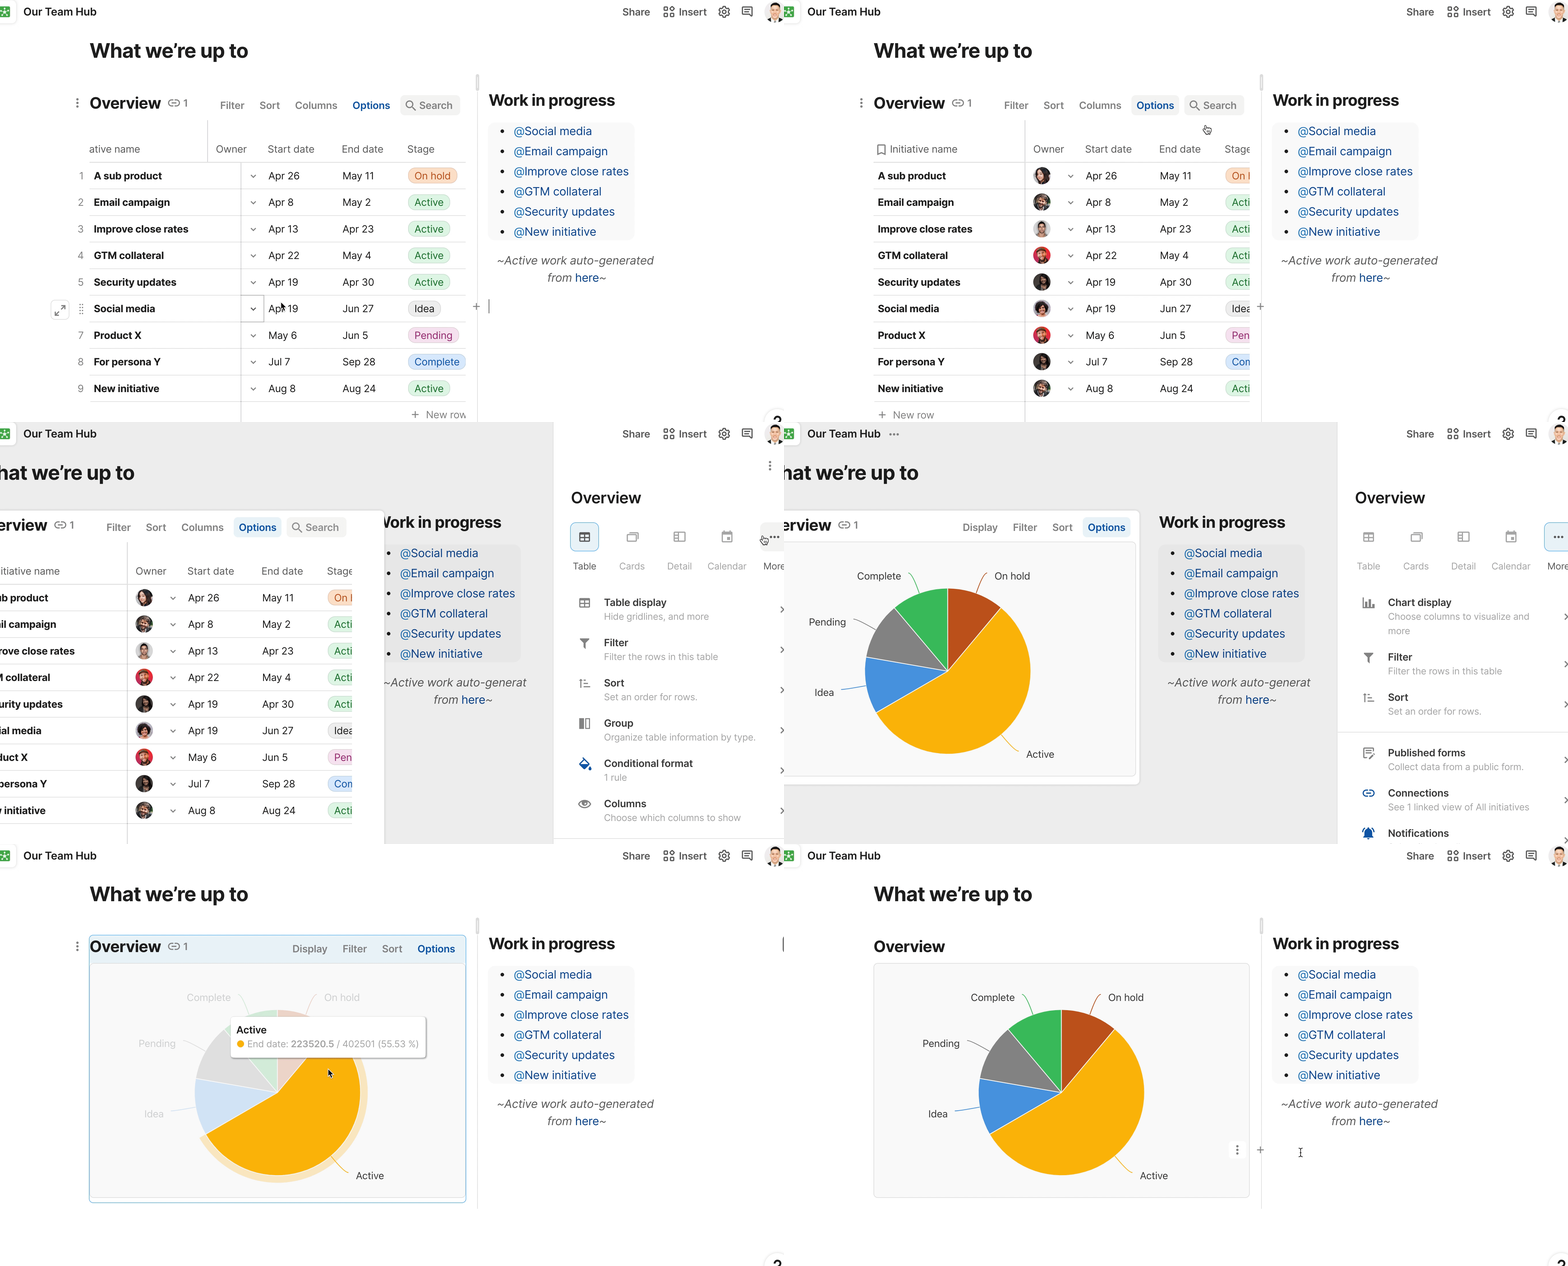
For tracking progress on projects, we build a chart off of our main initiative tracker. This is using the same initiative tracker we built earlier in this tutorial. The pie chart is just another layout or view we can build off of our main initiative tracker. We simply change the layout of the table, and the pie chart appears. The best part is that as our team updates their tasks and initiatives in the initiative tracker page, this pie chart automatically updates. No extra add-ons or macros required:

The key takeaway: the homepage should be connected to the rest of your team hub so that you don’t have to manually update it. Certain parts like the Announcements or Quicklinks might get updated every so often. But for things like Meetings Notes and the Project Overview sections, those should stay up to date as meeting notes are being written and project initiatives are being updated, respectively.
Other Resources
Want to print your doc?
This is not the way.
This is not the way.

Try clicking the ⋯ next to your doc name or using a keyboard shortcut (
CtrlP
) instead.