Skip to content
Create a new & secondary conversion on Google Ads, and set it up as an enhanced conversion.Follow the results for a couple of weeks and compare your existing conversion with the new one.Decide if you're happy with the stats to continue using Enhanced conversions as a Primary one.
Choose the SECONDARY in the actions. Use Google Tag & Edit code settings.
"gads_aw_id": In the first section, add your conversion ID right after "AW-". "AW-" must stay there, so ONLY change the numbers. If your conversion ID is 123456789, the final result will be AW-123456789."gads_send_to": Your conversion ID is right after the slash."product_id": is the same product ID format used on your Google feed. Go to the Product ID section below for more information."merchant_id": It is the ID of your Google Merchant account.feed_country & feed_language fields are self-explanatory.
Your merchant ID,Product feed country code and language.
 Chapter 2: Set up Google Ads Enhanced Conversions on Shopify
Chapter 2: Set up Google Ads Enhanced Conversions on Shopify
Google Ads Enhanced Conversions are much like the Facebook Conversion API. It allows you to share more data about your conversions with Google Ads. As a result, your tracking works infinitely better.
We'll show you how to set up Enhanced Conversions on Shopify as a secondary conversion. Discover these pages to learn more:
What we'll do next:
Let's kick it off.
Step 1: Create a new enhanced conversion in Google Ads.
The least risky version of creating a conversion. The slides below will show you to create a new conversion in Google Ads and connect it with your Shopify store - with enhanced features.
Keep these in mind:
Step 2: Copy the conversion ID & label.
Use slide #10 to get your Conversion ID & label. Alternatively, you can also head to conversion settings and find the conversion ID in the event snippet code:
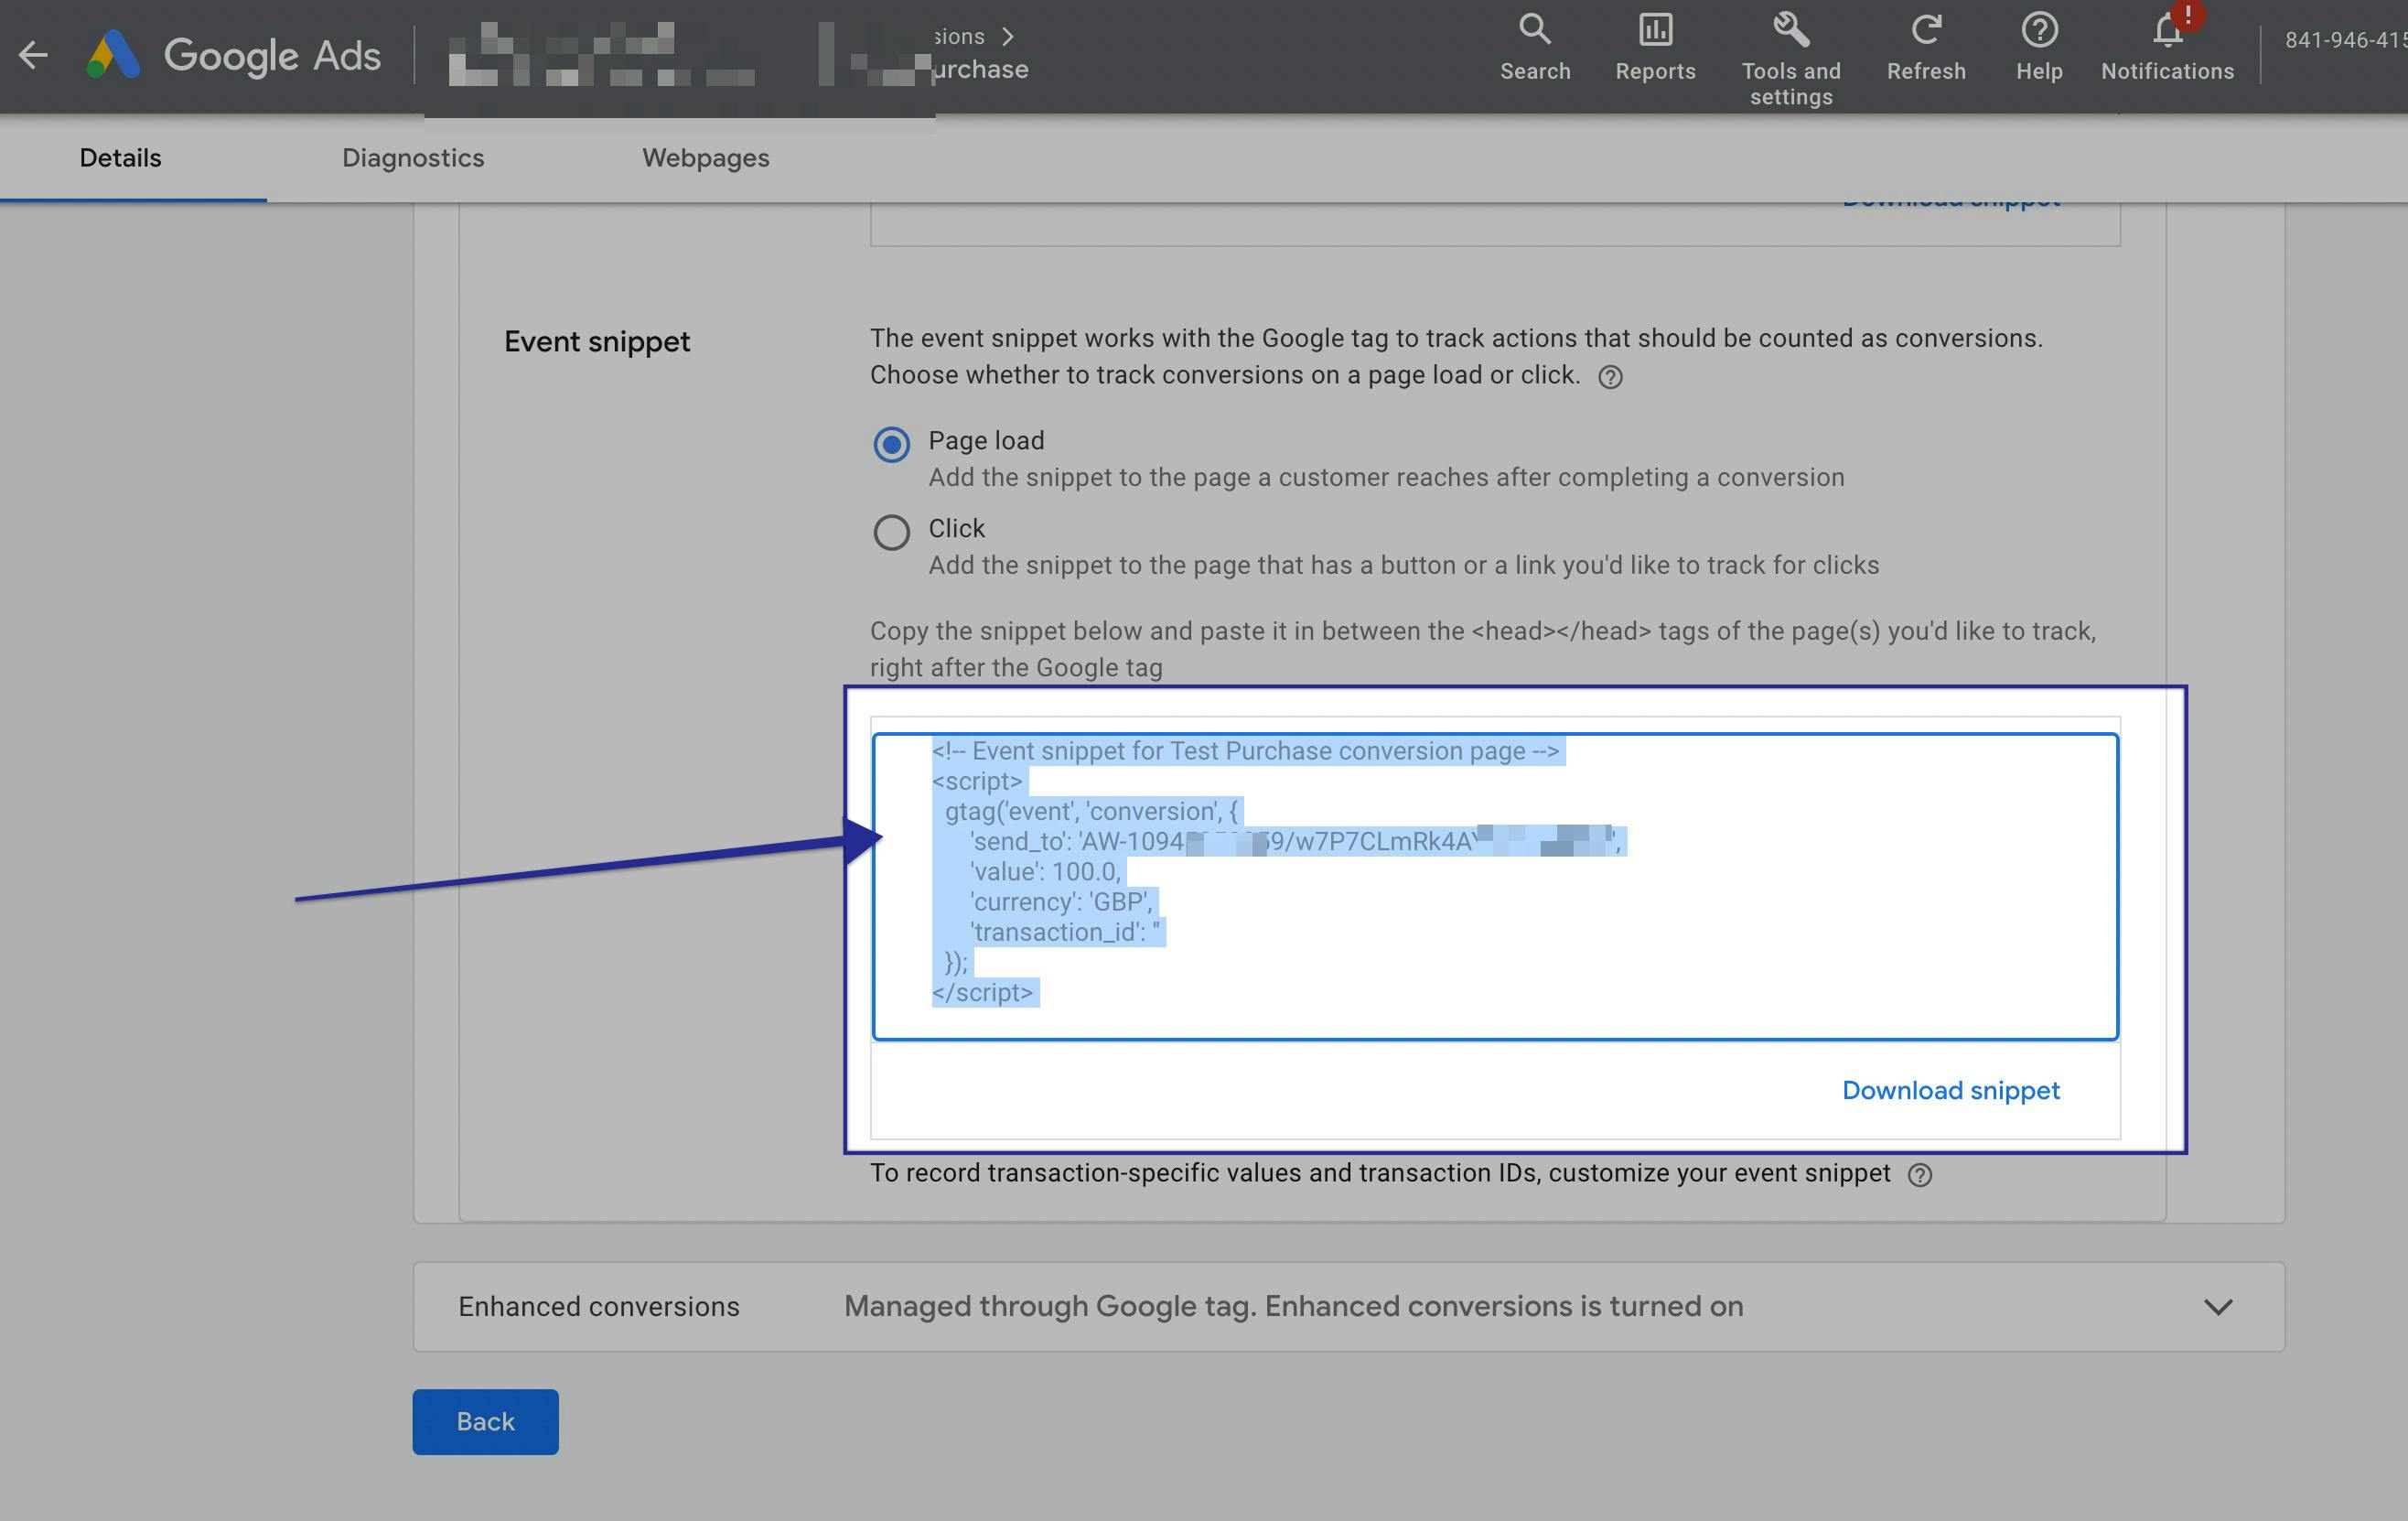
You can see your conversion ID and label in the "Send_to" section: Copy those because we'll need them in the following steps.
'send_to': 'AW-10945050000/w7P7CLmRk4AYEMvrgggg',
In this example:
Conversion ID: 10945050000
Conversion Label: w7P7CLmRk4AYEMvrgggg'
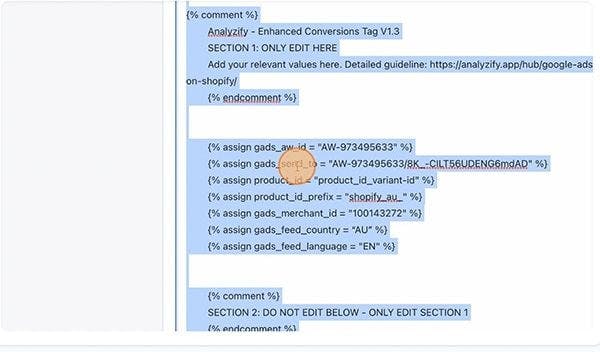
Step 3: Copy Analyzify's open-source Google Ads Enhanced Conversion tracking script.
Copy the script below - but be patient. We will change some variables for it to work correctly. Copy the script and paste it into a new Google Doc.
{% comment %
Analyzify - Enhanced Conversions Tag V1.3
SECTION 1: ONLY EDIT HERE
Add your relevant values here. Detailed guideline: https://analyzify.app/hub/google-ads-enhanced-conversion-setup-on-shopify/
{% endcomment %}
{% assign gads_aw_id = "AW-111111111" %}
{% assign gads_send_to = "AW-111111111/conversionlabelhere" %}
{% assign product_id = "product_id_variant-id" %}
{% assign product_id_prefix = "shopify_us_" %}
{% assign gads_merchant_id = "222222222" %}
{% assign gads_feed_country = "US" %}
{% assign gads_feed_language = "EN" %}
{% comment %}
SECTION 2: DO NOT EDIT BELOW - ONLY EDIT SECTION 1
{% endcomment %}
<!-- Global site tag (gtag.js) - Google Analytics -->
<script>
window.dataLayer = window.dataLayer || [];
function gtag(){dataLayer.push(arguments);}
gtag('js', new Date());
gtag('config', '{{ gads_aw_id }}', { 'allow_enhanced_conversions': true });
</script>
{% if first_time_accessed %}
<!-- START Google Ads Enhanced Conversions V1.3-->
<script>
var enhanced_conversion_data = {
{% unless checkout.email == blank %}"email": "{{ checkout.email }}",{% endunless %}
{% unless billing_address.phone == blank %}"phone_number": "{{ billing_address.phone }}",{% endunless %}
{% unless billing_address.first_name == blank %}"first_name": "{{ billing_address.first_name }}",{% endunless %}
{% unless billing_address.last_name == blank %}"last_name": "{{ billing_address.last_name }}",{% endunless %}
"home_address": {
{% unless billing_address.street == blank %}"street": "{{ billing_address.street }}",{% endunless %}
{% unless billing_address.city == blank %}"city": "{{ billing_address.city }}",{% endunless %}
{% unless billing_address.province_code == blank %}"region": "{{ billing_address.province_code }}",{% endunless %}
{% unless billing_address.zip == blank %}"postal_code": "{{ billing_address.zip }}",{% endunless %}
{% unless billing_address.country_code == blank %}"country": "{{ billing_address.country_code }}"{% endunless %}
}
};
</script>
<!-- END Google Ads Enhanced Conversions V1.3-->
<!-- START Cart data V1.3-->
<script>
gtag('event', 'purchase', {
'send_to': '{{ gads_send_to }}',
'transaction_id': '{{ order.order_number }}',
'value': Shopify.checkout.total_price_set.presentment_money.amount,
'currency': Shopify.checkout.total_price_set.presentment_money.currency_code,
'discount': discount(),
'aw_merchant_id': {{ gads_merchant_id }},
'aw_feed_country': '{{ gads_feed_country }}',
'aw_feed_language': '{{ gads_feed_language }}',
'items': items()
});
function discount(){
return (Shopify.checkout.discount == null) ? 0 : Shopify.checkout.discount.amount;
}
function items(){
var jsonarray = [];
for (var line_item_count = 0; line_item_count < Shopify.checkout.line_items.length; line_item_count++){
jsonarray.push({
id: {% if product_id == "product_id_variant-id" %}'{{ product_id_prefix }}' + Shopify.checkout.line_items[line_item_count].product_id + '_' + Shopify.checkout.line_items[line_item_count].variant_id{% elsif product_id == 'variant-id' %}Shopify.checkout.line_items[line_item_count].variant_id{% elsif product_id == 'sku' %}Shopify.checkout.line_items[line_item_count].sku{% endif %},
quantity: Shopify.checkout.line_items[line_item_count].quantity,
price: Shopify.checkout.line_items[line_item_count].line_price
})
}
return jsonarray;
}
</script>
<!-- END Cart data V1.3-->
{% endif %}
{% comment %}
END Analyzify - Enhanced Conversions Tag V1.3 Detailed guideline: https://analyzify.app/hub/google-ads-enhanced-conversion-setup-on-shopify/
{% endcomment %}}
Step 4: Edit the variables
It's the only section we will change in the code block. Follow the steps below closely.
The steps go:
Step 5: Product ID format & Merchant Center ID
It's time to double-check your Google Feed product ID format.
On Google Ads, find PRODUCTS on the left menu. Your Product ID is right next to the merchant ID marked below. We use "shopify_AU_..." because the native Google Sales Channel is used for . ⎋
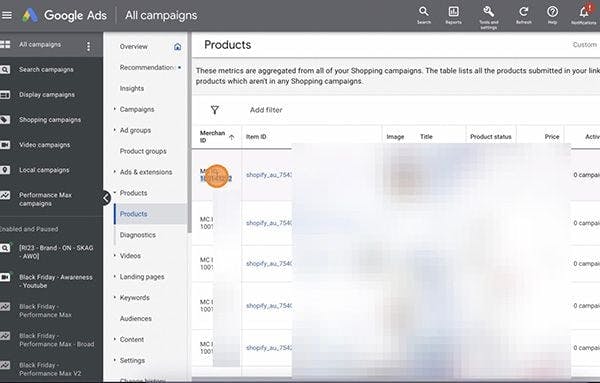
Make changes in line with the ID format your store uses. If you only see the variant ID as opposed to Shopify's classic format, you need to update the code like so:
{% assign product_id = "variant-id" %}
{% assign product_id_prefix = "" %}
And remember to replace other fields:
After replacing all the values, your code is ready. Only a step left!
Step 6: Paste the updated code into Shopify Checkout Additional Scripts
On your Shopify Admin, go to Settings and find Additional Scripts. Paste the code block there. It'll look like so:
There it is! Your setup is complete, and the new enhanced conversion data should flow nicely soon. Let's emphasize our previous point again.
Enhanced conversions are a relatively new feature, and while our tests resulted in excellent, it may still be challenging to work flawlessly.
Want to print your doc?
This is not the way.
This is not the way.

Try clicking the ··· in the right corner or using a keyboard shortcut (
CtrlP
) instead.