Private Beta
While anyone can start building and testing agents, publishing the to the agent store is only available to a
limited set of developers at this time.
The following documentation provides an early preview of the SDK, and the specifics are subject to change.
Developing and testing agents
This page covers some tips and techniques for building and testing agents.
Developing locally
In the Your first agent tutorial, we recommend developing in the Pack Studio, a web-based IDE. It is the simplest way to get started. All you have to do is visit pack.new and start writing code.
However, for production work, we recommend developing locally with the CLI, as it allows you to integrate with your version control system, write unit tests, etc. To learn how to set up this environment, follow the Get started on your local machine.
The CLI can run your code locally, but only an individual building block (formula, action, or sync table). It is not possible to run LLM-based functionality, like skills. For that, you'll need to upload a new version of your agent to the server and test it using Superhuman Go.
Testing in a Coda doc
If your agent contains formulas or sync tables, it can be helpful to test them in a Coda doc. Testing allows you to:
- Directly control parameter values, vs letting the LLM decide
- View the raw output from formulas and sync tables
- Easily access the Pack maker tools to view execution logs
You won't be able to test your agent skills in the doc, however, as those can only be used in Superhuman Go.
To test your agent's formulas and syncs in a Coda doc:
- Visit coda.new to create a new doc.
- Click the Insert button in the upper right of the screen.
- Search for your agent by name and then click it.
- Click the button Add to doc for free.
- Drag a building block into the page.
- If user authentication is required, click the + Connect an account button and sign in.
Testing unreleased versions
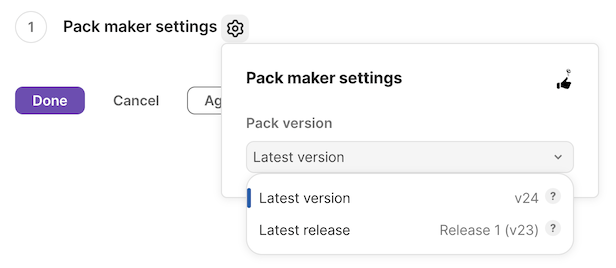
If your Pack has previously been released, the agent will default to the released version of your code when installed. To test a newer, unreleased version of your code:
- Open the settings screen for the agent (
https://coda.grammarly.com/brain/agent/setup/{PACK_ID}/debug). - Click the gear icon .
- Change the Pack version option to Latest version.
Test indexing
When an agent contains sync tables, the agent installation screen includes additional elements that let the user configure which records to sync. If a table has parameters, you can click its row to set those parameters. Clicking Done starts the indexing process, which can take a few minutes to complete depending on the size of the dataset.
Checking status
The status of the indexing job is visible on the agent's settings screen. You can access the settings screen by either:
- Clicking on your initials at the bottom of the agent bench, selecting Manage Agents, and then the gear icon next to the agent.
- Opening the URL
https://coda.grammarly.com/brain/agent/setup/{PACK_ID}/debug.
Click the Sync status tab to see whether the sync is complete and how many records were found.
Click into a specific table to open the Data Explorer. This allows you to view which records were indexed.
Missing data
You may sometimes see the sync status listed as Synced, but no data is shown for a given table. This can happen for a few reasons:
- The schema is missing the metadata required for indexing. See the Indexing Schemas guide for more information on how to add that metadata.
- There is a lag between when the sync is complete and when the data shows up in the Data Explorer. It can take a few minutes, so wait a bit and refresh the page later.
The table will show one row per record, with the rawText column showing the text from one of the indexed chunks.
Re-indexing
Making changes to your Pack or connection settings doesn't immediately trigger the indexing process. Instead, we recommend deleting and recreating the connection whenever you want to see the effects of a change.