Skip to content
Spinning Basics: Parts of a Spinning Wheel
A spinning wheel can be an intimidating piece of machinery, with lots of moving parts. But whether you’ve spun yarn on a spindle before or are brand new to spinning, it’s easy to get started with a spinning wheel once you are armed with a little knowledge. Although the details can vary from wheel to wheel, the basic anatomy of a spinning wheel is generally the same. Let’s take a look at the parts of a spinning wheel and how they work together to create yarn.


Saxony or castle style
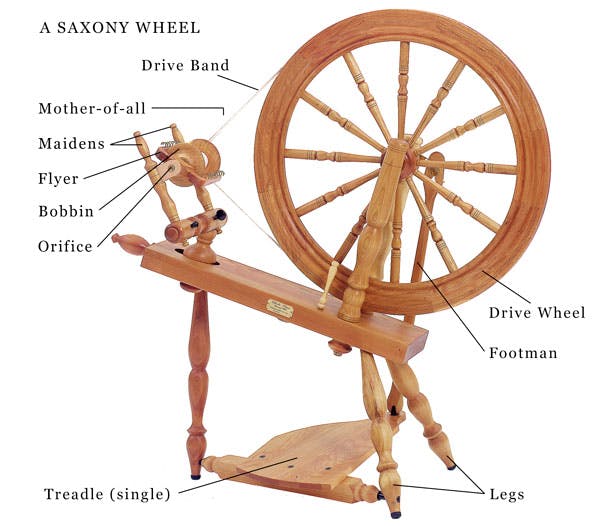
A Saxony spinning wheel (above) is what most people picture when they think of a spinning wheel. The flyer assembly is to one side of the drive wheel, and can be on either the right or the left. In contrast, a castle or upright wheel (below) places the flyer assembly above the drive wheel, providing a smaller and more compact footprint.


The drive wheel
The large wheel is called the drive wheel or fly wheel. It is connected to the treadle (which can be single or double) by a footman, so that the drive wheel turns when you press on the treadle with your foot. The drive wheel is connected to the flyer with a drive band, which can be made of cotton, hemp or stretchy nylon material.


The Mother-of-all
The mother-of-all is the business end of the spinning wheel. This is the piece that holds the maidens, which in turn hold the flyer, bobbin and brake system. The flyer is a U-shaped piece with a metal shaft through the middle to hold the bobbin and whorls, if necessary. The arms of the flyer usually have hooks to allow the yarn to wind onto the bobbin evenly, either at fixed distances or as a sliding guide.
The orifice is the opening at the bottom of the flyer that allows the newly spun yarn to wind onto the bobbin. Some spinning wheels come with a specialized hook called an orifice hook, used to pull the end of the yarn from the bobbin through the orifice.


The brake system
The bobbin always holds the spun yarn, but can be filled in several different ways depending on where the brake band is located.
Scotch tension, single drive, flyer-lead (above)
In these types of spinning wheels, the drive band is connected to the flyer, and the bobbin is held firmly in place with a brake band attached to a tensioning knob. When the drive wheel slows down, the yarn winds onto the bobbin. This type of brake system is very common and easy to adjust for different styles of yarn.


Bobbin-lead
On a bobbin-lead wheel (above), the drive band is held right on the bobbin, and the brake band is located on the flyer. In this type of system, the flyer slows down and the bobbin continues to turn, to wind on the yarn.


Double-drive
On double-drive spinning wheels (above), the drive band is a long band that is folded. One loop sits around the flyer whorl and one around the bobbin whorl, and both are connected to the drive wheel. In this system, the small bobbin whorl turns faster than the flyer whorl, pulling the yarn onto the bobbin.


Photo via Schacht Spindle Co.
Bobbins and whorls
Scotch tension and double-drive wheels have a whorl on the flyer where the drive band sits. These whorls may be up front, close to the orifice, or a separate piece that attaches to the back of the bobbin shaft. On a bobbin-lead wheel, this whorl is located right on the bobbin. Most wheels have at least two different sizes of whorl, which determine how many times the flyer spins for each full rotation of the drive wheel. A smaller whorl will rotate more quickly, pushing twist into the fiber at a faster rate.
Bobbin sizes and shapes differ from wheel to wheel. Some models have multiple sizes of bobbin available for different purposes, such as a larger bobbin for plying or creating very bulky yarns.
There you have it! A little overview of the anatomy of a spinning wheel. Once you understand the parts of a spinning wheel, you will have a better understanding of how they work together smoothly for a great spinning experience.
[box type=”shadow”]Learn the yarn-making process, from carding natural finders to creating stunning yarns in a variety of textures, all on a portable drop spindle, in the Craftsy class , taught by seasoned spindler Drucilla Pettibone.[/box]
Want to print your doc?
This is not the way.
This is not the way.

Try clicking the ··· in the right corner or using a keyboard shortcut (
CtrlP
) instead.