Share
Explore

f23 F23 IN6003-G1 Lab 2 Building the Simple AI model using Python in Google Collab Workbook

Being able to hold conversations with your input training text is the purpose of the Generative AI MODEL.
Focusing on text models. Like ChatGPT.

How to hand in Lab 2:

megaphone

You can reference the Instructor’s Google Collab Workbook to get ideas on what can be done:


Upload location for your TEXT FILE:
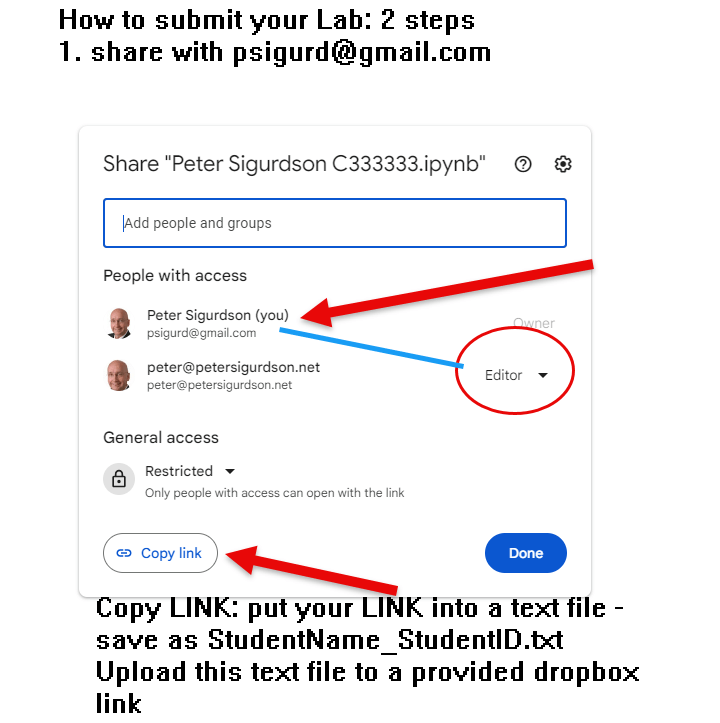
image.png
megaphone

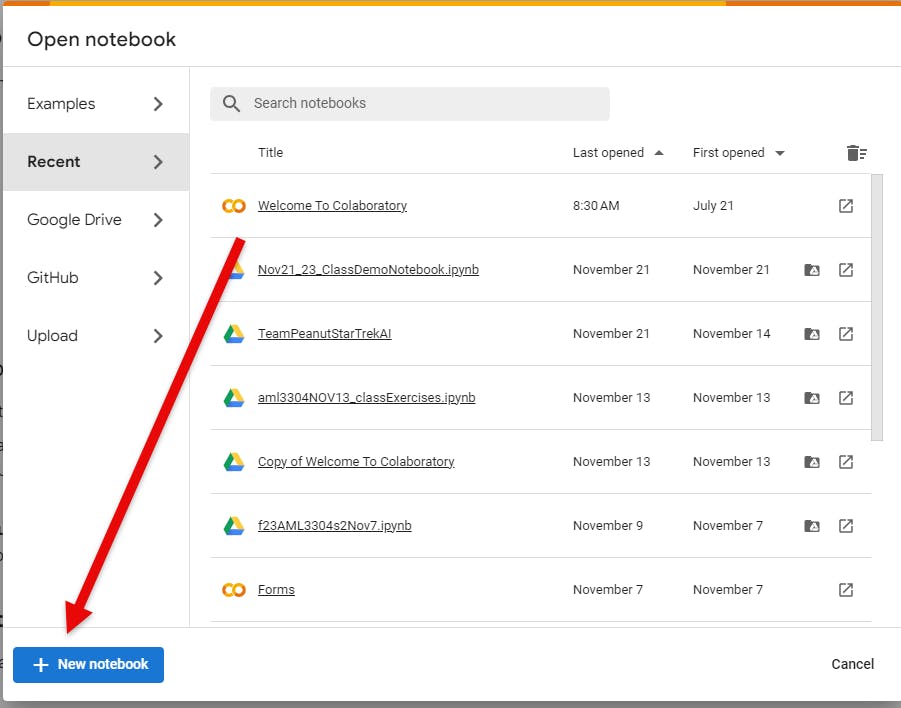
How to get started:

Go to
image.png
What is Google Colab?
Google Colab, or Colaboratory, is a hosted Jupyter Notebook service that requires no setup to use and provides free access to computing resources, including GPUs and TPUs 1. When you create your own Colab notebooks, they are stored in your Google Drive account, and you can easily share them with co-workers or friends 2.
How to Use Google Colab with Google Sheets
Google Colab can be connected to Google Sheets, allowing you to access and analyze data within your spreadsheets using Python. Here's a step-by-step guide on how to do it:
Authenticate to Google using the following code:
from google.colab import auth
import gspread
from google.auth import default
auth.authenticate_user()
creds, _ = default()
gc = gspread.authorize(creds)

This code will connect Colaboratory to your Google Drive, allowing you to access your Google Sheets 3.
After authenticating, you can use the gspread library to access your Google Sheets data. For example, to open a workbook, you can use the following code:
workbook = gc.open('Your Workbook Name')

Replace 'Your Workbook Name' with the name of your Google Sheets workbook.
Collaborating in Google Colab
Google Colab allows for easy collaboration. You can share your Colab notebooks with others, and they can view or edit the notebook based on the permissions you set 2. If you're working on a project that requires collaboration, you can set up a Google Drive folder where you store data and working files. This ensures that everyone has access to the most up-to-date files and can see when others are making edits 4.


Let’s get started with Google Collab Notebook.

Imports

import tensorflow as tf: Imports the TensorFlow library, which is not used in the given code snippet.
import torch: Imports the PyTorch library for building and training neural networks.
import re: Imports the Python regex library to work with regular expressions, which will be used for text preprocessing.

Preprocess Text Function

The purpose of the purpose of this is to do ‘tokenization’ on your input text that you want to train your model on, to clean it up.
megaphone

Regular expressions (regex) are a powerful tool for working with text data in Python. They allow you to search, validate, and manipulate text using patterns. Here are some basic concepts and functions you can use to work with regex in Python:

Importing the regex module: You can import the regex module by running import re in your Python code.
Creating a regex pattern: You can create a regex pattern by using the / character followed by a pattern. For example, /hello/ will match any string that contains the string "hello".
Searching for a pattern: You can search for a pattern in a string using the re.search() function. For example, re.search('/hello/', 'hello world') will return theMatch object if the pattern is found, else it will return None.
Validating a pattern: You can use the re.match() function to validate a pattern in a string. For example, re.match('/hello/', 'hello world') will return True if the pattern is found, else it will return False.
Replacing a pattern: You can replace a pattern in a string using the re.sub() function. For example, re.sub('/hello/', 'world', 'hello world') will return the modified string 'world world'.
Using modifiers: Regex patterns can be modified using special characters called modifiers. For example, re.DOTALL can be used to make . match new line characters, re.IGNORECASE can be used to make the pattern case insensitive, and re.VERBOSE can be used to show the matches as they are found.
Here are some common regex patterns and their meanings:
.*: Matches any character (except a newline character) zero or more times.
^: Matches the start of a string.
$: Matches the end of a string.
\w+: Matches one or more word characters (letters, digits, or underscores).
\W+: Matches one or more non-word characters.
sche: Matches the string "sche".
Python also provides a lot of useful functions for working with regex, such as re.findall(), re.split(), and re.escape().
Here in this Lab, we will input some text: And have conversations with that input text:

def preprocess_text(text):
text = text.lower()
text = re.sub(r'\d+', '', text)
text = re.sub(r'\s+', ' ', text)
text = re.sub(r'\W', ' ', text)
return text
This function preprocess_text cleans a given string text by:
Converting the text to lowercase.
Removing all digits by replacing them with an empty string.
Replacing multiple whitespace characters with a single space.
Removing non-word characters and replacing them with a space.

RNNModel Class


class RNNModel(nn.Module):
def __init__(self, vocab_size, embed_size, hidden_size, num_layers):
super(RNNModel, self).__init__()
self.embed = nn.Embedding(vocab_size, embed_size)
self.rnn = nn.RNN(embed_size, hidden_size, num_layers, batch_first=True)
self.linear = nn.Linear(hidden_size, vocab_size)
def forward(self, x, h):
x = self.embed(x)
out, h = self.rnn(x, h)
out = self.linear(out.reshape(out.size(0)*out.size(1), out.size(2)))
return out, h
The RNNModel class defines a simple recurrent neural network (RNN) for text processing:
__init__ constructs the model with embedding, RNN, and linear layers.
forward defines the forward pass through the network, taking input x and the hidden state h.

Training Function

def train(model, data, epochs, lr):
optimizer = torch.optim.Adam(model.parameters(), lr=lr)
criterion = nn.CrossEntropyLoss()
for epoch in range(epochs):
hidden = None
for x, y in data:
optimizer.zero_grad()
outputs, hidden = model(x, hidden)
loss = criterion(outputs, y)
loss.backward()
optimizer.step()
The train function trains the model with given data for a number of epochs, using an Adam optimizer and cross-entropy loss.

Text Generation Function

def generate_text(model, seed_text, num_words):
model.eval()
text = seed_text
for _ in range(num_words):
x = torch.tensor([text[-1]])
output, _ = model(x, None)
_, predicted = torch.max(output, 1)
text.append(predicted.item())
return text
The generate_text function generates num_words of text from a given seed_text, using the trained model to predict the next word given the current state of the text.
Complete this setup to allow a conversational interface between the user and the model.
Here is how you might set up a simple conversational interface:
def converse(model, initial_prompt, num_words_per_turn):
model.eval() # Set model to evaluation mode
conversation = initial_prompt
user_input = ""
while True:
# User input
user_input = input("You: ")
if user_input.lower() == "quit":
break
# Preprocess the input
user_input = preprocess_text(user_input)
conversation += user_input
# Generate model response
seed_text = conversation.split()[-num_words_per_turn:] # Get the last few words
seed_tensor = torch.tensor([word_to_ix[word] for word in seed_text if word in word_to_ix]) # Convert to tensor
for _ in range(num_words_per_turn):
output, _ = model(seed_tensor.unsqueeze(0), None) # Generate output from model
_, predicted = torch.max(output[:, -1, :], 1) # Get the predicted next word
generated_word = ix_to_word[predicted.item()] # Convert index to word
conversation += " " + generated_word
seed_tensor = torch.cat((seed_tensor, predicted)) # Append to the seed tensor for next iteration
print("AI:", conversation[len(initial_prompt):])
# Print AI's part of the conversation

# Before using the converse function, you will need to have:
# - word_to_ix: a dictionary mapping from words to their indices
# - ix_to_word: a dictionary mapping from indices to their words
# - initial_prompt: a string that starts the conversation

# You will also need to have trained your model with an appropriate dataset
# and have the model loaded into memory before starting the conversation.
Please note that there are several placeholders in this code, such as word_to_ix and ix_to_word, which you would need to define based on your vocabulary. Also, the seed_text needs to be appropriately preprocessed and converted to indices that the model can understand.
The converse function takes user input until the user types "quit". It preprocesses the input, generates a response from the current state of the conversation, and outputs the AI's response. The loop allows for a back-and-forth conversation.
Please keep in mind that your training dataset, model complexity, and preprocessing steps will highly influence the quality of the conversation. This example assumes you have a vocabulary mapping and a trained RNN model ready to be used for generation.

megaphone

To create a simple conversational interface, as well as the necessary dictionaries and initial prompt, you'll first need to establish a vocabulary from your dataset. A vocabulary is a collection of all unique tokens (e.g., words) that the model knows and can predict.

Below is an example that shows how you can generate these dictionaries and an initial prompt. This example assumes that you've already loaded your text data and built a vocabulary from it.

# Example: Build a vocabulary from a list of sentences
def build_vocab(sentences):
"""
Builds a vocab dictionary mapping from words to indexes and indexes to words.
"""
tokens = [token for sentence in sentences for token in sentence.split()]
vocab = set(tokens)
word_to_ix = {word: i for i, word in enumerate(vocab)}
ix_to_word = {i: word for word, i in word_to_ix.items()}
return word_to_ix, ix_to_word

# Sample text data [Note: In a real-world scenario, this should come from your dataset]
text_data = [
"hello how are you",
"i am fine thank you",
"what are you doing",
"i am building an AI model"
]

# Build the vocab dictionaries from the given text data
word_to_ix, ix_to_word = build_vocab(text_data)

# Define the initial prompt to start the conversation
initial_prompt = "AI: Hello, how can I help you today?"

# Convert the initial prompt into a list of indices
prompt_indices = [word_to_ix[word] for word in initial_prompt.split() if word in word_to_ix]

print("Word to Index: ", word_to_ix)
print("Index to Word: ", ix_to_word)
print("Initial Prompt Indices: ", prompt_indices)
The build_vocab function makes a set of all unique words (the vocabulary) and creates the two dictionaries. word_to_ix maps words to a unique index, and ix_to_word does the inverse. The initial_prompt is a string that you'll use to warm up the conversation. The prompt_indices are the indexed representation of the initial_prompt.
Once you've built your vocabulary, converted your initial prompt into indices, and trained your RNN model, you can integrate these with the converse function provided earlier to enable a user to have a conversation with the AI.
Keep in mind that this simple example is for illustrative purposes. In practice, you would likely have a much larger vocabulary and would need to employ more sophisticated preprocessing, including tokenization, handling of out-of-vocabulary words, and possibly subword segmentation (for handling unknown words).
Want to print your doc?
This is not the way.
Try clicking the ⋯ next to your doc name or using a keyboard shortcut (
CtrlP
) instead.