Share
Explore

F23 Assignment 2 The Warehouse F23 IN3193-G6 Database

What is the hand in requirement for this Assignment:

Part A:
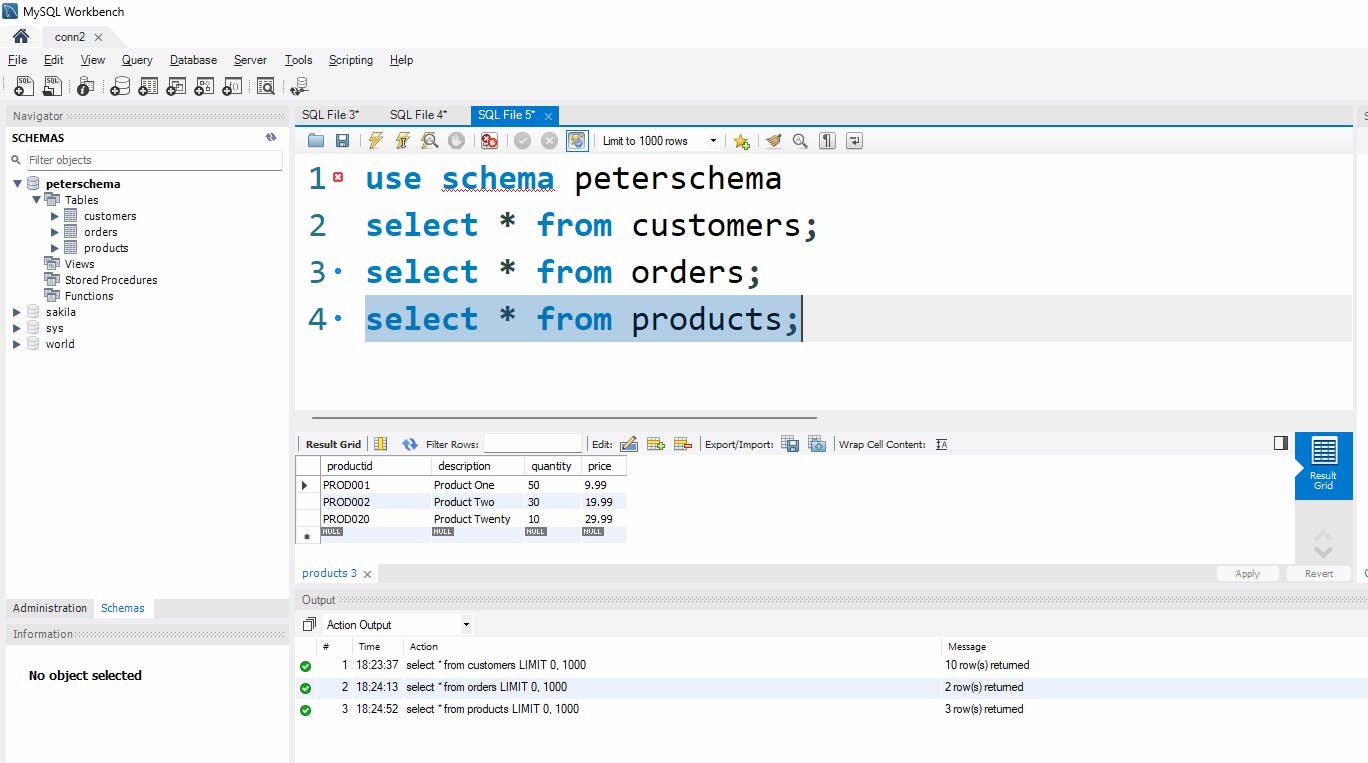
image.png

Part 2 of the hand in work for this Assignment:

Just like in the College: You made a SQL to generate student schedules: which connects class < → student.
Now here in the Warehouse:
Write 3 SQL statements write report on some customer orders:

What I want is to see output which looks like this: For at least 3 records.
megaphone

orders.orderid, orders.productid, orders.customerid, orders.quantity, products.description, products.price, customers.customername, customers.comments


Due December 10:
image.png
image.png

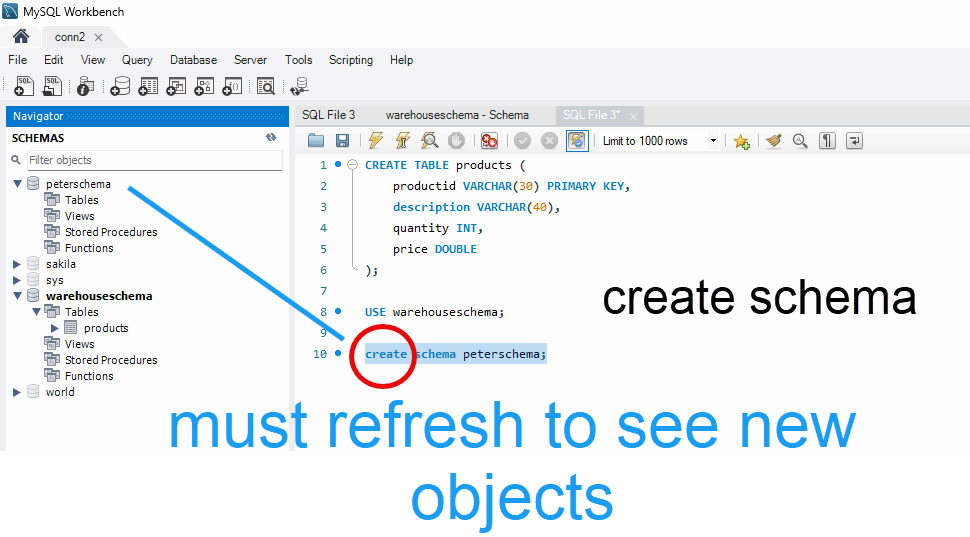
use schema
Updated Instructions:
Final hand in the assignment is to provide 3 Inner which output some customer orders.

You can use my Warehouse Database if needed:
Here is our November 29 work:
Last week: We make the Warehouse Database.

Now today we will take those tables and do some SQL
Inner JOIN : DONE
Left / Right Joins : Pulls all data from the left table : if there is a match the right table, this data is presented
Left Table : Students
Right Table: Classes
Inner Join: Shows all information for student who are enrolled in Classes.
Left JOIN : List out ALL students / if student is NOT enrolled in a class, student still prints out will null for enrolled-in class.
Right JOIN : List out ALL classes / if class does NOT have students, class records still prints out with null for the class
Outer Joins : All records from both tables
megaphone

Left Right Inner and Outer Joins:


by Dr. Thomas Codd

Lab Title: Understanding Left Joins and Outer Joins in SQL

Objectives:

Understand the concept of left joins (LEFT OUTER JOINS) in SQL.
Learn about outer joins and the differences between FULL OUTER JOIN, LEFT OUTER JOIN, and RIGHT OUTER JOIN.
Practice writing SQL queries to perform left and outer joins on sample datasets.

Lab Overview:

In this lab, we will explore how to use left joins and outer joins in SQL to retrieve data from multiple tables. We will first define what left and outer joins are, understand their use cases, and then apply these concepts using example tables through a series of SQL queries.

Concept Lecture:

What is a LEFT JOIN (LEFT OUTER JOIN)?

A LEFT JOIN, also known as LEFT OUTER JOIN, is used to return all records from the left table (table1), and the matched records from the right table (table2). If there is no match, NULL values are returned for columns from the right table.

What is an OUTER JOIN?

An OUTER JOIN in SQL can be a LEFT OUTER JOIN, RIGHT OUTER JOIN, or FULL OUTER JOIN, depending on which records you want to include in your result set.
A FULL OUTER JOIN returns all records when there is a match in either left (table1) or right (table2) table records. This means it combines the results of both LEFT JOIN and RIGHT JOIN.

Use Cases:

LEFT JOIN is used when you want to include all records from a primary table regardless of whether there are matching records in the joined table.
FULL OUTER JOIN is used when you need to include all records from both joined tables, filling in with NULLs where one table doesn’t have a corresponding record.

Practice Tables:

For our lab practice, we will be using two simple tables: Employees and Departments.

Employees Table:

| EmployeeID | EmployeeName | DepartmentID | |------------|--------------|--------------| | 1 | Jane Doe | 1 | | 2 | John Smith | 2 | | 3 | Alice Jones | 3 | | 4 | Evan Wright | NULL |

Departments Table:

| DepartmentID | DepartmentName | |--------------|-------------------| | 1 | Human Resources | | 2 | Marketing | | 3 | Information Tech | | 5 | Customer Support |

Lab Tasks:

Understanding LEFT JOIN:
Write an SQL query to retrieve a list of all employees and their respective departments using LEFT JOIN. Include employees who do not belong to any department.

SELECT Employees.EmployeeName, Departments.DepartmentName
FROM Employees
LEFT JOIN Departments ON Employees.DepartmentID = Departments.DepartmentID;
FULL OUTER JOIN Practice:
Write an SQL query to retrieve a list of all departments and any associated employees, including departments with no employees and employees with no departments using FULL OUTER JOIN.

SELECT Employees.EmployeeName, Departments.DepartmentName
FROM Employees
FULL OUTER JOIN Departments ON Employees.DepartmentID = Departments.DepartmentID;
Identifying NULL Values:
Modify the FULL OUTER JOIN query to filter results to only those records where there is no matching entry in either the Employees or Departments table (i.e., where the join condition fails).
1
2
3
4
SELECT Employees.EmployeeName, Departments.DepartmentName
FROM Employees
FULL OUTER JOIN Departments ON Employees.DepartmentID = Departments.DepartmentID
WHERE Employees.DepartmentID IS NULL OR Departments.DepartmentID IS NULL;

Follow-Up Questions:

What are the primary differences between LEFT JOIN and FULL OUTER JOIN?
In what scenarios might you prefer using a LEFT JOIN over a FULL OUTER JOIN?
How does the database handle situations where the JOIN condition is not met?

Assessment:

Students will be given a set of queries to write using LEFT JOIN and FULL OUTER JOIN based on similar example tables. Their understanding of joins will be assessed based on the correctness of the results and their ability to explain when to use each type of join.

Extension Activities:

Practice writing RIGHT OUTER JOIN queries.
Explore using JOINs with filtering conditions (using the WHERE clause).
Investigate the performance implications of using different types of joins with larger datasets.

Conclusion:

By the end of this lab, students should have a firm understanding of LEFT JOIN and FULL OUTER JOIN operations and how to apply them to retrieve data from relational databases effectively. Through hands-on experience and problem-solving, students will be more comfortable utilizing joins to perform data analysis and access the information they need from multiple related tables.
Using MySQL and MySQL Workbench:
Input some data from the Assignment Sheet:
4 kinds: Left, Right, Inner, Outer
Hand IN: Use MySQL Workbench: Export your database
Rename as StudentName_StudentID

Table 1
Column 1
Column 2
Column 3
Column 4
Column 5
1
Work Steps to make our Database
2
3
1
Make the Database: DONE
4
2
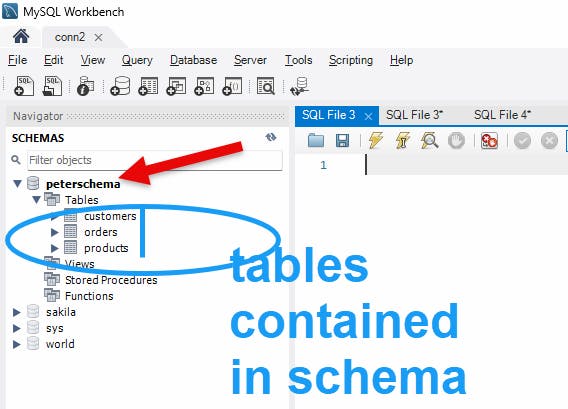
Make the Tables
5
3
Populate the Tables with Data
6
4
Generate some SQL to make the Reports
There are no rows in this table
image.png
image.png
image.png

Next Step: Put the data from the Excel Sheet {Available in Google Classroom} into the Tables.
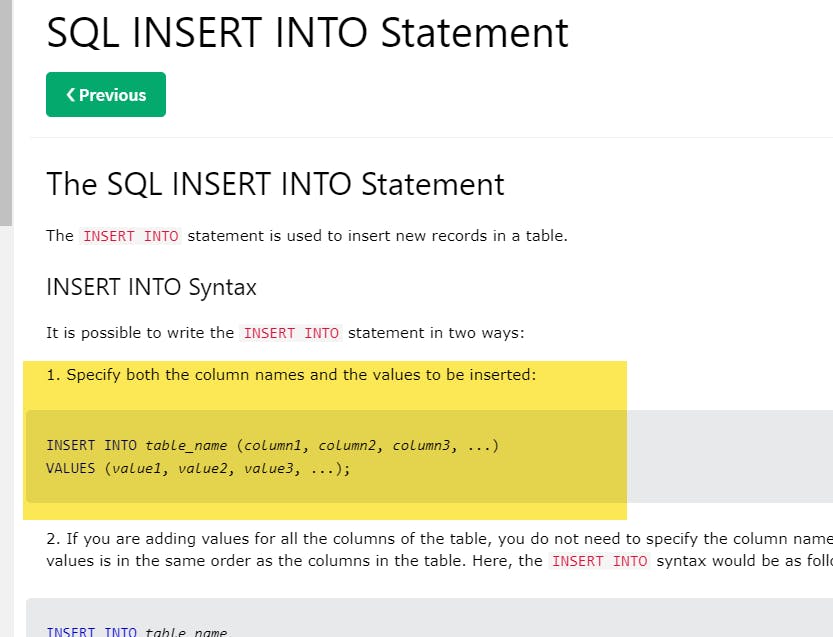
Create : insert SQL statement:
image.png

2 ways to get data into a Table in a SQL database:


Method 1: Use C in CRUD: Create via insert:
select * from products;
INSERT INTO Products (product_id, product_name, price) VALUES (3785, 'Company property culture.', 32.53); INSERT INTO Products (product_id, product_name, price) VALUES (7336, 'Three professor work.', 352.74); INSERT INTO Products (product_id, product_name, price) VALUES (2885, 'That.', 448.53); INSERT INTO Products (product_id, product_name, price) VALUES (1929, 'Environmental food leader.', 469.15); INSERT INTO Products (product_id, product_name, price) VALUES (123, 'Option over.', 306.41); INSERT INTO Products (product_id, product_name, price) VALUES (2931, 'Network four wall.', 104.16); INSERT INTO Products (product_id, product_name, price) VALUES (4921, 'Significant itself.', 184.85); INSERT INTO Products (product_id, product_name, price) VALUES (4378, 'Yeah data join.', 62.34); INSERT INTO Products (product_id, product_name, price) VALUES (7998, 'Speech increase environmental.', 498.31); INSERT INTO Products (product_id, product_name, price) VALUES (2419, 'Key decade.', 88.89);
error

In MySQL Workbench, to find the SQL Query panel where you can write and execute your SQL statements, follow these steps:

Open MySQL Workbench and connect to your desired MySQL server instance by double-clicking on the stored connection.
Once connected, you will be taken to the Query Editor window. This is the default panel that opens when you establish a connection and is where you can write and execute SQL queries.
If for some reason the Query Editor is not visible or you closed the initial tab, you can open a new one by going to the top menu and selecting:
File > New Query Tab
This will open a new tab in the SQL editor panel where you can write your SQL.
Alternatively, you can click on the "+" icon next to the existing query tabs at the top of the editor.
Remember to select the correct schema (database) in the SCHEMAS pane on the left side of the MySQL Workbench window before running your SQL statements. This ensures that your SQL statements will be executed against the correct database.


The Comma-Separated-Value (CSV) files are available here:

megaphone

To import a CSV file into a MySQL database using MySQL Workbench, you can follow these steps:

1. Prepare the Database Table**: - Ensure that the table you want to import the data into already exists in your database. - The table should have the same structure as the CSV file. If the table does not exist, create it with the appropriate columns and data types.
2. Open MySQL Workbench**: - Launch MySQL Workbench and connect to the MySQL server where you want to import the data.
3. Select the Database**: - From the main window, select the appropriate schema (database) from the SCHEMAS list on the left side.
4. Open the Table Data Import Wizard**: - Navigate to the `Server` menu at the top and choose `Data Import`. - Alternatively, right-click the schema name and select `Table Data Import Wizard`.
5. Import the CSV File**: - In the Import Options, choose 'Import from Self-Contained File'. - Click the '...' button to browse and select your CSV file. - Choose the character encoding of the file if it’s not the default value. - Click 'Next'.
6. **Configure Import Settings**: - Select the target table where you want to import your CSV data. The wizard should automatically select the table if the name matches the CSV file name. - Configure how the import wizard should handle duplicates or missing data. - If necessary, you can manually match CSV columns to table columns.
7. Review and Execute**: - Review your selections on the summary page. - Click 'Next' to proceed with the import. - The wizard will execute the import process, and you will see a progress window. - When the import is completed, you can see a summary of the import process.
8. **Check the Data**: - After the import is finished, navigate to the table and view the data to ensure everything has been imported correctly. - You can run a `SELECT * FROM your_table_name;` to verify the imported data.
9. **Troubleshooting**: - If you encounter any errors during the import process, check the error message for hints. - Common issues include mismatched data types, missing columns, or format errors in the CSV file.
Please note that the exact steps might vary slightly depending on the version of MySQL Workbench you are using. Make sure that the CSV file is closed in any other applications before attempting to import it.
Want to print your doc?
This is not the way.
Try clicking the ⋯ next to your doc name or using a keyboard shortcut (
CtrlP
) instead.