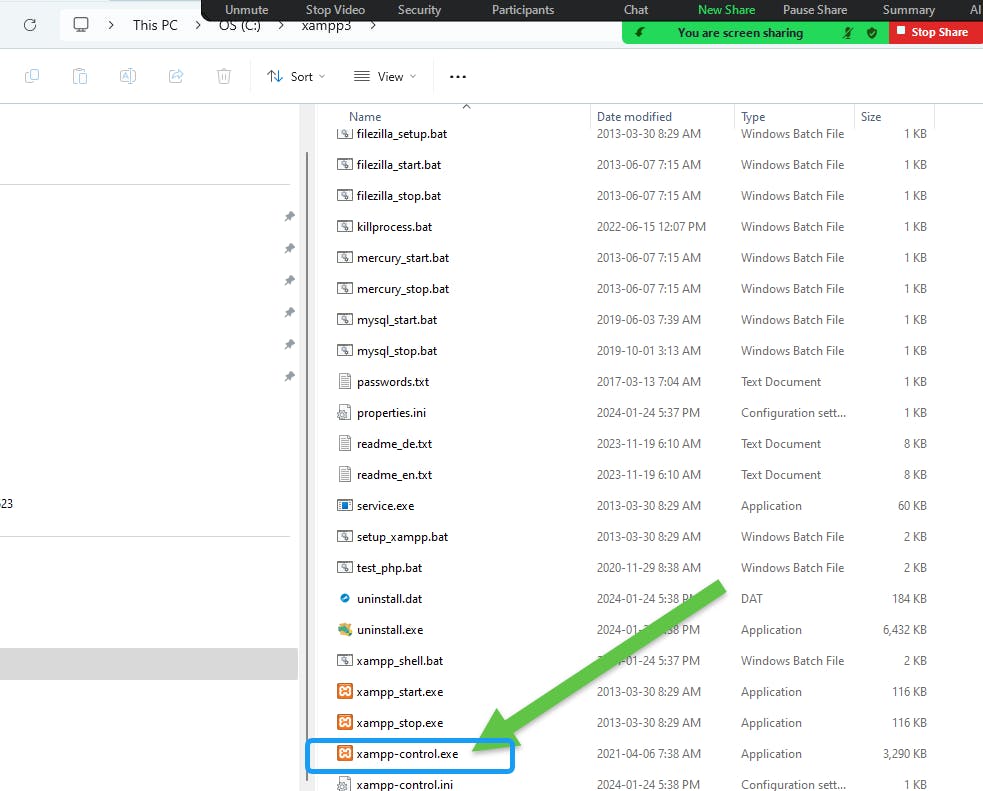
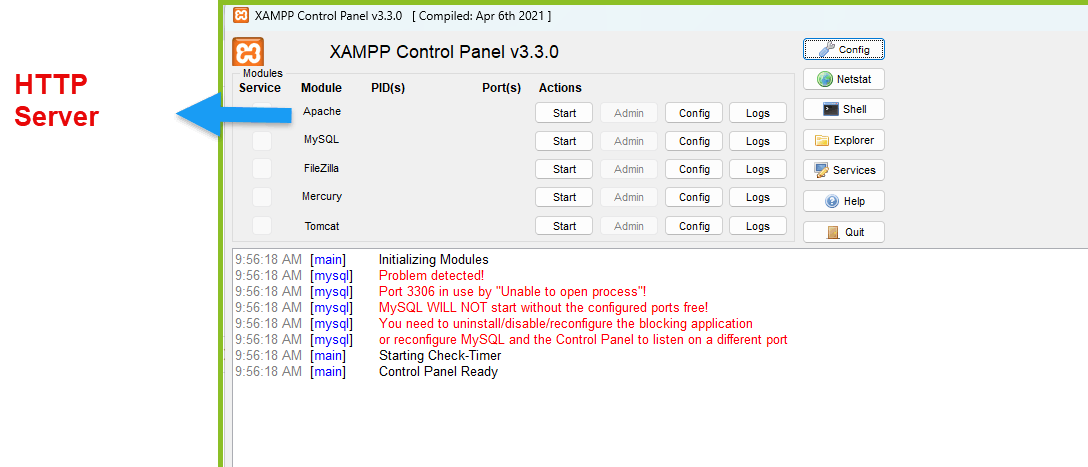
Now that we have gotten to this panel → This tells us that our Apache HTTP Server is running.
Window Server is a Server - Therefore it provides SERVER server to clients.
Let’s make that happen to get an understanding what that means!
TCP / IP is the networking suite of tools that runs the Internet.
Before we can connect to our server, we need to get it up and going:
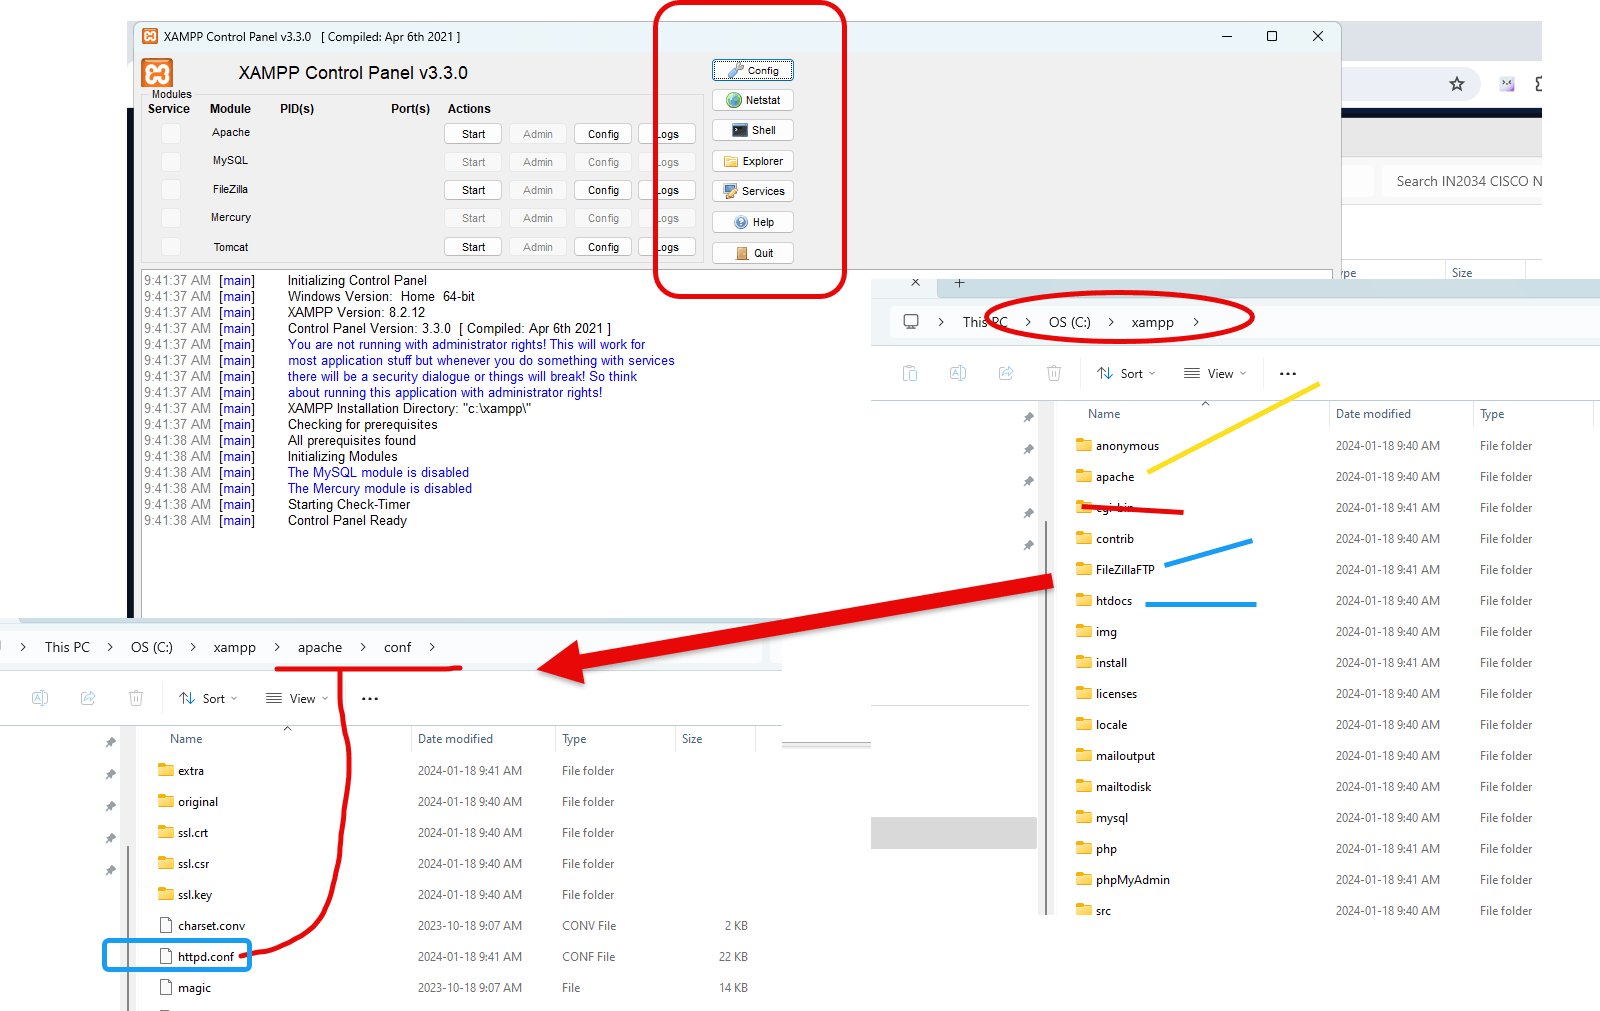
httpd.conf document in C:\xxamp
Learning outcomes:
What is a PORT:
**Understanding TCP/IP Ports:**
In the realm of networking, TCP/IP (Transmission Control Protocol/Internet Protocol) is the fundamental suite of communication protocols used for relaying data across network boundaries. Its routing and addressing conventions empower the global Internet.
Within this suite, the concept of "ports" serves as a communication endpoint in an operating system. To understand ports, you should first recognize that most network services rely on two widely used transport layer protocols: TCP (Transmission Control Protocol) and UDP (User Datagram Protocol).
When a service listens for incoming connections, it does so on a specific port number. This number is a 16-bit integer, allowing for port numbers from 0 to 65535. Some port numbers are preassigned to specific services by the Internet Assigned Numbers Authority (IANA) and are known as "well-known ports." For example, HTTP traffic commonly uses port 80, while HTTPS uses port 443.
Ports enable a single host with a single IP address to run network services. Each service listening on a different port provides a multiplexing service, so multiple applications can work over the network simultaneously.
**How Ports Work with the TCP/IP Model:**
When a client wants to communicate with a service, it specifies the target IP address and the port number associated with that service. Here’s a typical communication process:
1. The client queries a DNS server to resolve a domain name to an IP address.
2. The client sends a message including the destination IP address and specifying the port number of the service it wishes to access.
3. The hosting server's TCP/IP stack uses the port number to direct the message to the correct application.
**Setting up Apache HTTP Server:**
To set up the Apache HTTP Server to work with TCP/IP ports, follow these general steps. Note that the actual implementation can vary depending on your operating system.
1. **Install Apache**: Obtain the Apache HTTP Server software package for your operating system and install it. For instance, on a Unix-like system, you might use a package manager like apt or yum:
```
sudo apt-get install apache2
```
2. **Configure the Apache Configuration Files**:
- Locate the main Apache configuration file, usually called `httpd.conf` or `apache2.conf`, typically found in `/etc/apache2/` or a similar directory.
- Within this file, look for the `Listen` directive which tells Apache which IP address and port to listen on. By default, it will be set to port 80:
```
Listen 80
```
- If you want to change the port or bind to a different port in addition to port 80, you can add another `Listen` directive:
```
Listen 8080
```
3. **Restart Apache**: After saving any changes to the configuration file, you'll need to restart the Apache server to apply them:
```
sudo service apache2 restart
```
or
```
sudo systemctl restart apache2
```
4. **Firewall Configuration**: Ensure that your firewall settings allow traffic on the port that Apache is configured to listen on. For example, using `ufw` on Ubuntu, you would do something like this to allow traffic on port 8080:
```
sudo ufw allow 8080/tcp
```
5. **Testing the Configuration**:
- You can verify that Apache is listening on the new port by using a tool such as `netstat` or by attempting to access your server through a web browser using the server’s IP address followed by the port number, like `http://your-server-ip:8080`.
**Example Configuration Change and Result**:
If you change the `Listen` directive in the Apache configuration file to `Listen 8080` and restart the server, Apache will now be expecting incoming HTTP connections on port 8080. A client will now need to access `http://your-domain.com:8080` instead of the default `http://your-domain.com` to reach the Apache server.
By correctly setting up TCP/IP ports in your Apache configuration, you ensure that your Apache web server can listen for, and respond to, web traffic on the correct IP address and port. This is fundamental for multiple web services to coexist on a single server or for services to operate on non-standard ports for various reasons, including security.
Port is a service identifier number:
Operating system runs SERVERS on specified Ports.
Web Server will be configured to run on PORT 80.
Clients connect to our Server using TCP / IP.
To connect to our Server: We need to know the IP Address of our Computer:
Open a command window:
ipconfig /all This will report on the IP Stack information for all of our Adapters.
Apache Friends XAMPP is a software package that provides a local web server environment for developing and testing web applications. It is designed to be a simple and easy-to-use solution for setting up a web server on your local machine.
XAMPP stands for Cross-platform, Apache, MySQL, PHP, and Perl. It includes all the necessary components to run a web server, including the Apache web server software, the MySQL database management system, and PHP, a popular scripting language for web development. XAMPP also includes additional tools such as phpMyAdmin, which provides a graphical interface for managing MySQL databases, and FileZilla FTP server for file transfer.
Features of XAMPP:
Easy installation: XAMPP provides a simple installer that sets up the entire web server environment on your computer. It is available for Windows, macOS, and Linux.
Apache web server: XAMPP includes the Apache web server, which is one of the most widely used web server software. It allows you to host your web applications and serve them to clients.
MySQL database: XAMPP comes with MySQL, a popular open-source database management system. It allows you to create and manage databases for your web applications.
PHP: XAMPP includes PHP, a scripting language commonly used for web development. With PHP, you can write dynamic web applications that interact with databases and generate dynamic content.
phpMyAdmin: XAMPP provides phpMyAdmin, a web-based interface for managing MySQL databases. It allows you to easily create, edit, and manage your databases and their tables.
FileZilla FTP server: XAMPP also includes FileZilla FTP server, which allows you to set up an FTP server for transferring files to and from your web server.
Using XAMPP:
Once you have installed XAMPP, you can start the Apache and MySQL services from the XAMPP control panel. This will start the web server and the database server, allowing you to access your web applications through a web browser.
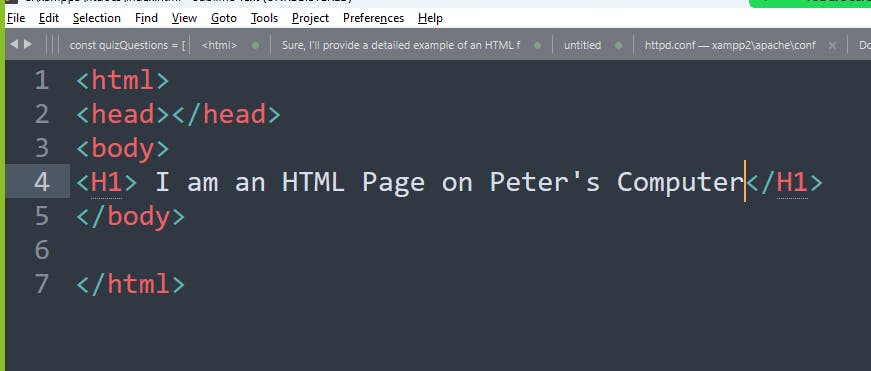
By default, the document root for Apache in XAMPP is the "htdocs" folder. This is where you can place your web application files, such as HTML, CSS, JavaScript, and PHP files. You can access your web applications by visiting "
XAMPP also provides a configuration file for Apache and PHP, allowing you to modify various settings to suit your needs. The configuration files can be found in the "xampp" folder.
It's important to note that XAMPP is primarily intended for local development and testing purposes. It is not recommended to use XAMPP for production environments, as it may not have the same level of security and performance as a dedicated web server.
Overall, Apache Friends XAMPP is a convenient solution for setting up a local web server environment for web development and testing. It provides an easy-to-use interface and includes all the necessary components to run a web server on your local machine.
Next tasking to setup our Apache Web is to setup the configuration:
Lab: Write a PowerShell script to report a list of all services running on Windows 11 along with their PORTS, PID (Process Identifier), and service names.
This script will list all running services, their status, and their display names. For the ports, I'll include a section that lists all listening ports and the associated processes.
Linking these ports directly to services is not straightforward due to the dynamic nature of ports and services.
PowerShell script that lists all running services along with their Process IDs (PIDs), names, and the ports they are using. Here's a revised script that will provide you with this information:
Any program running on your Operating System, on the CPU, has a PID Process ID.
Copy and paste the script into the PowerShell window.
Press Enter to execute the script.
This script does the following:
Lists all running services with their display names and PIDs.
Lists all listening ports, along with the names and PIDs of the processes that are using these ports.
Keep in mind that this script still doesn't directly map services to ports because of the dynamic and complex nature of how services use ports. However, by having both pieces of information (services with PIDs and ports with PIDs), you can manually cross-reference if needed.
Creating a PowerShell script to list all open ports along with their associated service names.
Services don't directly expose which ports they are using. However, you can correlate services with processes and then processes with ports.
The script I'll provide will do the following:
1. List all TCP and UDP ports that are currently listening or established, along with the Process ID (PID) of the process using each port.
2. For each PID, find the corresponding service name if available.
Here's a basic PowerShell script for this purpose:
# Get the list of processes with their corresponding service names
$processes = Get-WmiObject Win32_Service | Where-Object { $_.ProcessId -ne 0 } | ForEach-Object { @{ProcessId=$_.ProcessId; ServiceName=$_.Name} }
# Function to find service name by PID
function Get-ServiceNameByPID {
param (
[Parameter(Mandatory=$true)]
[int]$PID
)
This script uses `Get-NetTCPConnection` and `Get-NetUDPEndpoint` to list TCP and UDP connections, respectively. It then attempts to match each connection's PID to a service name using WMI (`Win32_Service`). If a service name is found for the PID, it is displayed; otherwise, the field may be empty (indicating that the port is used by a process that is not a service).
Remember to run this script in an elevated PowerShell prompt, as accessing network information and service details typically requires administrative privileges.
The `netstat` command is a widely used tool for network diagnostics, showing a variety of network connections, listening ports, and the associated statistics.
To replicate similar functionality with a PowerShell script, you can utilize the `Get-NetTCPConnection` cmdlet for TCP connections and `Get-NetUDPEndpoint` for UDP endpoints.
Here's a PowerShell script that lists all TCP and UDP ports similarly to how `netstat` does:
- For TCP: Local Address, Local Port, Remote Address, Remote Port, Connection State, and the Process ID (PID) of the owning process.
- For UDP: Local Address, Local Port, and the Process ID (PID) of the owning process.
To run the script:
1. Open PowerShell (preferably as an administrator).
2. Copy and paste the script into the PowerShell window.
3. Press Enter to execute the script.
Keep in mind that the `netstat` command can provide additional flags/options for more detailed information. This script aims to cover the basics but can be extended to include more details if needed. For instance, you can resolve the process names from the PIDs or filter the results based on specific criteria.
Lab: Write a Python script to use the python wireshark package to tell us interesting things about the network.
Creating a Python script that uses a package like PyShark (a Python wrapper for Wireshark) to analyze network packets can be a very useful tool for network analysis. PyShark allows Python to capture and analyze network packets in a way similar to how Wireshark does it, enabling a wide range of network diagnostics and analysis tasks.
Below is a basic Python script using PyShark to capture live network packets and print out some interesting information from each packet. This script is a starting point and can be extended to perform more specific and detailed analysis depending on your requirements.
First, you'll need to install PyShark. You can do this using pip:
Replace 'your_interface_name_here' with the name of the network interface you want to capture packets from. You can find the list of network interfaces by running pyshark.LiveCapture().interfaces.
This script captures live network traffic and prints out information about each packet, including source and destination IPs, and details specific to the protocol used (HTTP, DNS, TCP, UDP).
Note: Running this script may require administrative privileges because it involves packet capturing on network interfaces.
Want to print your doc? This is not the way.
Try clicking the ⋯ next to your doc name or using a keyboard shortcut (