Share
Explore

Building a React Native Component with ScrollView Using react-native-cli

Last edited 52 seconds ago by System Writer

Student Lab Workbook: Building a React Native Component with ScrollView and List Components to Display a List of Pokemon

Introduction

In this lab, we will be building a React Native component that uses the ScrollView and List components to display a list of Pokemon.
We will be emphasizing the importance of understanding state and props in React, and how they are used to create dynamic and responsive components.
Learning Outcomes:
By the end of this lab, you will have a solid understanding of how to create a React Native component that displays a list of items.

Prerequisites

Before starting this lab, you should have a basic understanding of React and React Native. You should also have the following installed on your computer:
Node.js - ensure update to latest, and that you have installed metro-bundler cli
npm
React Native CLI, command line interface - Let’s make a project in VSC: install the dependencies from NPMjs.com

Getting Started

To get started, navigate to your workspace folder and create a new React Native project. You can do this by running the following command in your terminal:

npx react-native init PokemonList


Once the project is created, navigate to the project directory:

cd PokemonList


Now, let's open the project in your code editor and we can begin writing our component.

Creating the Component
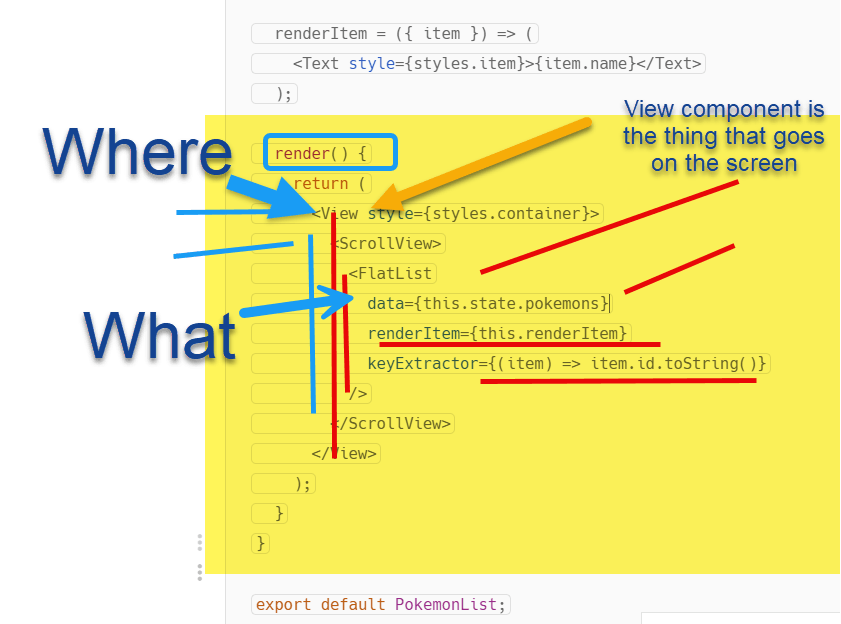


First, let's create a new file called PokemonList.js in the src folder. This file will contain our component code.
image.png
import React, { Component } from 'react';
import { View, ScrollView, Text, FlatList, StyleSheet } from 'react-native';

const styles = StyleSheet.create({
container: {
flex: 1,
backgroundColor: '#fff',
alignItems: 'center',
justifyContent: 'center',
},
item: {
padding: 10,
fontSize: 18,
height: 44,
},
});

class PokemonList extends Component {
constructor(props) {
super(props);
this.state = {
pokemons: [
{ id: 1, name: 'Bulbasaur' },
{ id: 2, name: 'Charmander' },
{ id: 3, name: 'Squirtle' },
{ id: 4, name: 'Pikachu' },
{ id: 5, name: 'Jigglypuff' },
{ id: 6, name: 'Snorlax' },
{ id: 7, name: 'Mewtwo' },
{ id: 8, name: 'Dragonite' },
{ id: 9, name: 'Mew' },
{ id: 10, name: 'Pichu' },
],
};
}

renderItem = ({ item }) => (
<Text style={styles.item}>{item.name}</Text>
);

render() {
return (
<View style={styles.container}>
<ScrollView>
<FlatList
data={this.state.pokemons}
renderItem={this.renderItem}
keyExtractor={(item) => item.id.toString()}
/>
</ScrollView>
</View>
);
}
}

export default PokemonList;


Let's go over what we just did:

We imported the necessary components from React Native: View, ScrollView, Text, and FlatList, as well as StyleSheet for creating styles.
We defined our component class, PokemonList, and created a constructor method to set the initial state of our component with an array of Pokemon objects.
We created a renderItem method that takes an object and returns a Text component with the name of the Pokemon.
We defined our render method, which returns a View component that contains a ScrollView component with a FlatList component inside it. The FlatList component takes in our pokemons array as data and our renderItem method as the function to render each item in the list.

Running the Component

To see our component in action, let's create a new file called App.js in the project root directory:
(You can tell your Project Root Directory: the root dir is where the package.json file is)

import React from 'react';
import { StyleSheet, View } from 'react-native';
import PokemonList from './src/PokemonList';

const styles = StyleSheet.create({
container: {
flex: 1,
backgroundColor: '#fff',
alignItems: 'center',
justifyContent: 'center',
},
});

export default function App() {
return (
<View style={styles.container}>
<PokemonList />
</View>
);
}


This file creates a new component App that renders our PokemonList component.

Start your project by running the following command in your terminal:


npx react-native run-android

This command will start the React Native development server and launch the app in the Android emulator.

Conclusion

Congratulations! You have successfully created a React Native component that uses the ScrollView and List components to display a list of Pokemon.


You have also learned how state and props are used to create dynamic and responsive components in React.
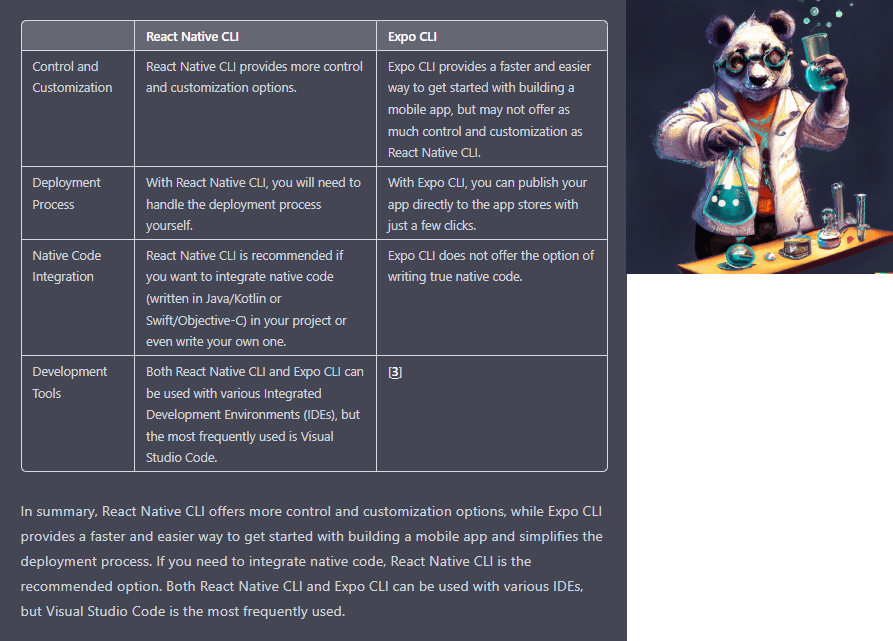

image.png


Now repeat the above exercise using expo-cli


The steps to deploy our React Native component using Expo CLI:

Install Expo CLI globally on your machine by running the following command in your terminal:
npm install -g expo-cli

Initialize a new Expo project by running the following command in your terminal:

expo init MyPokemonApp


This will create a new directory called "MyPokemonApp" with the basic files and structure of an Expo project.
Copy the PokemonList.js file we created earlier into the src directory of our new project.
Open the App.js file in the project root directory and replace its contents with the following code:

import React from 'react';
import { StyleSheet, View } from 'react-native';
import PokemonList from './src/PokemonList';

export default function App() {
return (
<View style={styles.container}>
<PokemonList />
</View>
);
}

const styles = StyleSheet.create({
container: {
flex: 1,
backgroundColor: '#fff',
alignItems: 'center',
justifyContent: 'center',
},
});


In your terminal, navigate to the project root directory and run the following command to start the development server:

expo start


This will open a browser window showing the Expo Developer Tools.

To test your app on your Android or iOS device or emulator, you need to install the Expo app from Google Play Store or App Store. Once installed, open the app and scan the QR code on the Expo Developer Tools page using your device camera.
Expo will then build and deploy your app to your device or emulator.

That's it! You have successfully deployed your React Native app using Expo CLI. Keep exploring and experimenting with React Native and Expo to create more complex and interesting apps.

Want to print your doc?
This is not the way.
Try clicking the ⋯ next to your doc name or using a keyboard shortcut (
CtrlP
) instead.