Skip to content
Library Speakers Consortium Help Site
Admins Only
Search
Automated Marketing Emails
Introduction
The monthly and newsletter email options send out automated emails to all users who have registered for webinars in the past, or who have subscribed to the service. It provides information on the upcoming author talks. This can be a useful tool for marketing, increasing registrants, and viewers.
Automated Email Options
For both the monthly email and the individual newsletter, you can edit the subject line, as well as add text to the beginning and end of the email. You can add images, adjust fonts, and other items. The events will automatically populate in the body of the email.
You can use email tags; more information will be available in a separate article soon. However, the two most important email tags are %month%, which will auto populate the month, and %upcomingWebinars%, which links to your upcoming webinars page.
To add an image, click on Insert then Image. Next to source there is an icon to upload. Click it to upload an image. From there you can adjust the image as needed.
For more info on using the text editor, please visit this article.
Sending the Emails
At the top of the "Newsletter Email Settings" is a "Send Test Email" button. Click this to send an email to yourself to see how it looks after filling in your email address. You can send tests for both the Monthly and Individual Newsletters.
The email will look something like the image below in its basic form. The events will be presented with a picture, registration link, and the title. Of course, you can edit the intro text.
This is the monthly:
And the individual:
Users will have the option to **unsubscribe** from the email if they no longer want to receive the emails. They can do this directly from the email.
Analytics and Net Promoter Score (NPS)
Introduction
The microsite offers a wide variety of analytics options for easy tracking of viewers, registrants, and events. There is also the Net Promoter Score (NPS), the survey that viewers are provided that allows them to rate events and leave comments. Both of these allow members to receive feedback and how they can improve their offerings.
There are two options to view analytics. First, analytics can be viewed by the Event. This allows the options to see which events did best and to get specific analytics on individual events. Second, there is the option to view Registrant analytics. This shows which viewers have been registering the most and offers the chance to see what variety there is among registrants.
Event Analytics
To view this, click Event Analytics in the admin menu. You can sort the list by name, date, registrants, viewers, or the average NPS. You can export this list to CSV to open in Excel if you want to do more advanced figuring, print, or email the numbers. Click on Details for an individual event to see specific registrations.
When looking at the details, each registrant is listed. Again, this can be exported to CSV or PDF and can be sorted by various options, including email, first and last name, affiliation, and whether watched. The NPS can also be viewed if turned on by clicking the link for NPS. That will be discussed later in the article.
Registrant Analytics
Registrant Analytics provides a mixture of the other two analytics. It shows a list of every single registration over a period of time. At the top dates can be filtered just like the Participant Analytics page.
Below that is the table. Like the other two, the table can be exported. The list can be sorted by name, email, registration date, and other options as well.
This can be useful to find out the total number of registrations for a period of time, for seeing which specific webinars a person has registered for, or for seeing when registrations occurred to see if an email marketing campaign was working.
Net Promoter Score (NPS)
The Net Promoter Score is turned on for all events. Users will receive a popup window asking them to rate the event when exiting. This allows the user to select a score from 1 to 10 and leave a comment or suggestion for the event.
To view the NPS for a particular event, go to the Event Analytics for the event you want to view and click on the NPS score mentioned above.
This will take you to a familiar screen. It will show the average NPS and the option to export to CVS and PDF and sort the comments. The individual scores and comments are visible to view. This can be useful for getting feedback on your webinars and make sure you're able to provide the best content to alumni.
How to Use the Microsite Text Editor
Introduction
The microsite text editor, which is powered by Tiny, forms the backbone of editing the texts on the microsite, whether it's for emails or event descriptions. It acts like many text editors you already use, like Microsoft Word or Google Docs, but it does have some quirks that set it apart. Nevertheless, it allows users to create, edit text, add images, and support you in building and using your microsite.
The Basics
First, the text goes into the text box, located at the bottom. It is large enough to be able to view a couple of paragraphs at one time. You can increase the size by dragging the bottom right.
Right above the text box is the tool bar. The bottom half of the tool bar includes several basic editing options.
From left to right:
On the far left are the undo and redo buttons. To the right of that is the formats tab. These allow you to add headers and adjust the fonts, alignment, and the look of the text.
Next are the options for bold and italics, then another option for adjusting text alignment. To the right of that are two options to add lists, either by bullet point or number. Next allows you to adjust the text's indentation and then there is a shortcut to add a link.
Use the link option, highlight the text you want to link (this will appear in the Text to Display field), and then click the link button. Enter the link in the URL field. You can also adjust under Target whether you want the link open in a New Tab or not. Once you are ready, click Save. The link will be saved.
Finally, there is an ability to add an image. Click the upload button next to the Source field. That will allow you to upload an image and adjust it as needed.
Drop-down Menus
At the top are drop-down menus, similar to ones you see in many other computer programs. These offer more editing options.
On the furthest left is the File menu. This allows you to print, or erase the document. To the Right of that is the Edit menu. It has many of the same options as covered previously, such as undo and redo.
The View option allows some more in-depth viewing options that likely won't be needed for simple text editing. To the right of that is the Insert menu. This is useful for adding images and other pieces of media. To add an image, click on Image in the Insert menu, and you'll be able to upload your image.
Adding other media types, such as a YouTube video, can be added using the same instructions as above, but by clicking on the Media button.
Format: To the right of Insert is Format. This has many of the same formatting options such as bolding or italicizing text. Finally, on the far right is the option to put in a table.
Using the Text Editor
The text editor, and all the above options, can be used to adjust how emails look, such as the registration and monthly emails and the descriptions for events. This allows for further branding to be done, especially on the emails.
How to add Links to the Microsite Header/Navigation Block
Introduction
Updating the header of the Microsite to include other links can allow for a more integrated experience with users. If there are other websites you want users to easily visit beyond the library home page, adding them to the header is a good way to do this. It can also be combined with the Tag feature to collect the tagged webinar pages into a central location for users to visit. [More information on tagging webinars can be found here.](https://help.alumlc.org/?docs=how-to-use-the-tag-feature-to-group-events-together)
Adding a Single Link to the Header
To add links to the header, click on Account Settings inside the Admin Menu. At the bottom of the page is the Navigation Customization Block. Enter in the URL for the tag you want as follows: {Title,URL} Then add whether you want to have the link open in a new or same tab. If you want it in the same window add {Title,URL,_self} and if you want to open in a new window add {Title,URL,_blank}. For example, a final result might be: {This is a Tag,https://libraryc.org/brandman/upcoming,_self} which opens in the same window or {This is also a tag, https://libraryc.org/brandman/tags/events/test,_blank} which opens in a different window.
The link will then appear at the top of the page.
Adding Multiple Links to the Header
If you have more than one link to add to the header, just separate the two links and whether they are opening in the same or different window with a single semi-colon {Title,URL,_self};{Title,URL,_blank} Don't place a space between the two links. It should look something like this: {Tag Test,https://alumlc.org/brandman/tags/events/this-is-a-url-slug,_blank};{Tag Test 2, https://alumlc.org/brandman/tags/events/test,_self}
Adding a Dropdown Menu to the Header
Adding a dropdown menu can be useful if there are several links or tag pages you want to add. Otherwise, the header can become very cluttered. To create a dropdown, add the title of the dropdown in square brackets surrounding all the URLs you wish to include separated by a comma, like this: [Title of Dropdown,{Title,URL,_blank},{Title,URL,_self}]. For example, [Tag Pages,{Tag Test,https://alumlc.org/brandman/tags/events/this-is-a-url-slug,_self},{Tag Test 2, https://alumlc.org/brandman/tags/events/test,_blank}] This will create a dropdown like this:
Using your Microsite (Video)
Here's a video on the variety of options and features and how to navigate your microsite:
https://youtu.be/qjnRWs433Co
How to Add an Admin User to Your Microsite
Introduction
Especially if you have a big team, adding users to the microsite is important. This gives users access to analytics, the ability to update and create events and other views. Thankfully, it is quick and easy to add another user.
Adding a User
Click on the Admin drop-down menu in the top right and click on User Accounts. This takes you to the user account screen. Here you can see all the users already added to your account.
Next, click on the bar at the top, Create a New User. This will open up a new tab. Enter the person's name, email, and a temporary password. Once you have the information entered, click on Create User.
Have the new user visit https://libraryc.org/login and click on the Forgot Password link. Enter their email and reset the password to something they like to use going forward. They will then be able to access your microsite's admin menu and other features.
Editing and Branding Your Microsite
Introduction
Customizing your microsite is important, and we recognize that most members want flexibility in how they present their microsite. Therefore, many of the customization and branding options are available for you to customize directly inside your admin menu.
Changing Titles and Descriptions
You can change the titles and descriptions for most pages on your microsite. This is done from the Account Settings in your admin menu.
At the top you can change your Organization Name which affects a few areas including the banner at the top. Your legal name is used for emails and a few other purposes.
Below that you can change the Title and Description for the Home Page, Upcoming Events, and Past Events. They all have a similar format.
Below that is the header settings, where you can change the URLs and titles of the various links at the top. You can also add your own custom headers, more info is available here.
Branding Settings
The next page is Branding and Font Settings in your admin menu. First in the list on this page is the logo and background image. The background image is the image that is present between the header and the main text of a page.
Because of the way the site is designed, the image cuts off at the bottom. Therefore, it is recommended to either choose a picture with the focus in the top half, or to add blank space at the bottom. The image resolution should be 1680x625.
The logo is placed at the top in the header, on the far left. It is recommended to cut off as much extra space as possible, especially from the top and bottom, to get it to size correctly. Both pictures can be uploaded directly on the page.
Below that is the Logo Styles, do not adjust this number.
Next is the color. This changes the color for the top header and the color of the buttons. It uses a hex color format.
Under that is Font Settings. We recommend using defaults, but both the size of the fonts and the type of font can be changed. To change the size, enter a new number to the corresponding item you want to change, such as the Primary Header. To change the type of font, type in the name of the font in the corresponding box. Most web fonts can be used.
If you have any questions, or want to change something that isn't listed in the settings, feel free to contact us and we can look into it!
How to Update or Delete Registrations
Introduction
Sometimes users will make a mistake when registering or might make duplicated registrations. When that happens, you might want to update the registration to make sure there is not an error or duplicate registration.
How to Update or Delete a Registration
Proceed to the Event Analytics in the Admin Menu. Then click on Details for the event, which has a registration that needs to be changed. You will see the Update and Delete buttons next to each registrant.
To update a registration, click on Update. This will take you to a screen where you can edit the names, email, affiliation, and contact settings. Click on Edit Registration to save the changes.
To delete a registration, click on Delete. You will be taken to a screen showing the registration. If you wish to delete the registration, type YES into the field marked.
Then click Delete User. The registration will be deleted.
Notes
- Deleting a user is not a ban; anyone deleted can re-register at any time.
- Updating one registration will not update all other registrations for that person.
- Custom field inputs can be updated in the Additional Field Data.
Adding Additional Fields
Introduction
The Additional Fields tool allows members to create registration forms with a high degree of customization. With this new tool, members can gain more information from registrants in different ways beyond the text fields currently available. For example, you can use this to collect or require patrons to provide their library card number.
You can view a video about the feature here:
https://youtu.be/uKisHJIchLQ
Turning On the Forms
There are two ways to turn on the advance forms. First, you can set up a default form for all events by going to Default Fields in your admin menu. This will take you to the editor, and anything saved there will be added to future events by default. The second way is to add/edit forms for each event. Under Manage Upcoming in the Admin Menu, you can click on Fields. This will take you to the form editor for that particular event. Additionally, after creating an event you will automatically be redirected to the Additional Fields page.
Using the Field Editor
You will see a blank slate when entering the editor, options on the right to drag and drop into the canvas. When dragged in, you will see the option to remove, edit, or copy the field.
When clicking on edit, you can adjust the settings of the field. Many of the settings are the same for all the fields. You can set whether it is required to be filled in or if it's just optional. The label is the Title of the field. The Help Text provides a question mark the user can hover over to get help with the field, similar to the help text present in the admin view.
You can also edit several advanced viewing options. Some options are only present for some of the fields. For example, the checkboxes allow for an "Other" category, and the Radio Group allows for selecting multiple selections.
There are also options to add Headers and Paragraphs. These are not fields but rather boxes so you can insert text to provide info to the registrant.
You can change the position of fields by dragging them to the location you desire. Once you're finished, click save!
Using the Form
When registering, in addition to the normal fields present (First Name, Last Name, Email, and Affiliation), users will now see the other form options and fill them in as the other fields when registering.
That data is then saved to the Event Analytics page as a separate column for each field:
This data can be exported with the Event Analytics export feature.
Using Tracking Link Variables
Introduction
We know that data tracking is an important piece of the platform, and we want to make it easy to connect with your data analytics platforms. With variable link tracking, you can now attach a marketing source to the link and, therefore, track which webinars they register for and link it to your data software.
Use Cases
There are a variety of use cases for link tracking. One use case is tracking the marketing source. LSC tracks registrations from the automated monthly emails if you have that turned on. But you can also track your own sources, for example, tracking if patrons clicked on a link on Facebook or through your own marketing email. If you want to use the marketing source, add uMarketingSource as the URL Key. So, for example, for tracking a link from Facebook, you could have it set up as libraryc.org/valleycottagelibrary/upcoming//?uMarketingSource=facebook
Setting up the Link
The template for the tracking link is set up as follows: libraryc.org/microsite/page//?urlkey1=val1&urlkey2=val2&urlkey3=val3...
The URL Key is the title for what you are tracking, while the val is the variable. The URL key must always have a "u" in front of it; otherwise, the data will not be tracked.
So, for example, if you are adding a marketing source to the link, it would look like this: libraryc.org/valleycottagelibrary/upcoming//?uMarketingSource=Twitter
If you have multiple variables, you want to track, add & and the second key and variable following the same rules, and repeat as needed. For example, if you wanted to track library card ID and marketing source, you can use libraryc.org/valleycottagelibrary/upcoming//?uMarketingSource=facebook&uLibraryCard#=765
Pulling the Data
When a patron registers for an event, any variable in the link will be tracked and added to the registration analytics. For example, in this picture, one person registered using the variable links they got in an email, and so their marketing source is present:
This information can then be exported in a CSV file.
Sending Test Reminder Emails
Introduction
Editing the emails for events is easy, but sometimes you want to make sure the changes you made look nice in an email format. You can send a test email to yourself to see how the reminder emails will look when they are sent.
Sending a Test Email
First go to Manage Upcoming in your admin menu and click Update on the event you want to send the test email for. Just below the title for the reminder email, you can see the button to send a test email.
Make sure any changes you made are saved, and then click on the button.
Enter in your email in the box and click Send Test Emails.
This will send all the reminder emails turned on for that event: the 24 hour, 2 hour, and thank you email.
Please note that the watch link does not work, if you want a watch link for the event you have to register for the event.
Note: If you want to see a test of a registration email, just register as a dummy registrant and use that as a test. This test only works for the reminder emails that are sent by the microsite: 24 hour, 2 hour, and the Thank You email.
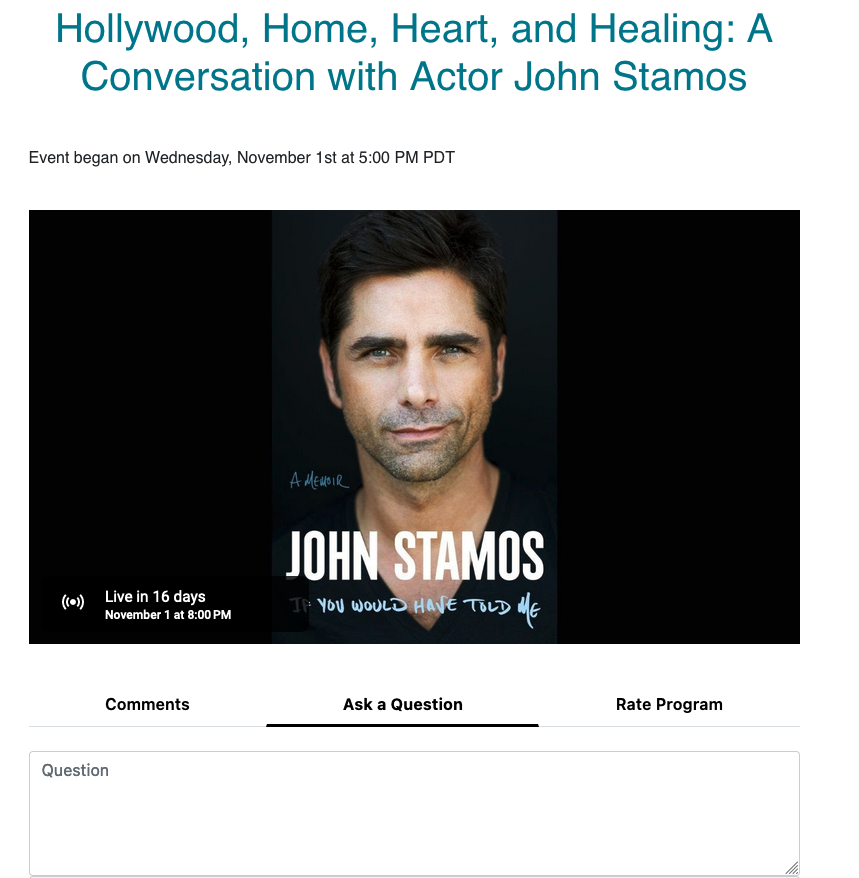
How to Register and Watch an Author Talk
Introduction
Author Talks are provided by your library through a special website. These Author Talks are available live to register and watch from the comfort of your own home. You can also watch recordings of the Author Talks at a later time. Let's find out how to register and watch an Author Talk!
Registering
To register go to the website for your library. You can find a list of participating libraries at this link. Once you have made it to the site, you can click on Upcoming Events to see the live Author Talk you can register for.
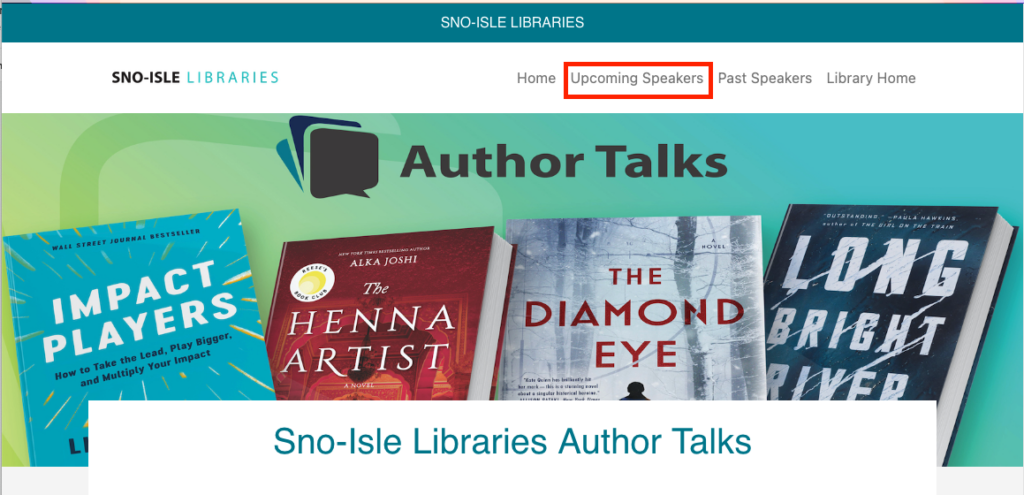
After that you will see a list of Author Talks. Click on the one you want to register for.
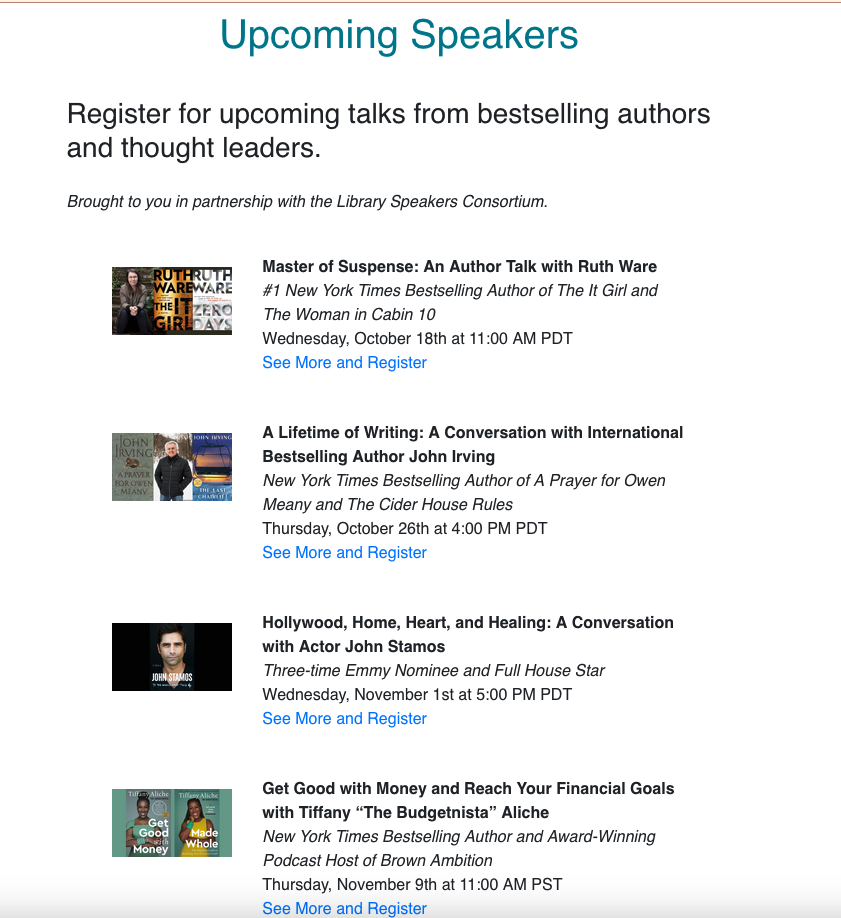
Then you can read the description for the Author Talk, and if you are still interested click on register.
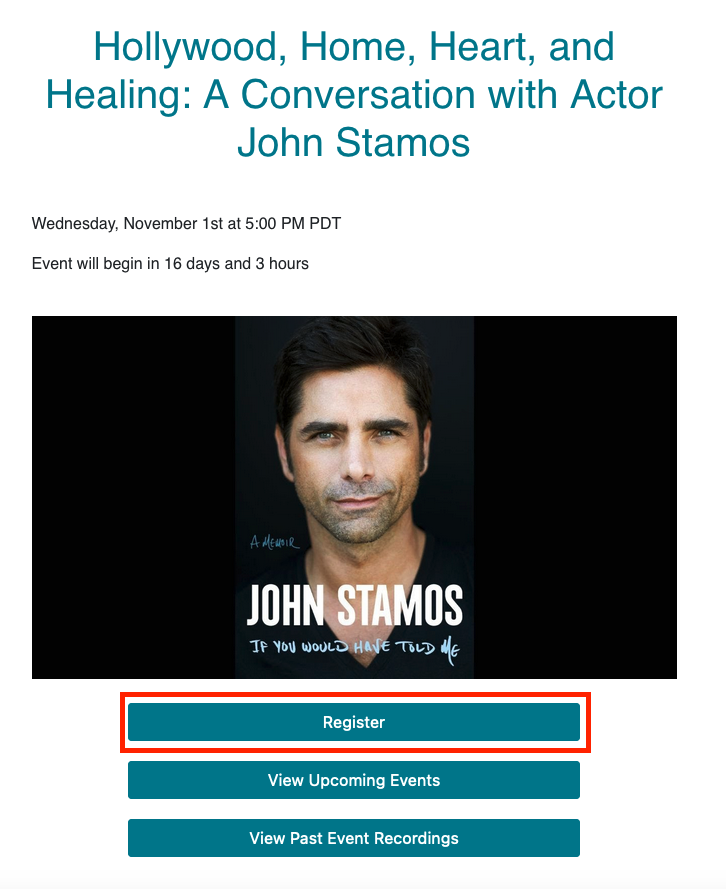
Then fill in your information. Make sure you put in the right email address as that is how you will receive the watch link!

After that you will receive an email with the watch link. You will also receive emails 24 hours and 2 hours before the Author Talk. When you're ready to watch click on Join Webinar.
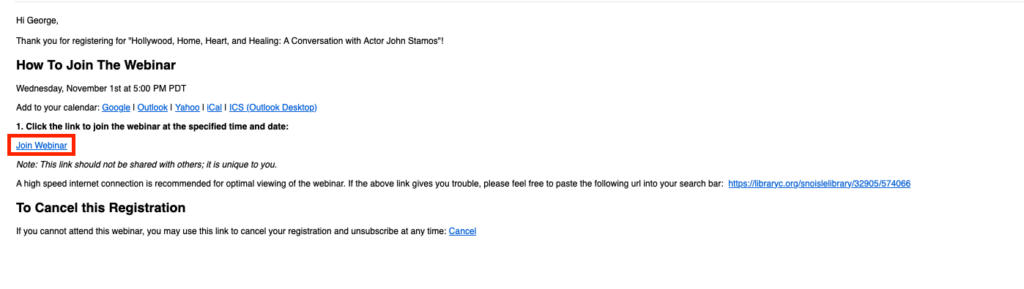
That will take you to the watch page. You can watch the Author Talk, ask questions, and participate in the live chat all in the same page. There is no Zoom, the live video will play in your browser.
How to Use the Bookmarks in Canva
Introduction
We provide templates for bookmarks that you can then add in your details and produce. This allows you to market the Author Talks in a fun and unique way! This is achievable through Canva, you can edit the templates and then produce them directly in there.
Creating the Bookmarks
First, go to the Bookmarks folder in the Google Drive Link. You'll be able to then see a list of docs, one for each month. Open the doc for the month you want to produce and then choose which time zone and color you want. Click that link.
This will take you to Canva.
If you are already logged in when you click the link you can click file in the top left then Make A Copy. This will create a copy that you can edit and then print as needed.
If you are not logged in you'll be taken to a screen where you can log in or create an account. Do that (you only need a free account) and then you'll be taken to the home page. You should see the bookmarks listed under recent designs. Click the three dots and click Make a copy and you'll be able to edit and print that copy as needed.
Automated Marketing Emails
Article
Introduction
The monthly and newsletter email options send out automated emails to all users who have registered for webinars in the past, or who have subscribed to the service. It provides information on the upcoming author talks. This can be a useful tool for marketing, increasing registrants, and viewers.
Automated Email Options
For both the monthly email and the individual newsletter, you can edit the subject line, as well as add text to the beginning and end of the email. You can add images, adjust fonts, and other items. The events will automatically populate in the body of the email.
You can use email tags; more information will be available in a separate article soon. However, the two most important email tags are %month%, which will auto populate the month, and %upcomingWebinars%, which links to your upcoming webinars page.
To add an image, click on Insert then Image. Next to source there is an icon to upload. Click it to upload an image. From there you can adjust the image as needed.
Sending the Emails
At the top of the "Newsletter Email Settings" is a "Send Test Email" button. Click this to send an email to yourself to see how it looks after filling in your email address. You can send tests for both the Monthly and Individual Newsletters.


The email will look something like the image below in its basic form. The events will be presented with a picture, registration link, and the title. Of course, you can edit the intro text.
This is the monthly:

And the individual:

Users will have the option to **unsubscribe** from the email if they no longer want to receive the emails. They can do this directly from the email.
Want to print your doc?
This is not the way.
This is not the way.

Try clicking the ⋯ next to your doc name or using a keyboard shortcut (
CtrlP
) instead.