Share
Explore

icon picker
Data Engineer Cert. - DataCamp

Welcome to my summary on Data Engineering Certification from DataCamp. This is an incomplete version. Some topic may not yet been covered. Please revisit this page from time to time to see the progress.
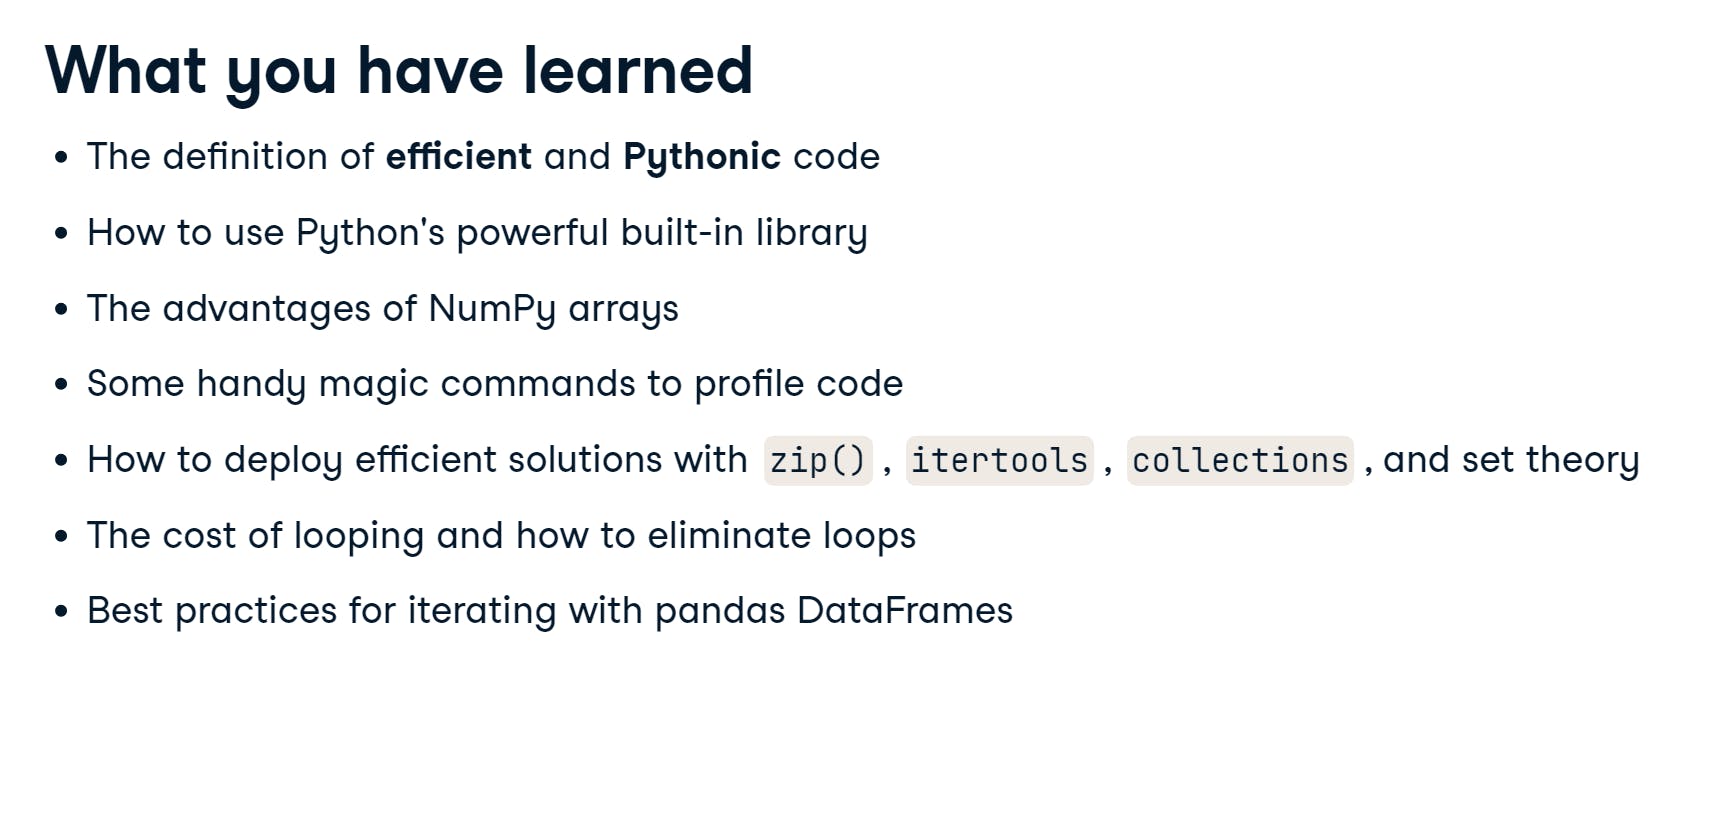
!Writing Efficient Code in Python
image.png
Build-in functions
Built-in types: list , tuple , set , dict , and others
Built-in functions: print(), len() , range(), round() , enumerate() , map() , zip() and others
Built-in modules: os, sys, itertools, collections, math, and others
Interesting points

nums = [1.3, 2.2, 3.6]
rnd_nums = map(rounds, nums)
print(list(rnd_nums))

[1, 2, 4]

nums = [1, 2, 3]
sq_nums = map(lambda x: x**2, nums)
print(list(sq_nums))

[1, 4, 9]
Component of lambda function
lambda input: output
Timing and profiling

Gaining Efficiencies

Pandas optimizations
!Writing Functions in Python
lorem ipsum
Intro to Shell
ls
file listing
pwd
print working directory
cd
change directory
cd ..
move up one level
cd ~
change to home directory
cp original.txt duplicate.txt
copy file
mv old_location.txt new_location.txt
move file (can also use for renaming file)
rm file.txt
remove file
rm -r directory
remove directory
cat file.txt
view file content
head file.txt
see first 10 lines of file
head -n 3 file.txt
see first 3 lines of file
ls -R
list everything below current directory
cut -f 2-5, 8 -d , values.csv
select column 2 to 5 and column 8 using , as separator
-f : field
-d : delimiter
grep search_term filename.csv
search for pattern in file
-c : print a count of matching lines instead of the lines
-h : do not print the filename when searching multiple files
-i : ignore case
-l : print the names of files that contain the matches
-n : print line number of matching lines
-v : invert match
head filename.csv > store.csv
store first 10 lines in filename.csv to store.csv
head -n 5 filename.csv | tail -n 2
store first 5 lines from filename.csv to be input for the next command
wc
print number of character -c , word -w , or line -l in a file
wildcards
* matches any characters at any length
? matches a single character
[...] matches any one of the characters inside
{...} matches any of comma separated patters inside
sort
sort output
-n numerical order
-r reversed order
-f fold case (case-insensitive)
-b ignore leading blank
uniq
remove adjacent of duplicate lines
filename=text.txt
assign text.txt to a variable called filename
echo $filename
print value contained in the variable filename
for filename in directory/*.csv; do echo $filename; done
print name of every file in the folder directory
nano filename
open filename in edi


tor
ctrl + k cut a line
ctrl + u paste a line from clipboard
ctrl + o save the file
ctrl + x exit the editor
bash script.sh
run commands in script.sh
Data Processing in Shell
data download
curl [option flags] [URL]
client url download data from http or ftp
-O download with existing filename
-o newname download and rename to newname
-L redirect HTTP if 300 error code occurs
-C resume previous file transfer if it times out before completion
wget [option flags] [URL]
www get > native command to download files
better than curl for multiple file downloading
-b background download
-q turn off wget output
-c resume broken download
-i download from list given in a file
--wait=1 wait 1 second before download
csvkit
in2csv filename.xlsx > filename.csv
convert the first sheet in filename.xlsx to filename.csv
in2csv -n filename.xlsx
list all sheet names
in2csv filename.xlsx —sheet “sheet1” > filename.csv
convert sheet sheet1 to filename.csv
csvlook filename.csv
preview filename.csv to console
csvstat filename.csv
df.describe in console
csvcut -n filename.csv
list all column names in filename.csv
csvcut -c 1 filename.csv
return column index 1 (regarding result from csvcut -n ) from filename.csv
can be used as -c “column name” as well
csvgrep
filter by row using exact match or regex
must use one of the following options
-m exact row value
-r regex pattern
-f path to a file
csvgrep -c “column name” -m value filename.csv
filter filename.csv where column name == value
csvstack file1.csv file2.csv > allfile.csv
stack file1.csv and file2.csv together and save to allfile.csv
csvstack -g “f1”,”f2” -n "source" file1.csv file2.csv > allfile.csv
create a special column name source (instead of the default group)to identify which row comes from which file
SQL
sql2csv --db "sqlite:///database.db" \
--query "SELECT * FROM base" \
> filename.csv
connect to database sqlite:///database.db using query SELECT * FROM base and save to filename.csv
csvsql --query "SELECT * FROM base LIMIT 1" filename.csv
use the above query to select data from local filename.csv file
csvsql --query "SELECT * FROM base1 INNER JOIN base2 ON ID" base1.csv base2.csv
can use for multiple csv but the bases should appear in order according to SQL query
csvsql --no-inference --no-constraints \
--db "sqlite:///database.db" \
--insert filename.csv
insert filename.csv to database
--no-inference disable type parsing (consider everything as string)
--no-constraints generate schema without length limit or null check
cron job
echo "* * * * * python hello_world.py" | crontab
Add as job that runs every minute on the minute to crontab
there are 5 * to indicate time for a cron job
minute(0-59)
hour(0-23)
day of month(1-31)
month(1-12)
day of week(0-6)
crontab -l
list all cron jobs
Intro to Bash
Bash is a script of shell commands
Usually starts with
#!/usr/bash or #!/bin/bash
file extension is .sh
run by bash scriptname.sh
arguments can be added by bash scriptname.sh arg1 arg2
These arg1 arg2 can be accessed inside the script by:
$1 get arg1
$2 get arg2
$@ get arg1 arg2
$# get 2 as the amount of arguments
variables
var1="sam" assign the value "sam" to var1 . Note that there must be no space between =
echo "There are $var1 items" will print There are 6 items
quotation marks
'sometext' interpreted literally
"sometext" interpreted literally except $ and `
`sometext` interpreted as bash command and return STDOUT into a variable
$(command) is equivalent to `command` but the $(command) is used more in modern applications
numerical calculation
expr 1 + 4 get 5
expr 11 + 3.5 get error as expr takes only int into account
echo "11 + 3.5" | bc get 14.5 as bc (basic calculator) can do more
echo "11/3" | bc get 3 since the decimal place has not been defined
echo "scale=3; 11/3" | bc get 3.666
$((11+3)) is expr 11 + 3
array
numerical-indexed
declare -a my_array to define empty array
or my_array=(1 2 3) to provide values while defining array. Note that space is used as separator
echo ${my_array[@]} get (1 2 3)
echo ${#my_array[@]} get 3 (length of array)
echo array[@]:N:M where N is the starting idx and M is how many elem to return
if-statement
if [ condition ]; then
# some code
else
# other code
fi
dont forget [ ]
special flags
-e if the file exists
-s if the file exists and has size greater than zero
-r if the file exists and readable
-w if the file exists and writable
combine conditions with && for AND and || for OR
for-loop
for x in 1 2 3
do
echo $x
done

for x in {START .. STOP .. INCREMENT} # like range(START, STOP, INCREMENT)
do
echo $x
done

for ((x=START;x<=STOP;x+=INCREMENT)) # use double parentheses to loop c-style
do
echo $x
done

for book in books/* # loop over files in a directory
do
echo $book
done

for book in $(ls books/ | grep -i 'air')
# use shell within a shell with $()
# resulting files with 'air' in their names inside the book directory
do
echo #book
done
function
function_name () {
# function code
return # return status code
}

function function_name {
# function code
return # return status code
}

function function_name {
echo "access the first input $1"
for file in $@
do
echo "access to $file"
done
}

function_name "file1.txt" "file2.txt" "file3.txt"
return does not return the return value but status code, where success is 0 and failure is 1-255, which is captured as $? . To output values from a function, one should
make a global variable and update it
use echo at the last line of the function and use shell within a shell to call the function
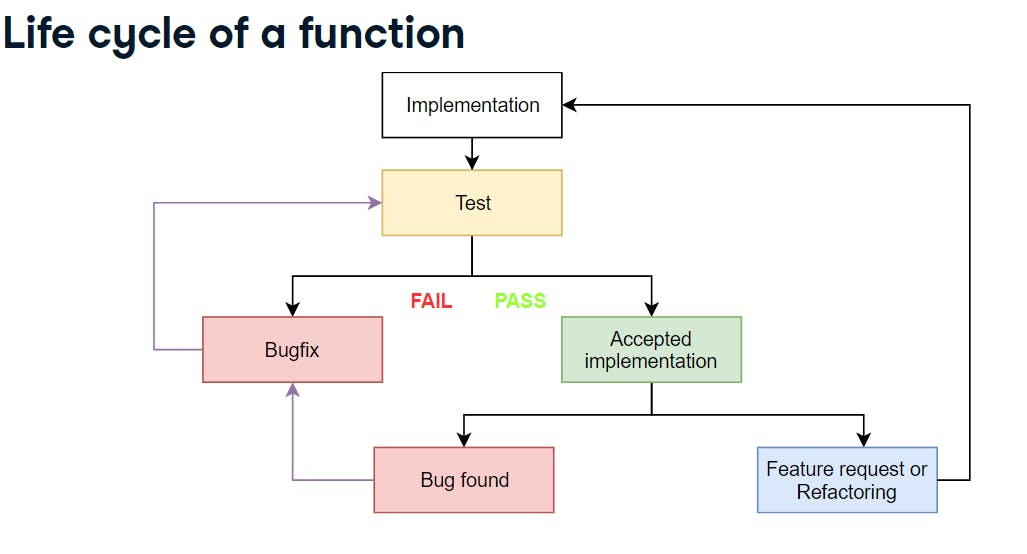
!Unit Testing
image.png
This makes like 100 times for testing a function before going into production
simple unit test process
create a file with naming convention of test_ in front, e.g., to test myfunc this test file should be test_myfunc.py
inside the testing file
import pytest
import myfunc

def test_cleaning():
assert myfunc("fixed_input") == "fixed_output"
def test_data_type():
message = "Input 'another_input' should gives int as output"
assert isinstance(myfunc("another_input"), int), message
def test_valueerror_on_input():
arg = "false text"
with pytest.raises(ValueError):
myfunc(arg)
# if this function raises ValueError, it passes
# if it does not raise ValueError or other error, it fails
run the unit test pytest test_myfunc.py
comparing float in assert statement, use assert 0.1+0.1+0.1 == pytest.approx(0.3)
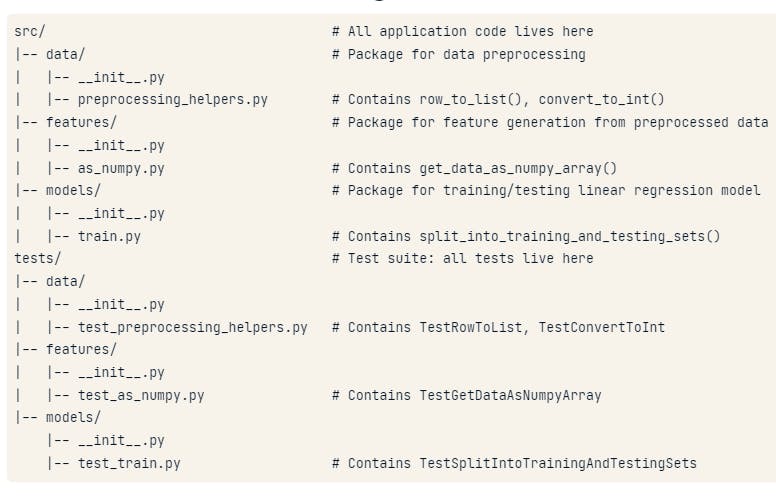
image.png
Project structure composed of src to contains source code and test to contain tests with corresponding test modules for each source file. Inside test file one can split different source functions to test by using class
import pytest
from data.preprocessing_helpers import func1, func2

class TestFunc1(object):
def test_functionality1_func1(self):
...
def test_functionality2_func1(self):
...

class TestFunc2(object):
def test_functionality1_func2(self):
...
def test_functionality2_func2(self):
...
if a function is expected to fail
import pytest

class TestFunc1(object):
@pytest.mark.xfail
def test_something(self):
...
# test_something is expected to fail at first.
# The above decorator is used to inform pytest that do not alarm on this fail.
@pytest.mark.skipif(bool_expression)
def test_another(self):
...
# test_another is expected to fail if bool_expression is true.
# pytest will not alarm if the condition satisfied
dealing with testing with files
create raw data file + create ref result file → function → compare the result file from function and ref result file → remove raw data file + remove ref result file
The process in orange is call Fixture in which pytest has a function to deal with
import pytest
import os

@pytest.fixture
def my_fixture():
# create data and so on
yield raw_data_path, ref_data
# remove data

def test_something(my_fixture):
...
data = my_fixture
...
or use tmpdir function from pytest to create files in this tmpdir and remove files and this tmpdir after the test ends
@pytest.fixture
def my_fixture(tmpdir):
raw_data = tmpdir.join("raw.txt")
clean_data = tmpdir.join("clean.txt")
with open(raw_data, "w") as f:
f.write("3131\n"
"21212\n"
"2111\n"
)

yield raw_data, clean_data
!Object Oriented
Object = states + behaviors = attributes + methods
attribute <> variable <> obj.my_attribute
method <> function() <> obj.my_method
class Customer:
MAX_VALUE = 10 # a global constant across the class is defined
def __init__(self, name, balance=0):
# function __init__ is called upon object creation
# whatever arguement give
self.name = name
self.balance = balance
# self.variable means an attribute which belongs to this object
def set_name(self, new_name):
# add a method to object by adding a function with self as the first argument
self.name = new_name
def identify(self):
print("I am "+name)

@classmethod # classmethod is a method that is assigned for the class, not the object
def from_file(cls, filename):
# classmethod needs cls as the first argument
with open(filename, "r") as f:
# get name and balance from file
name = f.readline()
balance = f.readline()
return cls(name, balance)
# call cls as a return value means call __init__() of the class Customer when from_file() is called
Intro to Airflow
Airflow is a platform to program workflows → Creation, Scheduling, Monitoring
Workflow in Airflow is written in Python implemented as DAG (Directed Acyclic Graphs)
DAG is a set of tasks forming into graph in which:
unidirection → task flow indicates inheritance and dependencies
acyclic → no loop or repeat
from airflow.models import DAG
from datetime import datetime
default_args = {
'owner': 'jdoe',
'email': 'jdoe@email.com',
'start_date': datetime(2022, 12, 30)
}
dag = DAG('task_name', default_args=default_args)
Airflow Operator
Bash Operator
from airflow.operators.bash_operator import BashOperator

task1 = BashOperator(task_id='first_task',
bash_command='echo 1', # this can be bash command or shell script
dag=example_dag)

# chain tasks
task1 >> task2
Python Operator
from airflow.operators.python_operator import PythonOperator
from time import time

def printme():
print("This goes into logs")
def sleep(length_of_time):
time.sleep(length_of_time)

python_task1 = PythonOperator(task_id="simple_print",
python_callable=printme,
dag=example_dag)

python_task2 = PythonOperator(task_id="sleep",
python_callable=sleep,
op_kwargs={"length_of_time": 5}
dag=example_dag)
Sensor
Operator that waits for a certain condition to be true
Can set how often to check
Attach to task
File sensor
from airflow.contrib.sensors.file_sensor import FileSensor

file_sensor_task = FileSensor(task_id='file_sense',
filepath='file.csv',
poke_interval=300,
dag=some_dag)

init_cleanup >> file_sensor_task >> generate_report
# This will perform a cleanup task and wait until the file is generated,
# then create the report.
Other sensors
ExternalTaskSensor
HttpSensor
SqlSensor
other sensors in airflow.sensors and airflow.contrib.sensors
Template
Replace things effectively using jinja template style
templated_command = """
echo "Reading {{ params.filename }}"
"""
t1 = BashOperator(task_id='template_task',
bash_command=templated_command,
params={'filename': 'file1.txt'},
dag=some_dag}
using for loop
templated_command = """
{% for filename in params.filenames%}
echo "Reading {{ params.filename }}"
{% endfor %}
"""
t1 = BashOperator(task_id='template_task',
bash_command=templated_command,
params={'filenames': ['file1.txt', 'file2.txt']},
dag=some_dag}
special variables
{{ ds }}: running date in YYYY-MM-DD
{{ ds_nodash }} : YYYYMMDD
{{ prev_ds }} : previous running date in YYYY-MM-DD
{{ prev_ds_nodash }} : YYYYMMDD
{{ dag }} : DAG object
{{ conf }} : Airflow config
{{ macros.datetime }} : datetime.datetime object in python
{{ macros.timedelta }} : timedelta object in python
{{ macros.ds_add(’2020-04-15’, 5) }} : modify days from date → in this case, 2020-04-20
Branching
Use logic to navigate the flow
def branch_test(**kwargs):
if int(kwargs['ds_nodash'] % 2 == 0:
return 'even_day_task'
else:
return 'odd_day_task

branch_task = BranchPythonOperator(task_id='branch_task', dag=dag,
provide_context=True,
python_callable=branch_test)

start_task >> branch_task >> even_day_task >> even_day_task2
branch_task >> odd_day_task >> odd_day_task2
Running DAGs and Tasks
run a specific task from command line
airflow run <dag_id> <task_id> <date>
run a full DAG
airflow trigger_dag -e <date> <dag_id>
Intro to Spark
Spark is used to distribute computing tasks to workers or nodes, in which the main connection between user and the cluster is a simple as calling SparkContext and the interface of the connection is SparkSession .
view tables
SparkSession.catalog.listTables()
use SQL query
query = '''
SELECT * FROM table LIMIT 10
'''

result = SparkSession.sql(query)
print(result.show())
# can convert result to pd dataframe
df_result = result.toPandas()
convert pd dataframe to spark
df = pd.DataFrame(np.random.random(10))
# create spark dataframe from pd dataframe,
# but this is not registered as a table in spark catalog yet
sp = SparkSession.createDataFrame(df)
# add sp to the catalog
sp.createOrReplaceTempView("table_name")
read csv to spark
file_path = "/some/where/in/the/pc"
sp = SparkSession.read.csv(file_path=file_path, header=True)
add column
df = df.withColumn("newCol", new_col_values)
rename column
df = df.withColumnRenamed("old_name", "new_name")
filtering
# SQL style
df.filter("column > 1000") # use string from WHERE clause
# R style
df.filter(df.column > 1000) # use filtering term in R
select columns
col1 = df.select("col1")
col2 = df.select(df.col2)
select column, modify, and assign with alias
# SQL style
df.selectExpr("col1/60 as col1_new", "col2", "col3")
# R style
col1_new = df.select(df.col1/60).alias("col1_new")
df.select(col1_new, "col2", df.col3)
aggregation
# SQL style
df.filter("col > 1000").groupby().max("col")
# R style
df.filter(df.col > 1000).groupby().min("col1")
join
df_new = df.join(another_df, on="shared_key", how"leftouter")
ML Pipeline in Spark
pyspark.ml composed of two main classes
Transformer classes have .transform() method which takes in df and returns df with an additional transformed column
Estimator classes have .fit() method which takes in df but returns a model object
ML pipeline in spark allows only numerical columns for calculation. In many cases, Spark guesses datatype of each column for us once throwing into the pipeline but they could guess incorrectly, e.g., bus line number which is number but does not contain numerical meaning behind. Therefore, it would be safer to transform each column to their corresponding data type before throwing into ML pipeline.
cast data type → target data type should be int integer or float double
df = df.withColumn("col", df.col.cast("integer"))
create one hot encoder for categorical data
col_indexer = StringIndexer(inputCol="col", outputCol="col_indexer")
col_encoder = OneHotEncoder(inputCol="col_indexer", outputCol="col_fact")
assemble features into a vector (prerequisite for spark before training a model)
from pyspark.ml.feature import VectorAssembler
vect_asm = VectorAssembler(inputCols=["col1", "col2", "col3"], outputCols="features")
create pipeline
from pyspark.ml import Pipeline

pipe = Pipeline(stages=[col_indexer, col_encoder, vect_asm])

# fit and transform
piped_data = pipe.fit(df).transform(df)
split data
train, test = df.randomSplit([0.8, 0.2])
model tuning
from pyspark.ml.classification import LogisticRegression
import pyspark.ml.evaluation as evals
import pyspark.ml.tuning as tune

# define model
lr = LogisticRegression()
# define metric
evaluator = evals.BinaryClassificationEvaluator(metricName="areaUnderROC")
# define search grid
grid = tune.ParamGridBuilder()
grid = grid.addGrid(lr.regParam, np.arange(0, .1, .01))
grid = grid.addGrid(lr.elasticNetParam, [0,1])
grid = grid.build()
# define cross validation
cv = tune.CrossValidator(estimator=lr,
estimatorParamMaps=grid,
evaluator=evaluator
)
# Fit cross validation models
models = cv.fit(training)

# Extract the best model
best_lr = models.bestModel
!AWS Boto
Boto3 is python interface to AWS. There are multiple services available in AWS for data projects but some interesting services are:
Simple Storage Service (S3) - store files (or so-called objects) in AWS
Simple Notification Service (SNS) - send alerts or notifications (via email or other channels)
Comprehend - sentiment analysis on text data
Rekognition - extract text from image and image classification
S3
service to store files in folders on cloud. In fact, terminology in cloud computing use:
file → object
folder → bucket
create boto3 client:
import boto3
s3 = boto3.client('s3', region-name='us-east-1',
aws_access_key_id=AWS_KEY_ID,
aws_secret_access_key=AWS_SECRET)
create bucket
bucket = s3.create_bucket(Bucket='bucket-name')
list buckets
# get all buckets and their metadata
bucket_response = s3.list_buckets()['Buckets']
delete bucket
response = s3.delete_bucket('bucket-name')
upload file
s3.upload_file(
Filename='path/to/file.txt', # local file path
Bucket='bucket_name', # name of bucket
Key='filename.txt' # object name in bucket
)
list objects in a bucket
response = s3.list_objects(
Bucket='bucket-name', # which bucket to look in
MaxKeys=2, # how many objects to show as result
Prefix='pref' # only objects with given prefix will be shown
)['Contents']
get object metadata
response = s3.head_object(
Bucket='bucket-name',
Key='filename.txt'
)
download object
s3.download_file(
Filename='download/path/name.txt', # local path to download
Bucket='bucket-name', # name of bucket
Key='filename.txt' # object name in buckeet
)
delete object
s3.delete_object(
Bucket='bucket-name', # name of bucket
Key='filename.txt' # object name in bucket
)
Permission
By default, AWS denies every request to access to data unless AWS_KEY_ID and AWS_SECRET of users with appropriate permission are defined. Permissions can be given by the following:
IAM - provide permissions across AWS services
Bucket Policy - permission on buckets
Access Control List (ACL) - permission on objects
Pre-signed URL - temporary access to an object
Here, we will discuss about ACL and Pre-signed URL only.
There are 2 types of ACL to define: public-read and private . Upon uploading, all object ACLs are private by default. To set ACL to public-read :
s3.upload_file(
Filename='initial/path/to/file.csv',
Bucket='bucket-name',
Key='targetfile.csv'
)
s3.put_object_acl(
Bucket='bucket-name',
Key='targetfile.csv',
ACL='public-read'
)
or
s3.upload_file(
Filename='initial/path/to/file.csv',
Bucket='bucket-name',
Key='targetfile.csv',
ExtraArgs={'ACL':'public-read'}
)
public file in s3 will be in the format
{bucket-name}.s3.amazonaws.com/{object-key}
read csv file as dataframe on s3 without downloading to local disk
s3.get_object(
Bucket= bucket-name,
Key= 'targetfile.csv'
)['Body']
generate pre-signed URL
shared_url = s3.generate_presigned_url(
ClientMethod='get_object',
ExpiresIn=3600, # timeout
Params={'Bucket': 'bucket-name', 'Key': 'targetfile.csv'}
) # equivalent to use s3.get_object(Bucket= 'bucket-name', Key= 'targetfile.csv')
SNS
service to send SMS, email, or notifications to subscribers via AWS. To send messages, these components need to be considered:
publisher - script/code that generate topic or send topic from
topic - topic of messages to subscribe to
subscriber - listener
create sns client
sns = boto3.client('sns',
region_name='us-east-1',
aws_access_key_id=AWS_KEY_ID,
aws_secret_access_key=AWS_SECRET
)
create sns topic
response = sns.create_topic(Name='topic-name')
# to use the topic further ARN is required
arn = response['TopicArn']
list topics
response = sns.list_topics()
delete topic
sns.delete_topic(TopicArn='topic-arn')
subscribe to a topic
response = sns.subscribe(
TopicArn='topic-arn',
Protocol='SMS', # or 'email'
Endpoint='+49123456'
)
list subscriptions
sns.list_subscriptions()['Subscriptions']
list subscriptions by topic
sns.list_subscriptions_by_topic(TopicArn='topic-arn')
delete subscription
sns.unsubscribe(SubscriptionArn='topic-arn')
send a topic
response = sns.publish(
TopicArn='topic-arn',
Message='This is my message',
Subject='Subject for email' # not available for SMS protocol
)
send a single SMS to a single subscriber
<