Skip to content
05. Presentation Visual Effects

icon picker
Self Study

Prepared by: learnloophq@gmail.com
Last edited 10 days ago by Learn LoopHQ.

Chapter: 05. Presentation Visual Effects

Presentation-Visual Effects: A Self-Study Guide for 6th Grade

Welcome to this self-study guide on Presentation-Visual Effects! In this chapter, you will learn about many advanced features of PowerPoint 2016 to make your presentations more engaging and dynamic. You already know that a presentation is a collection of slides, and how to create basic presentations. Now, let’s explore how to add exciting visual and audio effects!

Chapter Overview

This chapter will cover:
Different ways to view your slides (Slide Views)
Adding movement to objects (Animation)
Adding sounds to your presentation
How slides change from one to the next (Slide Transition)
Using video and audio clips (Media Clips)
Creating interactive buttons (Action Buttons) ​
PlantUML Diagram

SLIDE VIEWS

PowerPoint offers various ways to look at your slides and their content. These are called “Slide Views.” The most common way you see your slides is the Normal view, which is the default setting.
To change how you view your presentation, you will always start by clicking on the View tab in the ribbon. Then, look for the Presentation Views group and click on any of the options available.
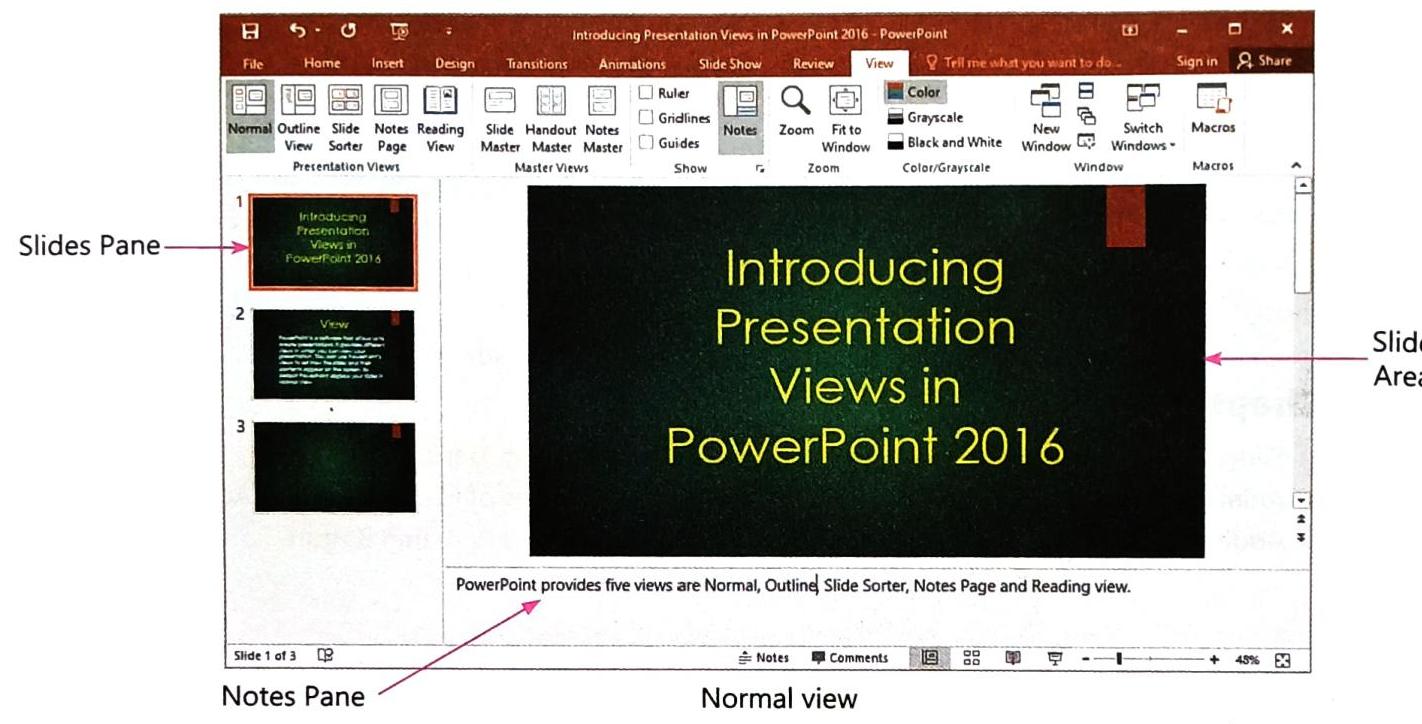
The image displays the 'View' tab of the PowerPoint 2016 ribbon interface. It highlights various command groups, including 'Presentation Views' (Normal, Outline View, Slide Sorter, Notes Page, Reading View), 'Show' (Ruler, Gridlines, Guides), 'Zoom' (Zoom, Fit to Window), 'Color/Grayscale' (Color, Grayscale, Black and White), and 'Window' (New Window, Arrange All, Cascade, Move Split). The title bar indicates the context as 'Introducing Presentation Views in PowerPoint 2016'.
PlantUML Diagram

Normal View

The Normal view is where you do most of your work. It shows you:
The current slide you are working on.
The outline of your presentation (text structure).
The Notes pane.
Here’s a breakdown of its parts:
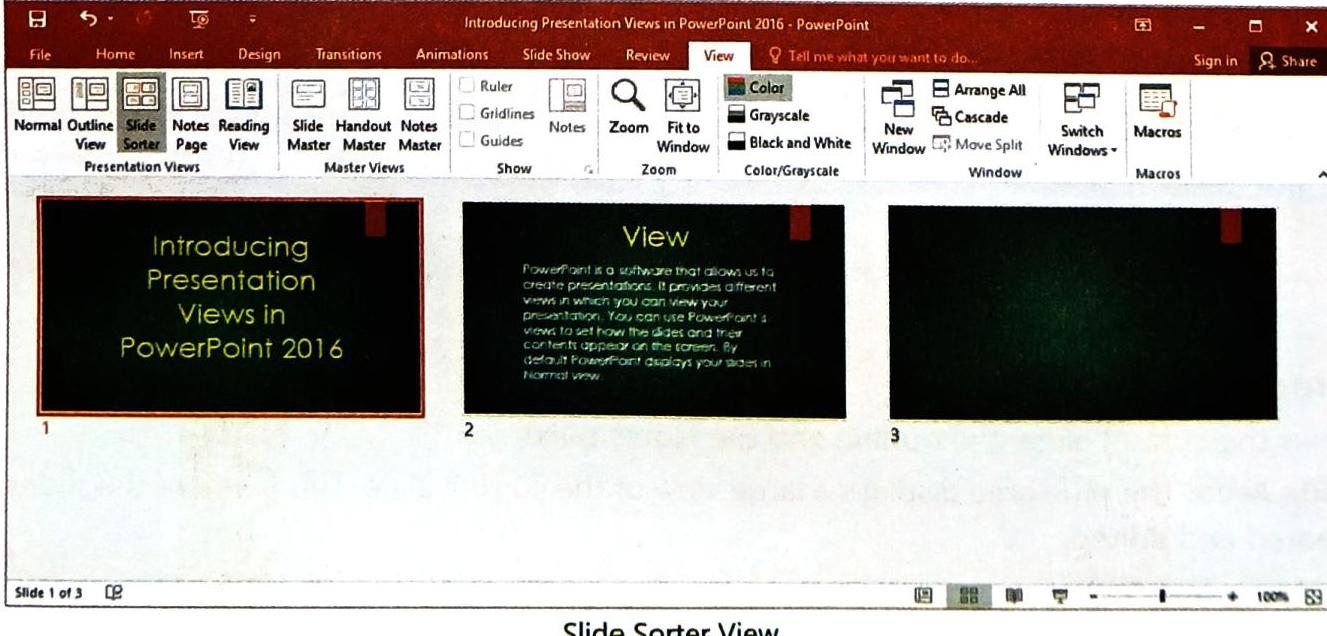
Slide Area: This is the large central space where you create and edit your slides.
Slides pane: Located on the left, this pane shows small thumbnail pictures of all your slides.
Notes pane: This area at the bottom is where you, as the speaker, can write private notes to remind yourself of key points during your presentation. These notes will not be visible to your audience when you run the slide show.
Microsoft PowerPoint 2016 window displaying the 'View' tab. The active 'Normal' view shows a presentation titled 'Introducing Presentation Views in PowerPoint 2016' on the main slide area. To the left, the 'Slides Pane' lists thumbnail previews of the presentation's three slides, with the first slide highlighted. The bottom of the window features the status bar indicating 'Slide 1 of 3' and zoom controls, along with a label for the 'Notes Pane'.
PlantUML Diagram

Slide Sorter View

This view displays all the slides in your presentation as small miniature versions. It’s great for:
Seeing many slides on the screen at once.
Quickly changing the order of your slides.
Moving, deleting, or rearranging slides easily by dragging and dropping them.
To switch to this view, click on the Slide Sorter command under the View tab. PowerPoint will then show all your slides arranged neatly.
Microsoft PowerPoint 2016 interface with the 'View' tab active. The main content area displays the title slide 'Introducing Presentation Views in PowerPoint 2016' and the second slide titled 'View' with descriptive text. The ribbon shows options for presentation views, showing, zoom, color, and window management. Slide navigation indicates 'Slide 1 of 3'.
Thinking Point: Imagine you wanted to create an interactive book using PowerPoint. How would seeing all your slides at once in Slide Sorter view help you organize the chapters and pages? What kind of book would you choose? ​
PlantUML Diagram

Notes Page View

The Notes Page view lets you see exactly how your notes pages will look if you were to print them out. In this view, both your presentation slide and the speaker notes you added in the Notes pane for that specific slide appear together.
To use this view, click on the Notes Page command from the Presentation Views group of the View tab.
A screenshot of Microsoft PowerPoint 2016 displays the 'View' tab with various presentation view options, zoom controls, and color settings. The active slide in the main window features the title 'Introducing Presentation Views in PowerPoint 2016' in large yellow text against a dark background. The status bar at the bottom indicates 'Notes 1 of 3' and a zoom level of 70%.
PlantUML Diagram

Reading View

Reading view is designed for when you want to review a presentation, but not necessarily in full-screen mode. It shows your presentation in a window with simple controls, making it easy to read through. In this view, the ribbon (the top menu bar) and the slides/outline pane are not visible, giving you a cleaner look.
To use Reading View, click on the Reading View command under the View tab. PowerPoint will then display your presentation in a full-screen-like window, but you’ll still see the Title bar and Status bar, along with some basic controls.
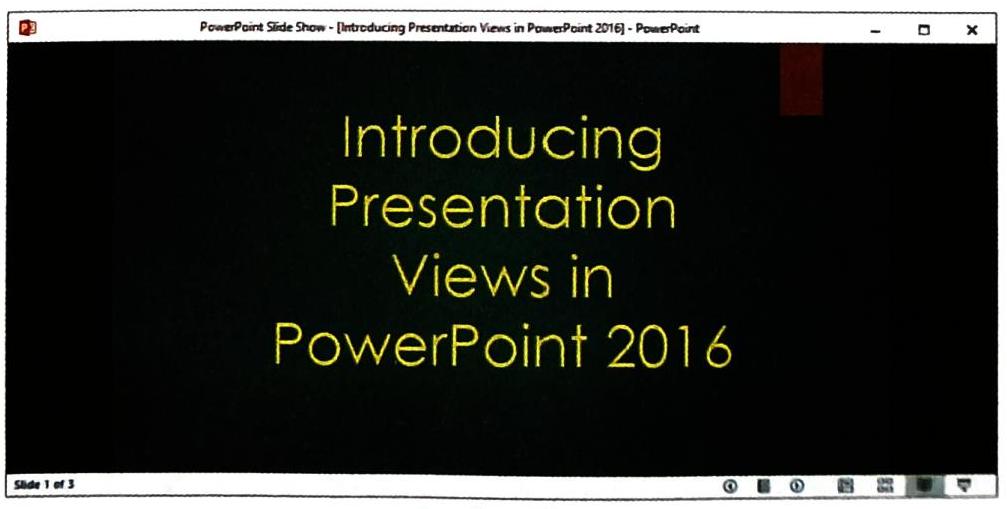
A PowerPoint slide titled 'Introducing Presentation Views in PowerPoint 2016' is displayed on a black background with yellow text. The slide is labeled 'Slide 1 of 3' at the bottom left corner.
PlantUML Diagram

Slide Show View

The Slide Show view is what you use when you want to present your work to an audience. It displays your presentation in full-screen mode, with slides appearing one after another, just like a movie! This view is essential for seeing how your presentation will look to others. However, it’s important to remember that you cannot modify (edit) the presentation while in Slide Show view.
To start your presentation in Slide Show view:
Click on the Slide Show tab from the ribbon.
Then, choose:
From Beginning: To start the slide show from the very first slide.
From Current Slide: To start the slide show from the slide you are currently viewing.
TECH FUNDA: A quick shortcut to start a slide show from the current slide is to press Shift + F5 on your keyboard.
PlantUML Diagram

SLIDE TRANSITION

A slide transition is the visual effect that happens when you move from one slide to the next during a presentation. PowerPoint offers many different types of transition effects to make your presentation flow smoothly and look professional.
Follow these steps to add a transition to a slide:
Choose a slide: Select the slide on which you want to apply the transition effect.
Go to the Transitions tab: Click on the Transitions tab from the ribbon. This will show you all the slide transition options. The most commonly used ones are visible as icons directly on the ribbon. ​
Microsoft PowerPoint 2016 interface with the 'Transitions' tab active, showcasing a grid of slide transition effects. A slide pane is visible on the left. The text 'Applying slide transitions' appears at the bottom.
Explore more options: You can click on the More button (a small arrow pointing down) to see a complete list of all available transitions, or scroll through them.
Preview before selecting: PowerPoint 2016 allows you to see what the transition effect will look like on your slide just by moving your mouse pointer over a transition choice, even before you click to select it.
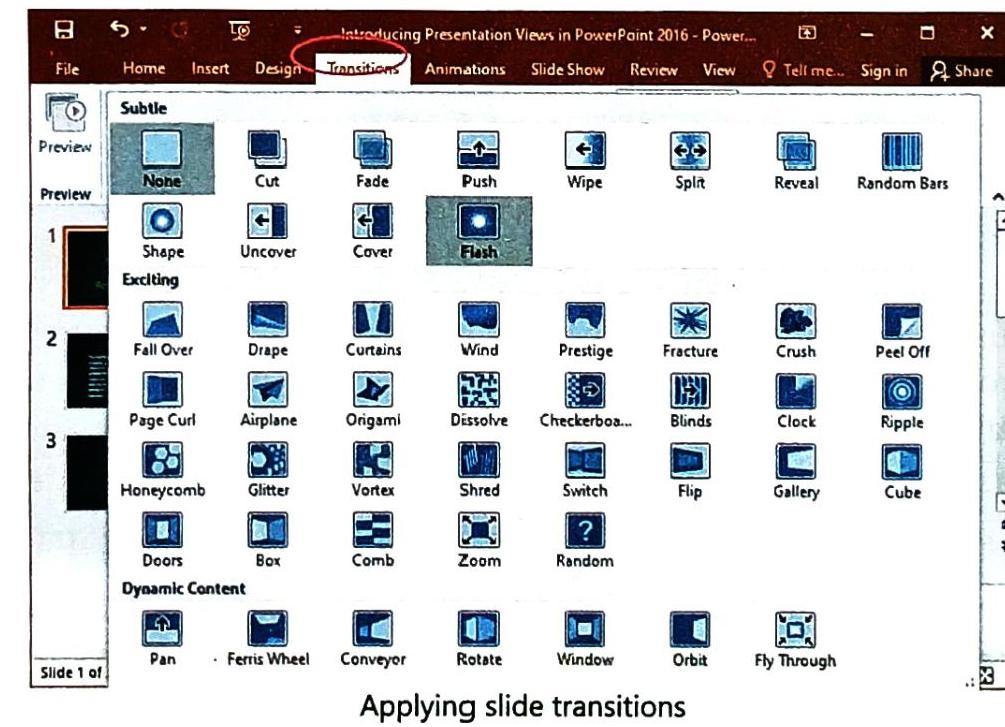
Clickipedia: Remember, you can only apply one slide transition to a single slide. If you choose a new transition for a slide that already has one, PowerPoint will automatically replace the old transition with the new one.
You can also customize transition options:
Sound and Duration:
Add a sound effect to play during the transition.
Set how long the transition effect lasts (duration).
Apply To:
Choose whether the transition applies only to the selected slide or to all slides in the presentation.
Advance Slide: Decide how to move to the next slide:
On Mouse Click: The next slide appears only when you click the mouse.
After: The next slide appears automatically after a set number of seconds you specify. ​
Table Image
A sound selection menu within a software interface displays various effects like 'No Sound', 'Applause', and 'Whoosh'. The option 'Loop Until Next Sound' is highlighted. Interface elements 'Sound', 'Duration', and 'Apply' are visible, with partial presentation text on a dark background. The caption reads 'Choosing a sound'.
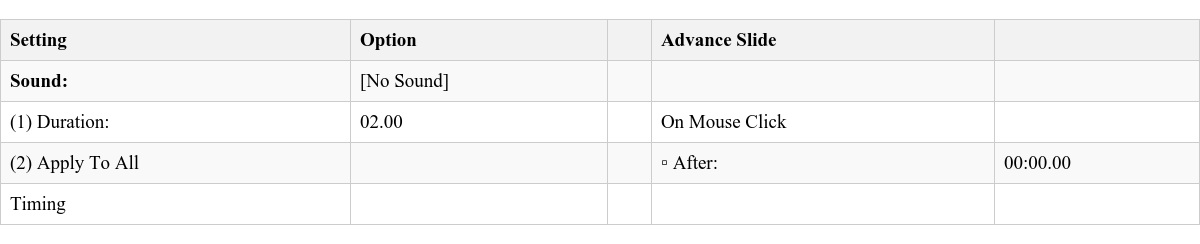
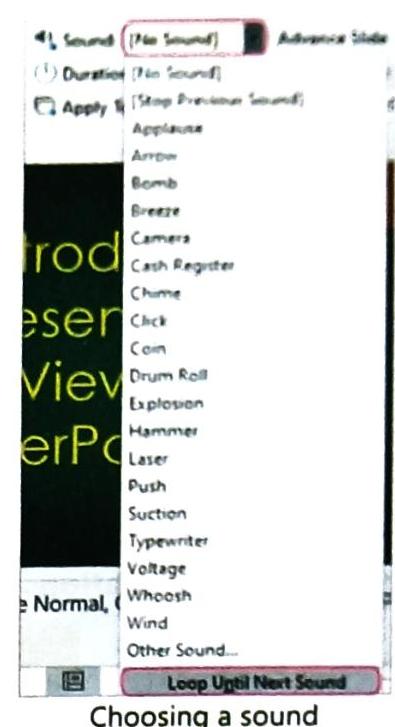
There is also an option called Loop Until Next Sound. If you select this, the chosen sound will keep repeating during the transition until another new sound is introduced later in the presentation. ​
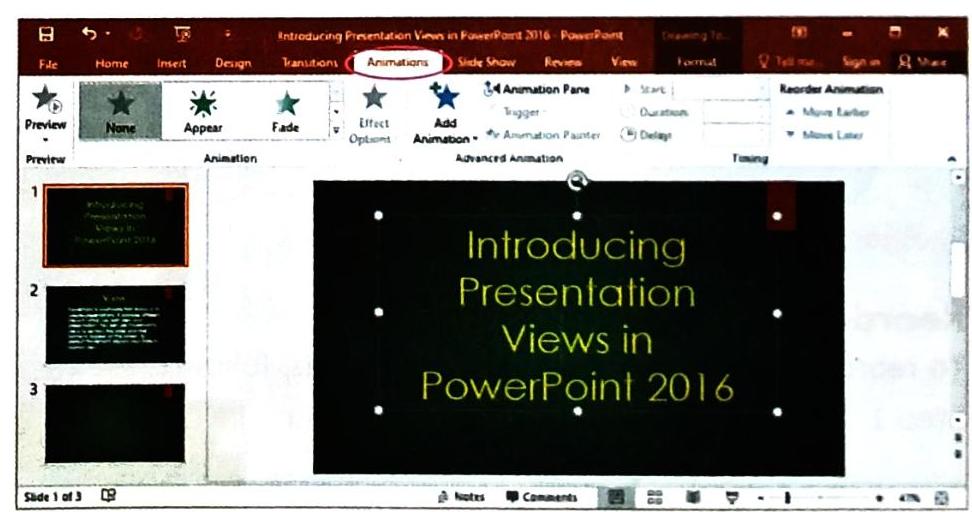
PlantUML Diagram

ANIMATION

Animations in PowerPoint are special visual effects applied to text, images, or other objects on a single slide. They help make your presentation more interesting by giving a moving effect to elements, rather than just appearing static.
To apply animation to text or objects, follow these steps:
Select the object: Click on the image or text you want to animate. If it’s a whole text box, click on its border to select it entirely.
Go to the Animations tab: Click on the Animations tab in the ribbon.
Choose an animation effect: Click on the Add Animation drop-down list. ​
PowerPoint 2016 interface with the 'Animations' tab selected. The main slide features yellow text 'Introducing Presentation Views in PowerPoint 2016' on a black background. The left pane displays thumbnails for three slides, with the first slide highlighted. The animation ribbon commands, including 'Preview', 'None', 'Appear', and 'Fade', are visible.
Then, select the animation effect you like.
There are four main types of animation effects:
Entrance: How an object appears on the slide (e.g., Fade In, Fly In).
Emphasis: Effects that draw attention to an object already on the slide (e.g., Pulse, Spin).
Exit: How an object leaves the slide (e.g., Fade Out, Fly Out).
Motion Paths: Allows an object to move along a specific path you define (e.g., Line, Circle). ​
PowerPoint interface with an active 'Animations' tab, featuring an 'Animation Pane' and a slide titled 'Introducing Presentation Views in PowerPoint 2016'. A comprehensive 'Animations drop-down list' is displayed, showcasing various animation effects such as Entrance, Emphasis, Exit, and Motion Paths, accompanied by representative icons.
Set the animation start: In the Timing group of the Animations tab, specify when you want your animation to start:
On Click: The animation starts when you click the mouse during the slide show.
After previous: The animation of the selected object starts automatically after the animation effect of the previous object on the slide has finished.
With previous: The animation of the selected object starts at the same time as the animation of the previous object on the slide.
Preview the effect: You can see how the animation will look by:
Clicking the Preview command from the Animations tab.
Clicking the Play From button in the Animation Pane (which you can open from the Animations tab). ​
Microsoft PowerPoint 2016 shows the Animations tab with the Animation Pane open. An arrow points to the 'Play From' button within the pane, next to the animation for 'Title 1: Introduc...'. The slide displays the text 'Introducing Presentation Views in PowerPoint 2016'.
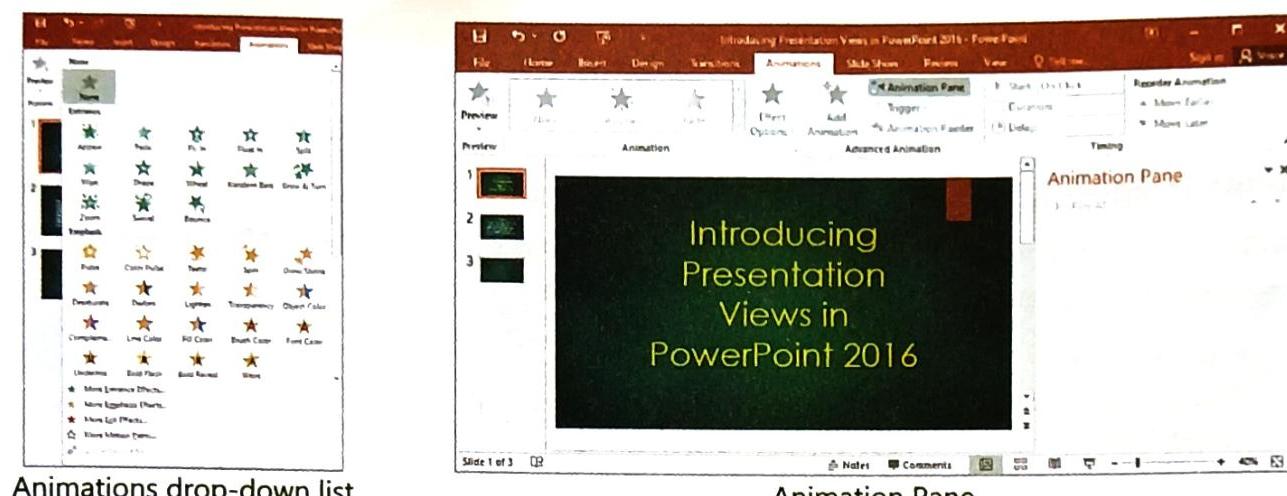
Clickipedia: If you select a new animation from the menu in the Animation group, it will automatically replace any animation that was previously applied to that same object.

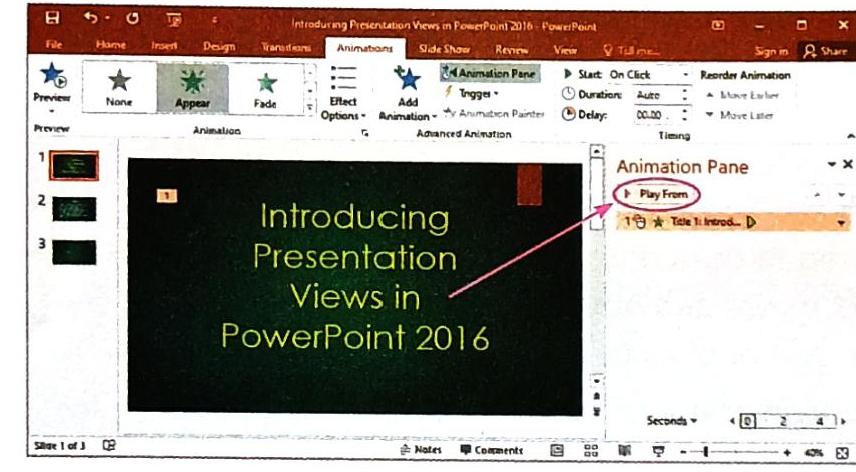
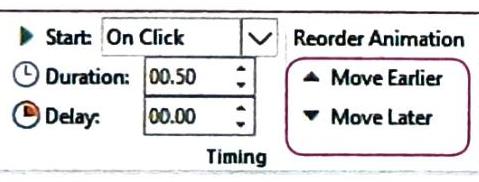
Reordering the Animations

Sometimes you might have multiple animations on a single slide and want to change the order in which they appear. Here’s how:
Select the animation effect: In the Animation Pane (which lists all animations on the current slide), select the number of the animation effect you want to move.
Change the order: From the Animations tab, click on the Move Earlier or Move Later commands in the Timing group. This will shift the selected animation up or down in the sequence.
A user interface panel displays animation timing settings, including options for Start (On Click), Duration (00.50), and Delay (00.00), along with Reorder Animation buttons (Move Earlier, Move Later).
PlantUML Diagram

USES OF MEDIA CLIPS AND ACTION BUTTONS

Media files, like video and audio clips, are incredibly useful for making your presentation clearer and more impactful. Sometimes, a video clip or a sound bite can explain a concept much better than just text.
Action buttons are interactive shapes that help people viewing your presentation move around (navigate) from one slide to another. You can also set them to perform a specific task, like playing a video or opening a file, when clicked. ​
PlantUML Diagram

Adding a Video File

You can add video files directly into your presentation. This video can be set to play at a specific point while you are giving your slide show.
To add a video to your presentation:
Go to the Insert tab: Click on the Insert tab in the ribbon.
Want to print your doc?
This is not the way.
Try clicking the ⋯ next to your doc name or using a keyboard shortcut (
CtrlP
) instead.