Chapter: 04. Word Processor Mail Merge
4 Word Processor - Mail Merge
Imagine you’re having a big birthday party and want to invite all your friends from school! You have all their names and addresses on your computer. But typing out a new letter for each friend, changing their name and address every time, would take forever! Good news! Microsoft Word has a super helpful feature called Mail Merge that lets you send the same letter to many different people, each with their own personal details, without typing everything again and again. It’s like magic for letters!
MAIL MERGE
Mail Merge is a powerful feature in Microsoft Word that helps you create many personalized documents, such as letters, envelopes, or labels. Instead of writing each letter individually, Mail Merge lets you combine a standard letter with a list of names and addresses (or other details) to create many unique letters quickly.
It saves a lot of time and effort because you don’t need to type the same information multiple times.
Advantages of Mail Merge
Using Mail Merge offers many great benefits, especially when you need to send similar information to a large number of people:
Saves Time and Effort: You write the main message only once. Quick Changes: You can make changes to the main letter, and these changes will apply to all letters instantly. Produce Thousands Quickly: Imagine printing hundreds or thousands of letters in a short amount of time! Save as Templates: You can save your Mail Merge setup as a template to use again later for similar tasks. Personalization: Each document can be customized with specific details like names, addresses, or even unique messages for different recipients, making them feel more special. Consistent Format: All the documents produced will look exactly the same in terms of design and layout, ensuring professionalism.
Components of Mail Merge
To make Mail Merge work, you need three important parts that work together:
This is your main letter or document. It contains the text and graphics that are the same for every person you are sending it to. Think of it as the common message of your invitation. This is a separate file that holds all the unique information about each person you want to send the letter to. It’s like an address book or a list. Examples of information it can store: Title, First Name, Last Name, Address, City, Phone Number, etc. This is the final result of Mail Merge. It is created when the Main Document and the Data Source are combined. It contains a list of all the personalized letters, with each letter having the common text from the Main Document and the specific details for one person from the Data Source.
CREATING MAIL MERGE
Let’s go step-by-step through the process of creating a Mail Merge document.
Step 1: Prepare Your Main Document (The Invitation)
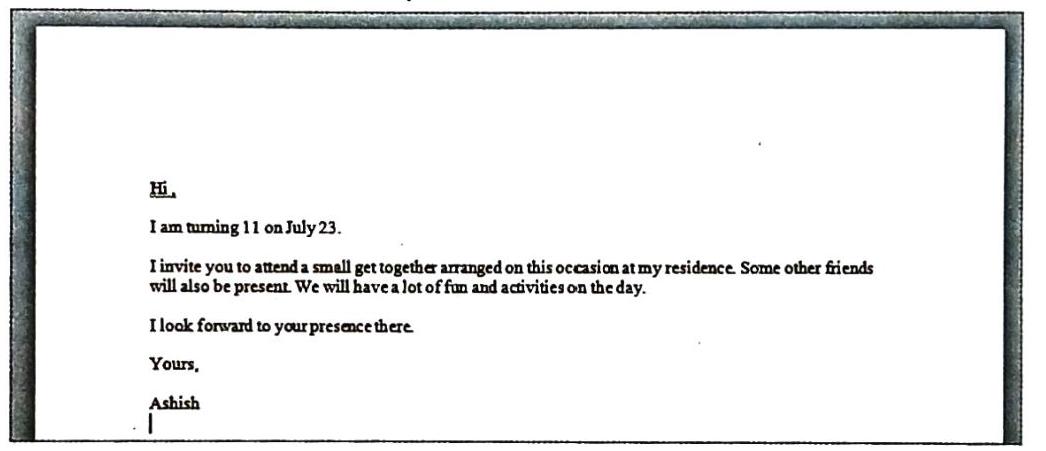
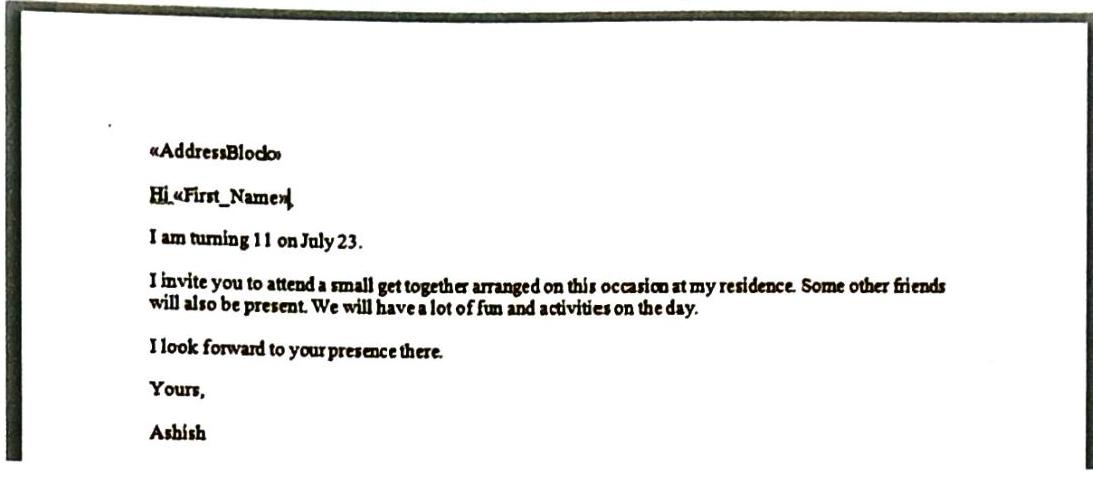
Type the Common Invitation: Start by typing the main part of your invitation letter in Word. This is the text that everyone will receive. Important: Do NOT type the names, addresses, or other personal details of the recipients here. You will add special placeholders for these later. For example, you might type: “I am turning 11 on July 23. I invite you to attend a small get-together arranged on this occasion at my residence. Some other friends will also be present. We will have a lot of fun and activities on the day. I look forward to your presence there.” Step 2: Start the Mail Merge Process
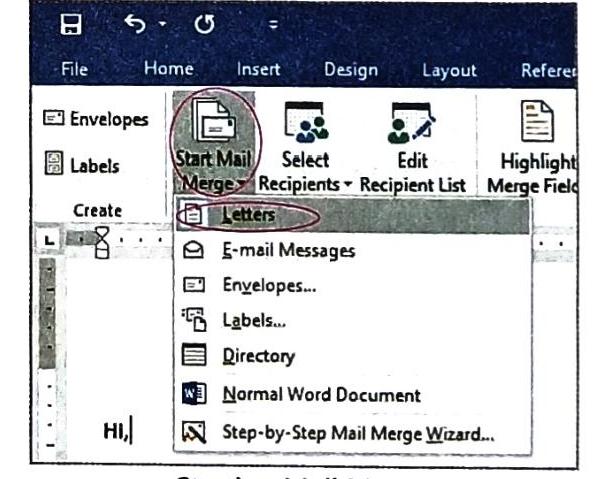
Go to the Mailings Tab: In Word, find the “Mailings” tab on the ribbon at the top. Click “Start Mail Merge”: In the “Start Mail Merge” group, click the “Start Mail Merge” command. A drop-down list will appear. Select “Letters”: From the drop-down list, choose the “Letters” option. This tells Word that you are creating personalized letters. Step 3: Select Recipients (Create Your Address List)
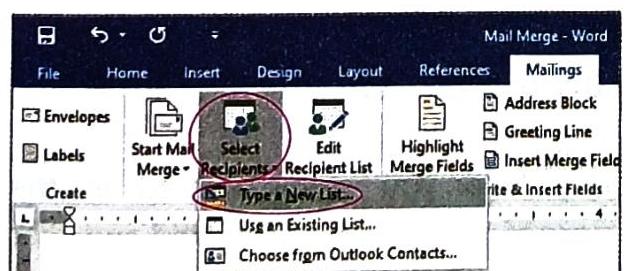
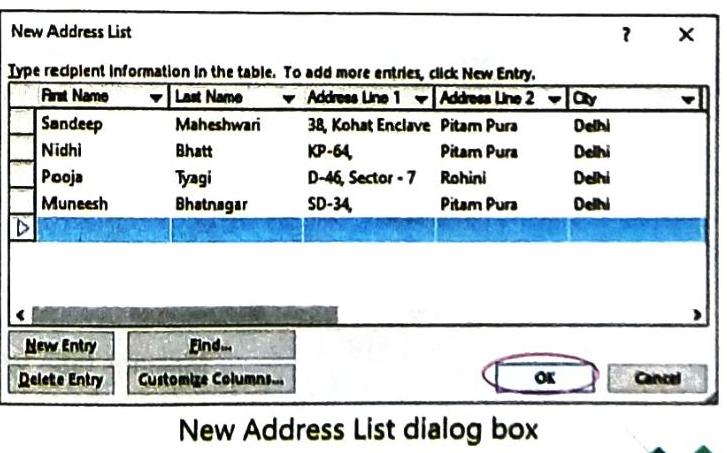
Click “Select Recipients”: Still in the “Mailings” tab, in the “Start Mail Merge” group, click on the “Select Recipients” command. Choose “Type a New List”: From the new drop-down list, select “Type a New List…”. The “New Address List” dialog box will appear. This is where you’ll create your Data Source. Enter Recipient Details: In the “New Address List” dialog box, you’ll see columns like Title, First Name, Last Name, Address Line 1, etc. Enter the details for your first recipient. To add another recipient, click the “New Entry” button. Repeat until you’ve added details for all your recipients. Once all details are entered, click the “OK” button. Save Your Address List: The “Save Address List” dialog box will open. Give your file a meaningful name (e.g., “Birthday_Party_Guests”). Tip: By default, Word saves these files in the “My Data Sources” folder inside your “Documents” folder. This is a special type of file (Microsoft Office Address List). Step 4: Insert Merge Fields into Your Letter
Now, you need to tell Word where to put the personalized information from your Data Source into your Main Document.
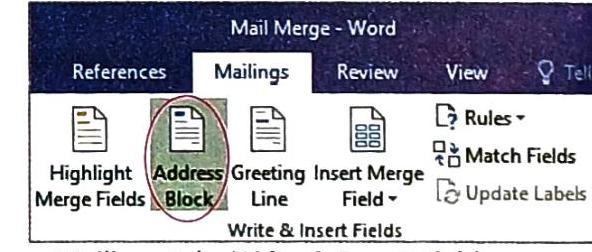
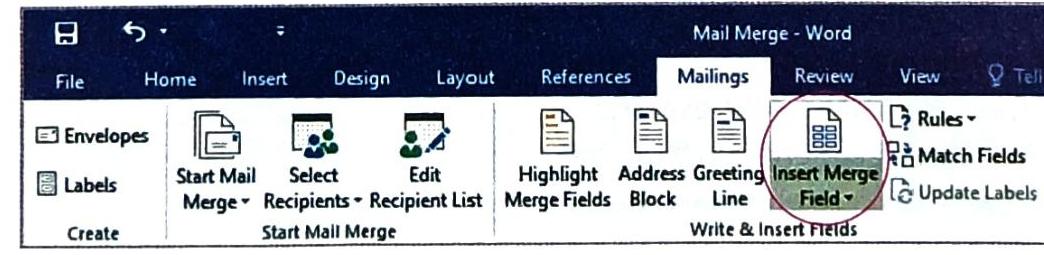
Position Cursor: Move your cursor to the place in your letter where you want the address block to appear (usually at the top, under the date). In the “Mailings” tab, find the “Write & Insert Fields” group. Click on the “Address Block” command. A preview of how the address will look will appear in the “Insert Address Block” dialog box. A placeholder <<AddressBlock>> tag will appear in your letter. Move your cursor to where you want the greeting (like “Dear [Name],”) to appear. Click on the “Greeting Line” command in the “Write & Insert Fields” group. You can choose the format of the greeting (e.g., “Dear Sir or Madam,” or “To Whom It May Concern:”). Click “OK”. A <<GreetingLine>> tag will appear. Insert Individual Merge Fields (Optional but Useful!): If you want to use specific parts of the recipient’s information (like just their First Name) somewhere else in your letter, you can. Move your cursor to the desired spot. Click on the “Insert Merge Field” command in the “Write & Insert Fields” group. A drop-down list of all your data fields (like First_Name, Last_Name, City, etc.) will appear. Select the field you want to insert. For example, if you chose First_Name, a <<First_Name>> tag will appear. Example: «AddressBlock» Hi «First_Name», I am turning 11 on July 23. ... Step 5: Preview Your Merged Letters
Before you print, it’s a good idea to check how your personalized letters will look.
Click “Preview Results”: In the “Mailings” tab, in the “Preview Results” group, click on the “Preview Results” command. Word will replace the <<AddressBlock>>, <<GreetingLine>>, and other merge field tags with the actual information from your Data Source for the first recipient. Use the arrow buttons (next record, previous record) in the “Preview Results” group to scroll through and see each personalized letter. Step 6: Finish and Print Your Letters
Once you’re happy with how the letters look, it’s time to finalize and print them.
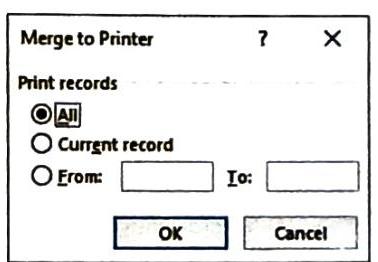
Click “Finish & Merge”: In the “Mailings” tab, in the “Finish” group, click on the “Finish & Merge” command. Select “Print Documents”: From the drop-down list, choose “Print Documents…”. The “Merge to Printer” dialog box will appear. All: Select this option to print all the letters you’ve created. Current record: Prints only the letter currently shown in the preview. From… To…: Lets you specify a range of records (e.g., print letters for records 5 through 10). Click “OK”: If your printer is connected, all your personalized letters will start printing. Edit Individual Documents (Alternative Option): Instead of “Print Documents,” you can select “Edit Individual Documents…” from the “Finish & Merge” drop-down list. This will create a new Word document that contains all the merged letters, each on a separate page. You can then make small, specific changes to individual letters in this new document before printing them. This is useful if you want to add a unique handwritten note to just one or two friends, for example.
Reb(0)t (Summary)
Let’s quickly review the most important things we learned about Mail Merge:
Mail Merge Purpose: It’s a Word feature used to create personalized letters for many people, saving time and effort. Main Document: This is the letter containing the text that stays the same for everyone. Data Source: This is a separate file that stores all the unique details (like names and addresses) for each recipient. Merged Document: This is the final result – a combination of the Main Document and the Data Source, giving you a set of personalized letters.
 Self Study