Chapter: 03. Word Processor Tabular Representation
Word Processor: Tabular Representation
A word processor allows you to create and edit documents. One powerful feature is the ability to organize information using tables.
What is a Table?
A table is a structured way to arrange text and data in the form of columns and rows. Tables are very useful for enhancing and analyzing data, making it easier to read and understand.
Columns: These are the vertical arrangements of data in a table. Rows: These are the horizontal arrangements of data in a table. Cell: The intersection point of a row and a column is called a cell. This is where you enter individual pieces of data.
Inserting a Table
You can insert tables in your document using a few simple methods.
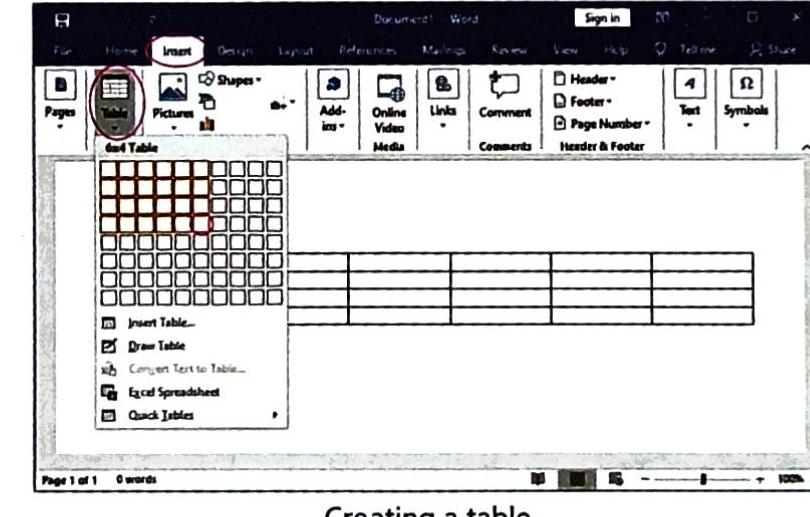
Method 1: Using the Grid
This method is quick for inserting tables with a smaller number of rows and columns.
Click on the Insert tab in the ribbon at the top of the window. In the Tables group, click on the Table command. A grid of squares will appear. Move your mouse pointer over these squares to select the desired number of columns and rows for your table. As you move the mouse, a preview of the table will show in your document. Click your mouse button when you have highlighted the correct number of squares for your table size. The table will be inserted into your document.
Method 2: Using the Insert Table Command
This method allows you to specify the exact number of columns and rows you need, especially useful for larger tables.
Click on the Table command in the Tables group. From the dropdown menu, click on the Insert Table option. The Insert Table dialog box will appear. In this dialog box, enter the required number of columns in the “Number of columns” field and the required number of rows in the “Number of rows” field. The table will be inserted with your specified dimensions.
Entering Data in a Table
Once you have inserted a table, the next step is to fill it with your data.
Click inside the specific cell where you want to type your data. Type the required data into the cell. For example, if you are making a sports record, you might type ‘Class’ in the first cell. To move to the next cell in the same row, press the Tab key on your keyboard. Continue typing your data and pressing Tab to move between cells until all your information is entered.
Selecting Cells, Rows, Columns, and the Entire Table
Word 2016 provides several ways to select different parts of a table, which is essential for applying formatting or making changes.
To select a single cell: Simply click on the cell you want to select. To select a group of cells: Click on one of the corner cells of the group you wish to select. Without releasing the mouse button, drag your mouse to highlight all the desired cells. Release the mouse button when all the required cells are selected. Move your mouse pointer outside the left edge of the first cell in the row. The pointer will change into a black right-pointing arrow. Drag the mouse pointer across the row elements to select the entire row. To select an entire column: Move your mouse pointer outside the top edge of the first cell in the column. The pointer will change into a black down-pointing arrow. Click the mouse button to select the entire column. To select an entire table: Move your mouse pointer over the table. A table move handle (a small square with four arrows) will appear in the top-left corner of the table. Click on this table move handle to select the entire table. Adding and Deleting Rows
You can easily add or remove rows from your table to adjust its structure.
Adding Rows
Click on any cell in the row where you want to add a new row (either above or below it). Click on the Layout tab under the Table Tools ribbon. In the Rows & Columns group, choose either Insert Above (to add a row above the selected one) or Insert Below (to add a row below the selected one). A new blank row will be added at the chosen position.
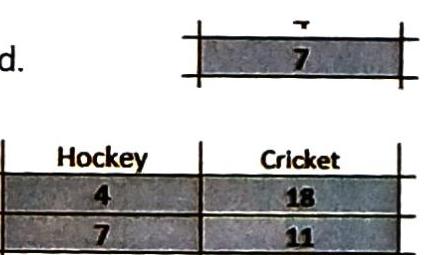
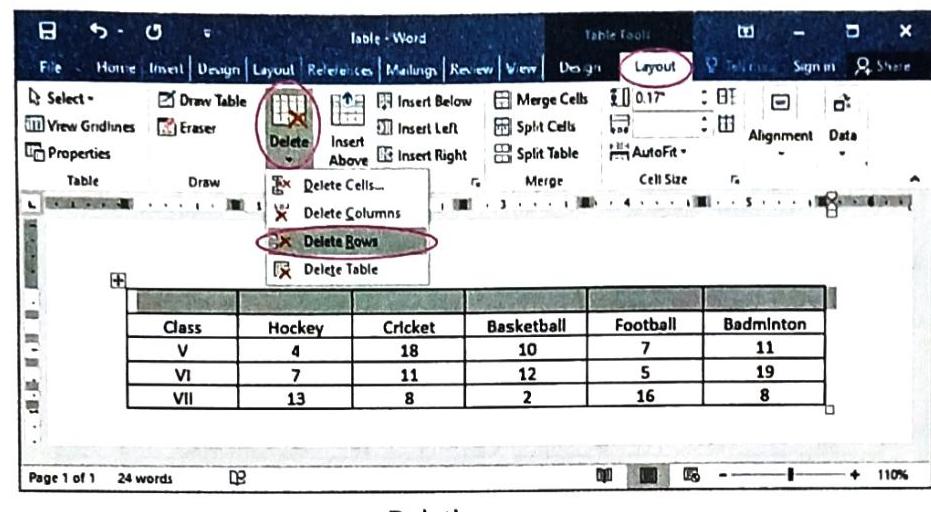
Deleting Rows
Click on any cell in the row you wish to delete. In the Rows & Columns group, click on the Delete command. From the dropdown list, choose the Delete Rows option. The selected row will be deleted from the table.
Adding and Deleting Columns
Just like rows, you can add or remove columns to modify your table’s layout.
Adding Columns
Click on any cell in the column where you want to add a new column (either to its left or right). In the Rows & Columns group, choose either Insert Left (to add a column to the left of the selected one) or Insert Right (to add a column to the right of the selected one). A blank column will be added at the required place in the table.
Deleting Columns
Click on any cell in the column you wish to delete. In the Rows & Columns group, click on the Delete command. From the drop-down list, choose the Delete Columns option. The selected column will be deleted from the table.
TECH FUNDA
You can also delete selected columns quickly by pressing the Shift + Del keys.
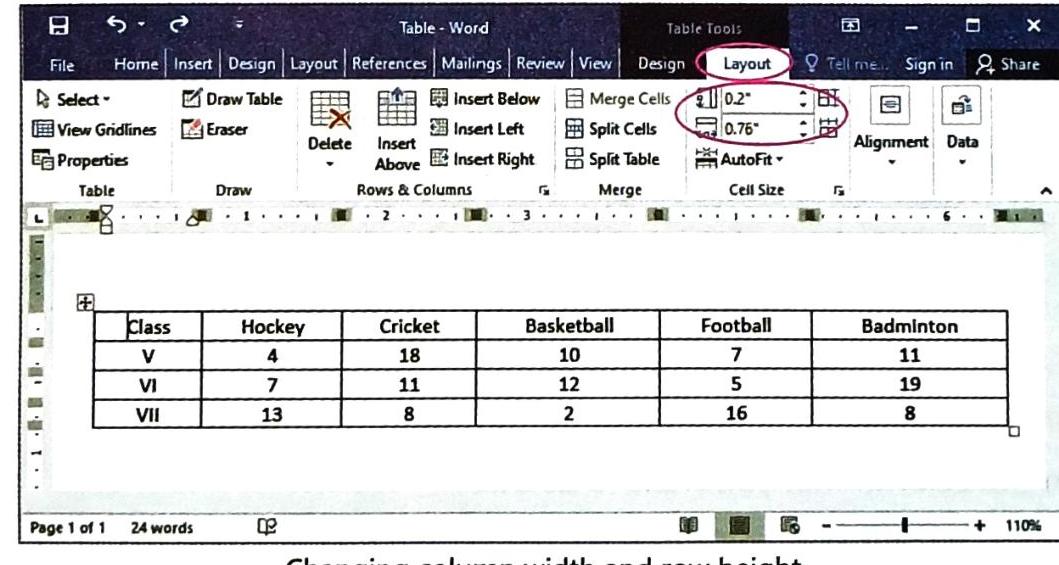
Changing Column Width and Row Height
You have control over the size of your table’s columns and rows.
Specifying Dimensions Manually
Click anywhere within the column or row whose width or height you want to change. In the Cell Size group, you can specify the exact dimensions: Enter the desired value for column width in the Table Column Width spin box. Enter the desired value for row height in the Table Row Height spin box. TECH FUNDA
You can also change column width manually by placing the pointer on the right side of the column boundary. When the pointer becomes a resize pointer (a double-headed arrow), click and drag the boundary to adjust the column width to your desired size.
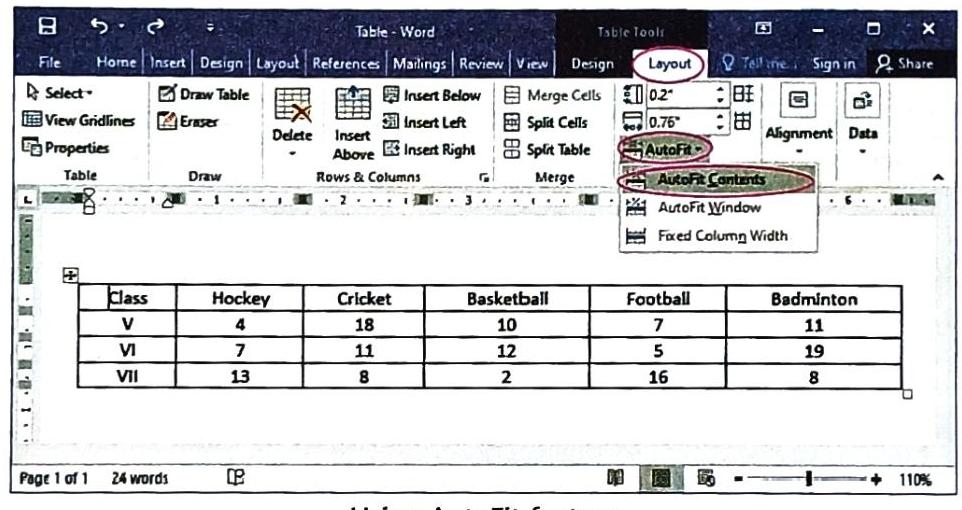
AutoFit Contents
This feature automatically adjusts the column width to fit the content within them, ensuring no text is cut off and space is used efficiently.
Click anywhere inside your table. In the Cell Size group, click on the AutoFit command. From the dropdown menu, select the AutoFit Contents option. The columns will automatically adjust their width to fit the data.
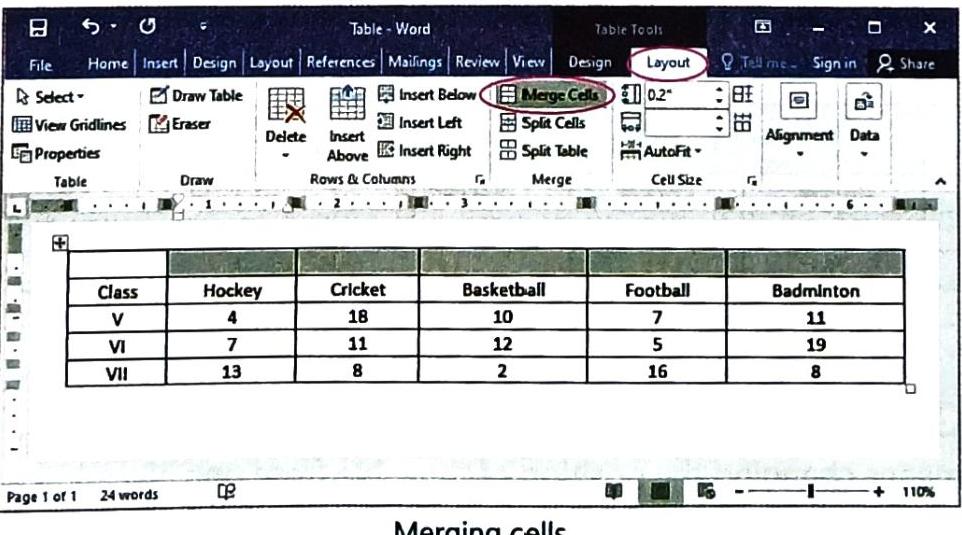
Merging Cells
Merging refers to combining two or more cells in the same row or same column into a single larger cell. This is useful for creating headings that span multiple columns or rows.
Select the cells you want to merge. These cells must be adjacent and form a rectangular block. In the Merge group, click on the Merge Cells command. The selected cells will be combined into one single cell.
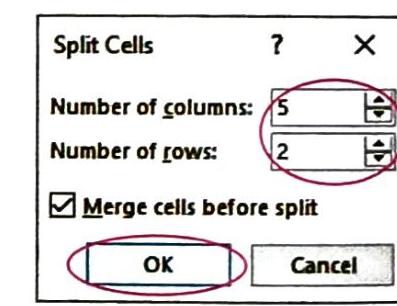
Splitting Cells
Splitting refers to dividing one cell into two or more smaller cells. This is the opposite of merging and allows you to create more detailed structures within a single cell.
Select the cell you want to split. In the Merge group, click on the Split Cells command. The Split Cells dialog box will open. In this dialog box, enter the desired number of rows and columns you want to split your selected cell into. 
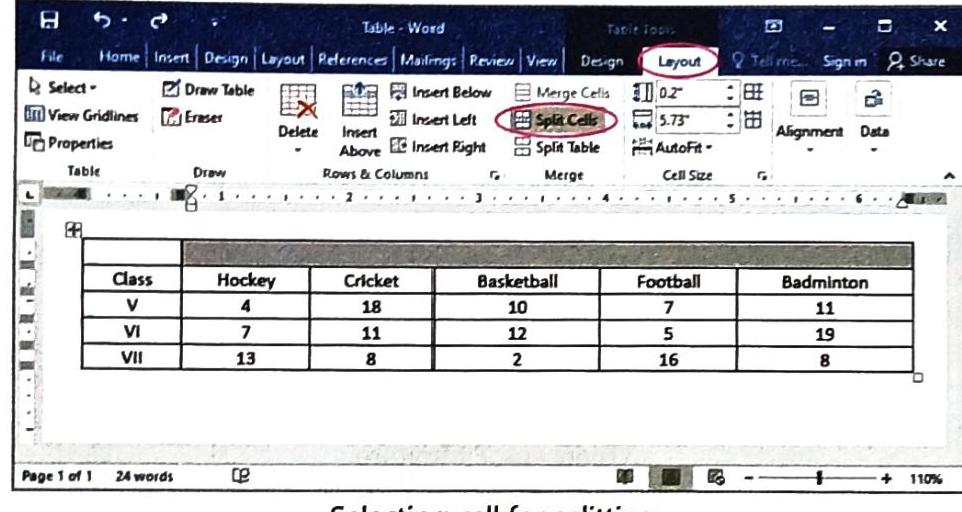
The selected cell will be divided into the entered number of rows and columns.
Moving and Resizing Tables
You can easily change the position and size of your entire table within the document.
Moving a Table
Moving a table means changing its position from one place to another on your document page.
Move your mouse pointer over the table. The Move Table Handle (a small square with a plus sign inside) will appear in the top-left corner of the table. Move your mouse pointer over the Move Table Handle. The pointer will convert into a plus sign with arrows (a four-headed arrow). Click and drag the table to your desired new location (left, right, top, or bottom) and then release the mouse button. Resizing a Table
Resizing a table means increasing or decreasing its overall size.
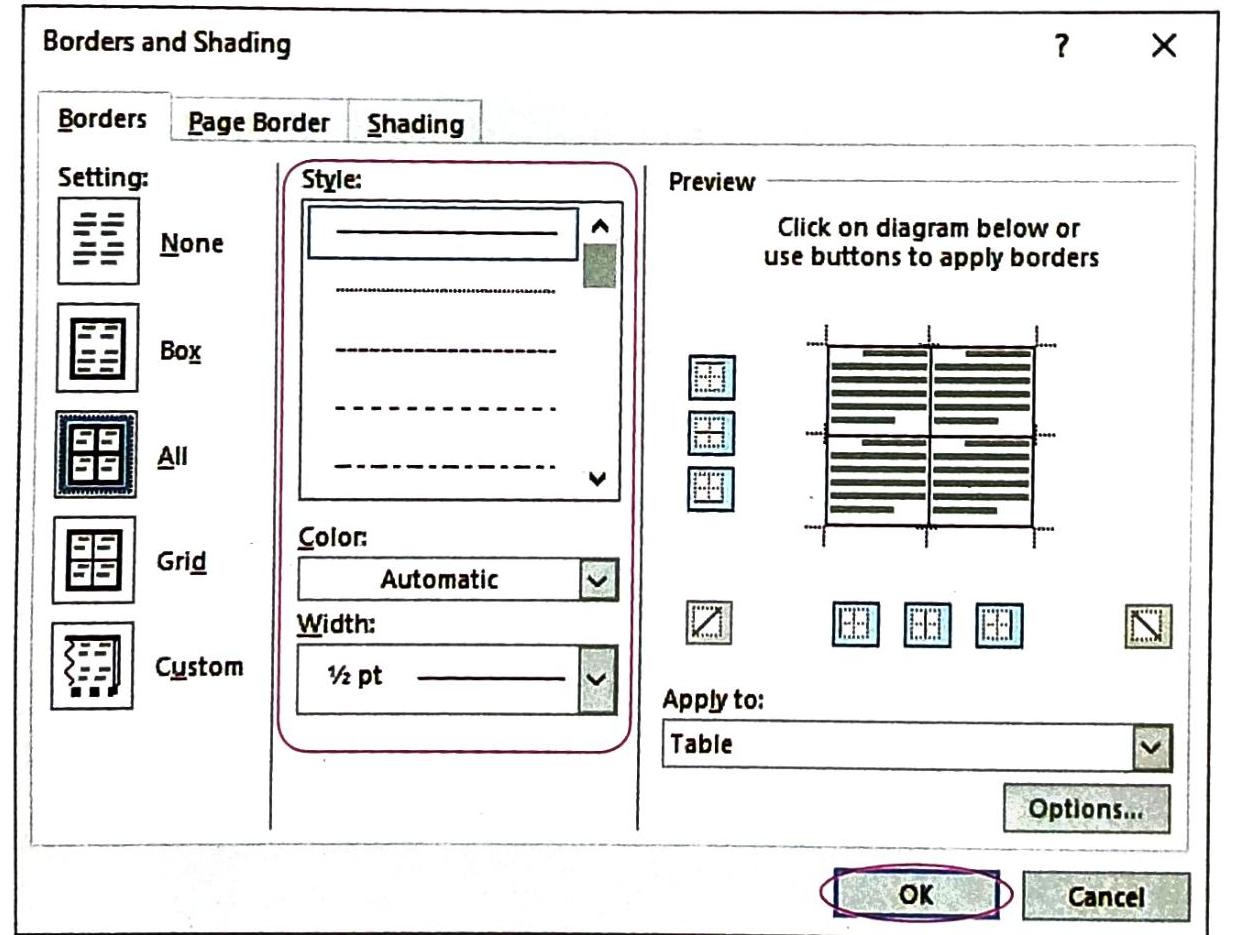
Move your mouse pointer over the table. The Table Resize Handle (a small square) will appear at the bottom-right corner of the table. Move your mouse pointer over the Table Resize Handle. The pointer will convert into a two-headed diagonal arrow. Click and drag the mouse diagonally (in or out) and release the mouse button when the table reaches your desired size. Borders and Shading
Borders and Shading are powerful tools to enhance the visual appeal and readability of your table by adding lines around cells and filling them with colors.
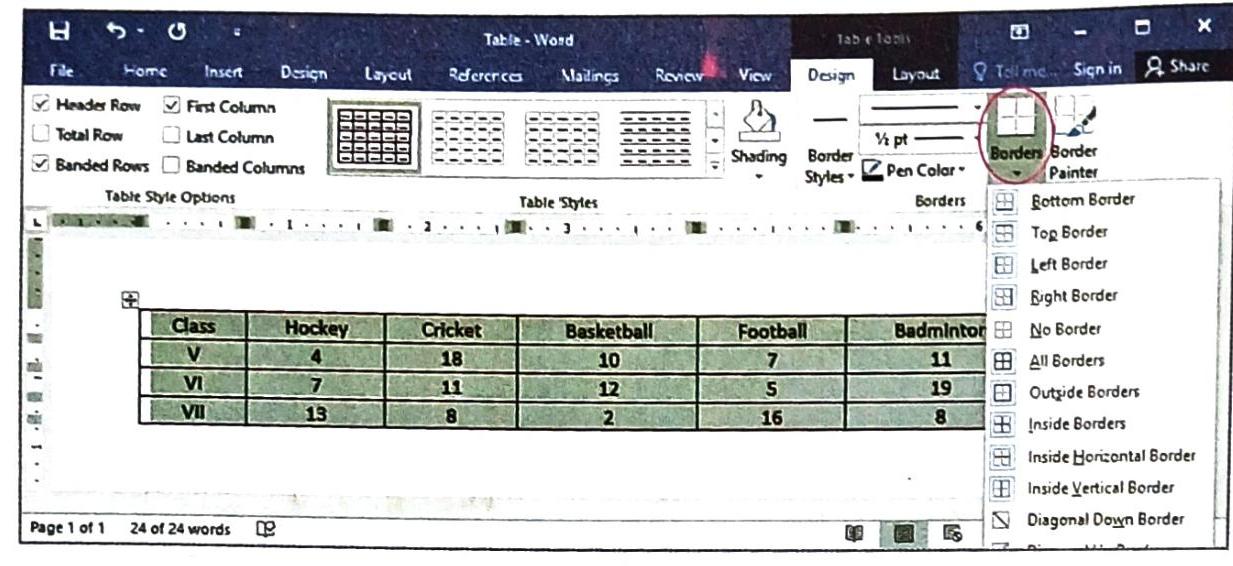
Applying Borders
You can apply borders to individual cells, entire rows, columns, or the whole table.
Select the desired cells, rows, or columns to which you want to apply the border. Click on the Design tab under Table Tools. In the Borders group, click on the Borders command. A list of common border options will appear. Select the type of border you want (e.g., All Borders, Outside Borders, etc.). To change the style, color, or width of the border: