Skip to content
07. Magnetism
 Self Study
Prepared by: learnloophq@gmail.com
Last edited 26 days ago by Learn LoopHQ.
Chapter: 07. Magnetism
Magnetism: Your Guide to Understanding Invisible Forces
Welcome to your self-study journey into the fascinating world of magnetism! By the end of this journey, you’ll be able to understand the invisible force that influences many objects around us.
What You Will Learn
Connecting with Magnets
Magnetism is an invisible force that pulls certain substances towards a magnet. You can’t see it, but you can definitely feel its pull! Magnets attract materials like iron, steel, cobalt, and nickel. Think about how a refrigerator door seals, or how a paperclip sticks to a magnet – that’s magnetism in action.
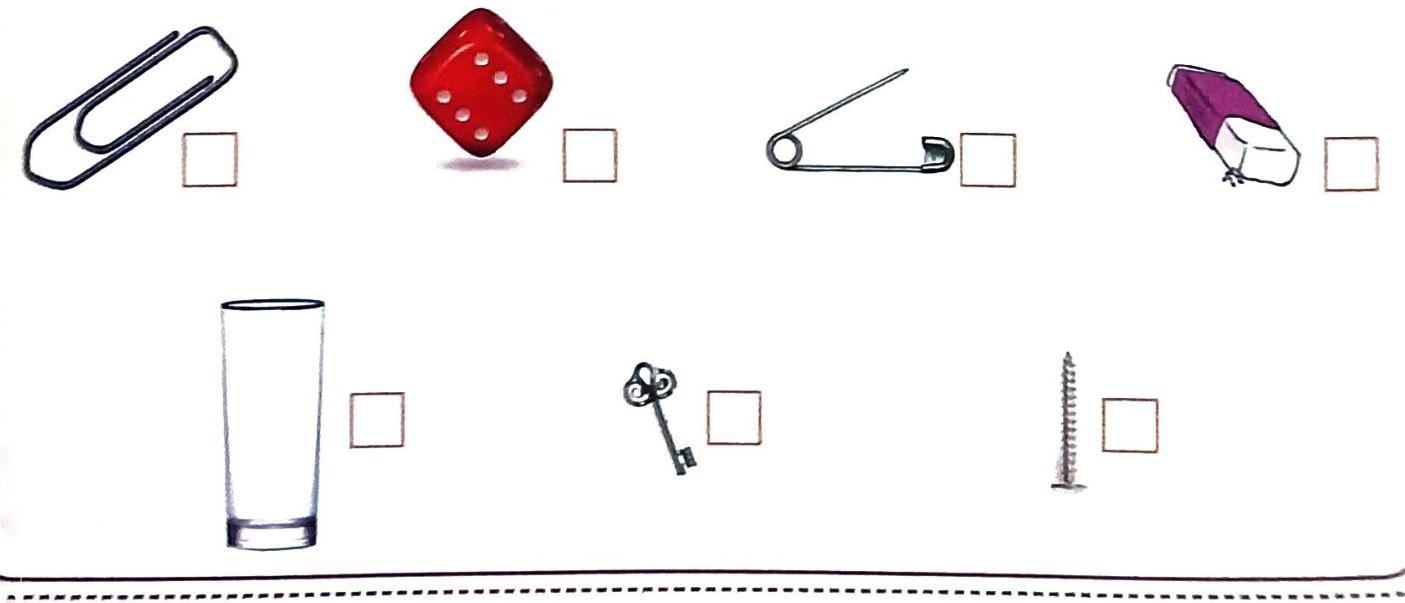
Try to imagine: What happens if you bring a magnet close to a paperclip? A red die? A safety pin? A purple eraser? A glass? A key? A screw? You’ll find that some are attracted, and some are not!

Introduction to Magnets
Any substance that has the special ability to attract iron and other materials like steel, cobalt, and nickel is called a magnet. This amazing property is known as magnetism.
Natural and Artificial Magnets
Magnets can be found in nature or made by people.
Here are some common shapes of artificial magnets:
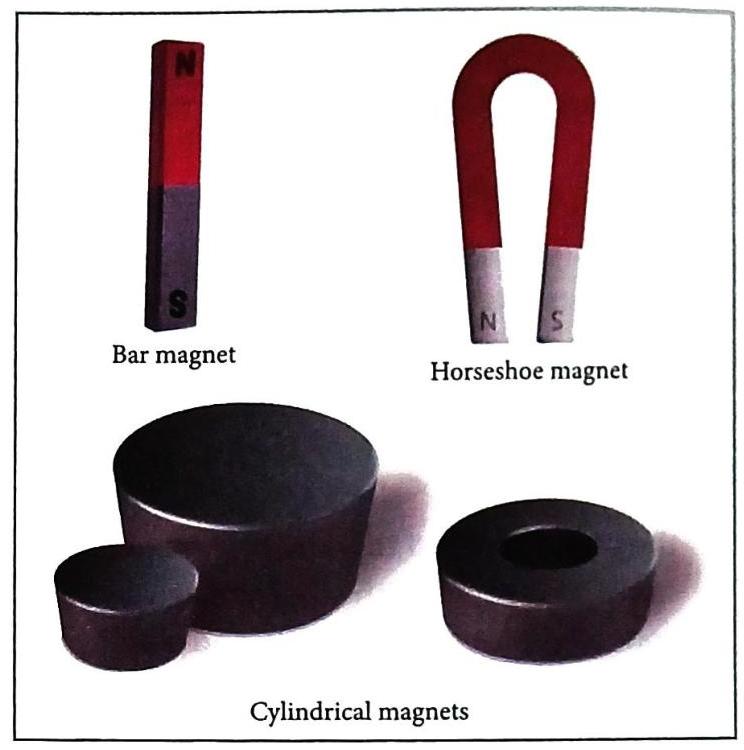
Fig. 7.1 Artificial magnets
Fig. 7.1 Artificial magnets
Magnetic and Non-Magnetic Substances
Not all materials react to magnets in the same way. We classify them based on whether they are attracted to a magnet or not.
To understand this better:
Imagine you have a horseshoe magnet and various items like iron nails, a knife, steel paper clips, a piece of paper, a stainless steel plate, wood, a sewing needle, a silver spoon, a comb, a plastic ruler, a glass, a drawing pin, an eraser, a pencil, a hair pin, a safety pin, copper wire, and a screwdriver.
You could test each item by bringing the magnet close to it.
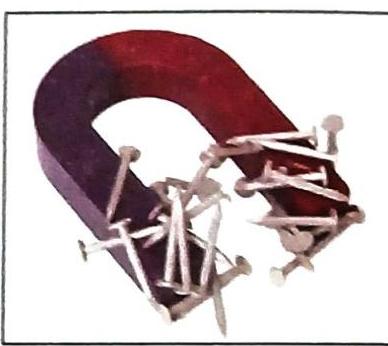
Fig. 7.2 A magnet attracts magnetic materials.
Fig. 7.2 A magnet attracts magnetic materials.
You would observe that items like iron nails, steel paper clips, a sewing needle (if steel), drawing pins, hairpins, and safety pins are attracted. These are magnetic substances.
Items like paper, wood, a silver spoon (unless it’s an alloy with iron/nickel/cobalt, but generally considered non-magnetic in this context), a comb, a plastic ruler, a glass, an eraser, a pencil, and copper wire are not attracted. These are non-magnetic substances.
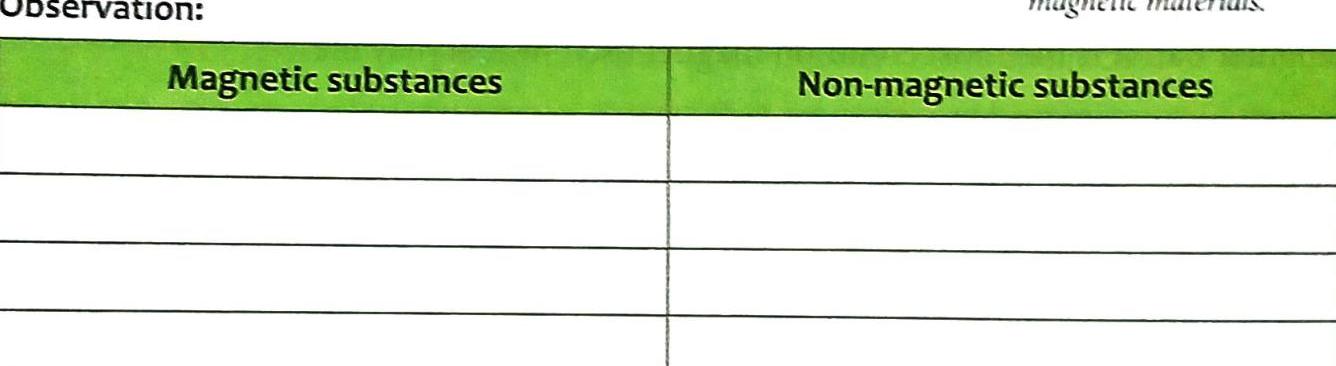
A table to categorize observations.
A table to categorize observations.
Fact Check: Mythous Facto
Properties of Magnets
Magnets have several fascinating properties that make them unique.
1. Attractive Property
This is the most well-known property: a magnet’s ability to pull magnetic substances towards itself. The magnetic pull, or magnetic force, is not uniform across the entire magnet. It’s actually strongest at the two ends of the magnet, which are called its poles. Very little or no magnetic force is felt in the middle of the magnet.
To understand this better:
Imagine spreading iron filings (tiny pieces of iron) on a table. If you place a magnet over them and lift it, you’ll see that most of the iron filings cling to the ends (poles) of the magnet, with very few in the middle. This clearly shows that the magnetic force is concentrated at the poles.
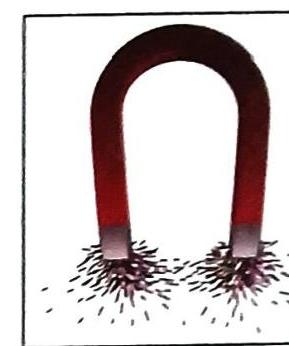
Fig. 7.3 Magnetic force is maximum at the poles.
Fig. 7.3 Magnetic force is maximum at the poles.
2. Directive Property
When a magnet is allowed to swing freely, it always settles down pointing in a specific direction: north-south. This is known as the directive property of the magnet.
To understand this better:
You could mark the north, south, east, and west directions on a surface. Then, suspend a bar magnet from a stand using a string, making sure it can swing freely. No matter how many times you disturb the magnet, it will always return to rest with one end pointing north and the other pointing south.
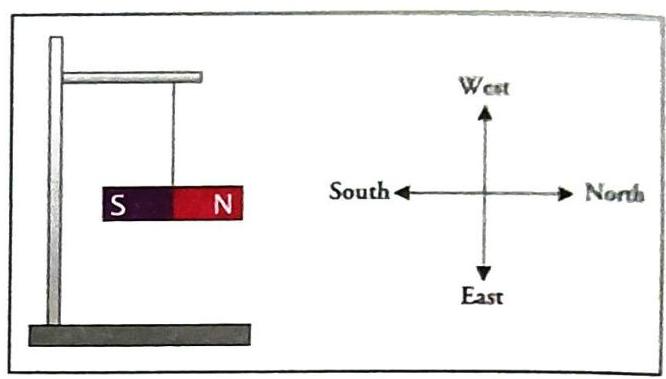
Fig. 7.4 Freely suspended magnet pointing north-south direction.
Fig. 7.4 Freely suspended magnet pointing north-south direction.
3. Like Poles Repel and Unlike Poles Attract
This is a fundamental rule of magnets:
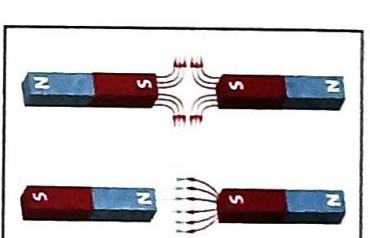
Fig. 7.5 Like poles repel and unlike poles attract.
Fig. 7.5 Like poles repel and unlike poles attract.
To understand this better:
If you suspend a bar magnet freely, and then bring the north pole of another magnet close to the north pole of the suspended magnet, you’ll see the suspended magnet swing away – they repel! The same happens if you bring two south poles together.
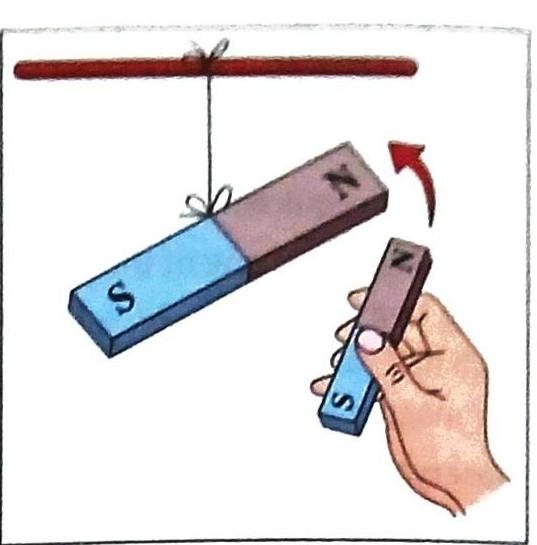
Fig. 7.6 Like poles repel.
Fig. 7.6 Like poles repel.
However, if you bring the south pole of the second magnet near the north pole of the suspended magnet, they will pull towards each other – they attract! The same happens with a north pole and a south pole.
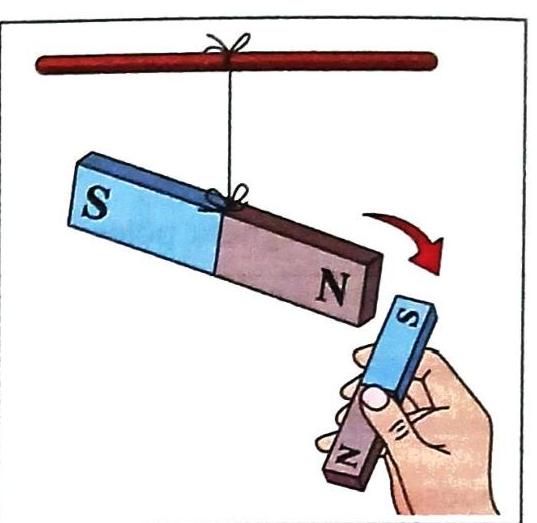
Fig. 7.7 Unlike poles attract.
Fig. 7.7 Unlike poles attract.
Repulsion is the Surest Test of Magnetism:
Why is repulsion so important? Because a magnet will attract both unlike poles and non-magnetic materials (like an iron bar). However, only a magnet will repel another magnet’s like pole. So, if you want to know if a piece of metal is a magnet or just a simple iron bar, you must check for repulsion. If one end is attracted and the other is repelled by a known magnet, then it’s a magnet. If both ends are attracted, it’s just an iron bar.
4. Magnetic Poles Always Exist in Pairs
Every magnet, no matter how small, always has two poles: a north pole and a south pole. You can never have a magnet with only one pole. Even if you break a magnet into smaller and smaller pieces, each new piece will instantly become a complete magnet with its own north and south poles. The poles simply cannot be separated.
To understand this better:
Imagine taking a bar magnet and breaking it in half. Each half immediately becomes a new, smaller magnet, each with its own north and south poles. If you kept breaking it, the result would be the same every time!

Fig. 7.8 Magnetic poles exist in pairs.
Fig. 7.8 Magnetic poles exist in pairs.

Magnetic Field Around a Magnet
The area surrounding a magnet where its magnetic influence can be felt is called the magnetic field of a magnet. This invisible field can be visualized using imaginary lines called magnetic lines of force.
To visualize this:
If you place a bar magnet under a sheet of white paper and sprinkle iron filings evenly on top, you’ll see the filings arrange themselves in a distinct pattern of curved lines around the magnet. These curved lines show the presence and shape of the magnetic field and are called magnetic lines of force.
The direction of these magnetic lines of force is always from the north pole of the magnet to its south pole outside the magnet. Inside the magnet, they go from south to north, forming continuous closed loops.
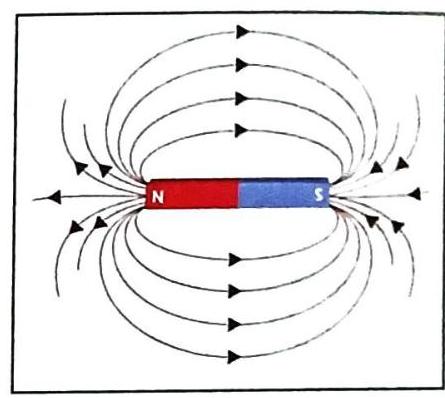
Fig. 7.9 Magnetic lines of force.
Fig. 7.9 Magnetic lines of force.
A magnetic compass is a useful tool for understanding magnetic fields. Its tiny magnetic needle will always align itself with the magnetic field lines. If you move a compass around a bar magnet, you’ll see its needle change direction, showing how the magnetic field influences it. The compass needle always points in the direction of the magnetic field at that specific point.

Fig. 7.10 Determination of direction of magnetic lines of force using magnetic compass.
Fig. 7.10 Determination of direction of magnetic lines of force using magnetic compass.
Properties of Magnetic Lines of Force
Magnetic lines of force have specific characteristics:
Earth’s Magnetic Field
Have you ever wondered why a freely suspended magnet always points north-south? It’s because our Earth acts like a giant, enormous bar magnet!
This means that when you suspend a magnet, its north pole is attracted to Earth’s magnetic south pole (which is near geographic north), and its south pole is attracted to Earth’s magnetic north pole (which is near geographic south). This is why magnets align themselves with the geographic north-south direction.

Fig. 7.11 Geographic and magnetic poles of Earth.
Fig. 7.11 Geographic and magnetic poles of Earth.
Science Talk: Earth’s Magnetism and Animals
It’s not just humans who use the Earth’s magnetism! Many animals, like birds and sea turtles, use Earth’s magnetic field for navigation during their long migrations. There’s ongoing research into how changes in Earth’s magnetic field (like its weakening polarity) might affect these animals and their ability to survive and navigate.

Magnetisation: Making of Magnets
Magnetisation is the process by which a magnetic material gains magnetic properties, either for a short time (temporarily) or for a long time (permanently). Here are different ways to make a magnet:
1. Magnetic Induction Method
This is a phenomenon where an ordinary piece of iron (a magnetic material) temporarily becomes magnetic just by being near another magnet. It doesn’t even need to touch the magnet directly!
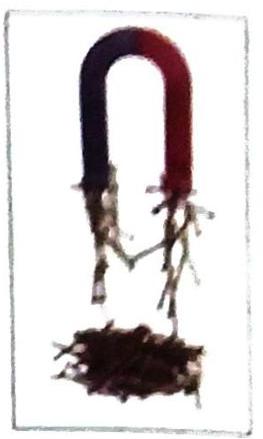
Fig. 7.12 Magnetic induction.
Fig. 7.12 Magnetic induction.
To understand this better:
If you hold an iron nail near a bar magnet, you’ll see that the iron nail itself starts attracting small iron filings, acting like a temporary magnet. However, as soon as you take the bar magnet away, the iron nail loses its magnetism and the filings fall off.
When using magnetic induction, if the south pole of a magnet touches an iron nail, the end of the nail in contact with the magnet becomes a north pole, and the other end becomes a south pole. The induced polarity is always opposite at the point of contact.
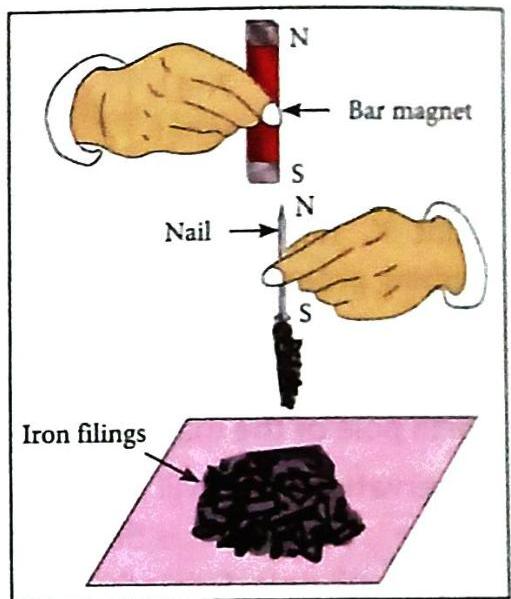
Fig. 7.13 Temporary magnetisation of an iron nail.
Fig. 7.13 Temporary magnetisation of an iron nail.
2. Single Touch Method
This method involves creating a permanent magnet by rubbing a single bar magnet against a magnetic material (like a steel rod) in a specific way.
To understand this better:
Place a steel rod on a surface. Take the north pole of a bar magnet and place it at one end (let’s say X) of the steel rod. Then, rub the magnet along the entire length of the steel rod, all the way to the other end (Y). Important: Lift the magnet and bring it back to end X without touching the steel rod on the return path, and then repeat the rubbing process, always in the same direction, many times.
After many rubs, if you bring end X of the steel rod near the north pole of a freely suspended magnetic needle, you’ll see repulsion. This shows that end X has become a north pole, and the steel rod is now a permanent magnet! The end where you start rubbing will acquire the opposite polarity of the pole you are using. If you use the North pole of the magnet, the starting end of the steel rod (X) will become a South pole, and the other end (Y) will become a North pole. Correction from source image: Image shows N pole used, X becomes N. This is contrary to usual induction rules but is depicted in the source. Let’s follow the source image’s implicit result for clarity for the student. So, end X gets the same polarity as the magnet’s pole used for rubbing.
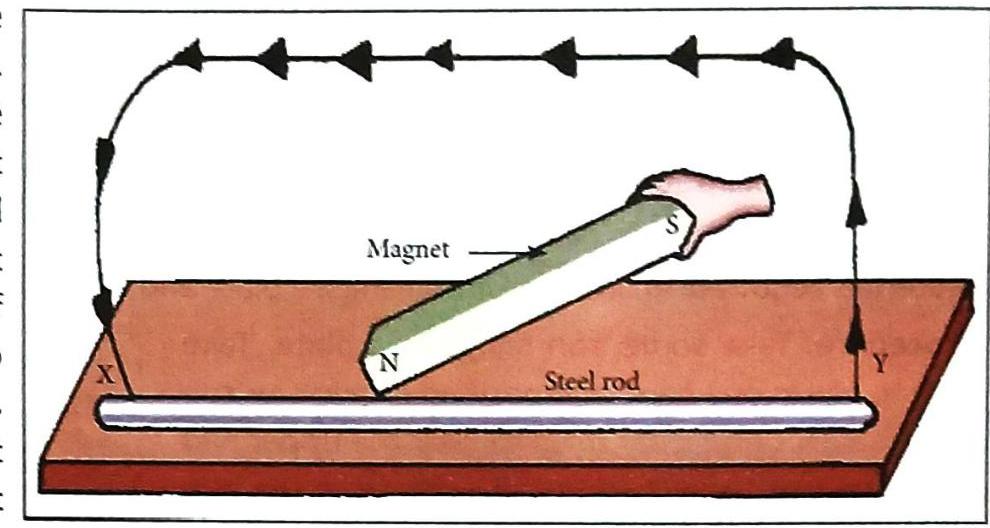
Fig. 7.14 Single touch method.
Fig. 7.14 Single touch method.
3. Double Touch Method
This method also creates a permanent magnet, but it uses two bar magnets of equal strength to rub against the magnetic material.
To understand this better:
Place a thin steel rod (XY) on a surface. Take two bar magnets of equal strength. Place their opposite poles (e.g., South pole of one, North pole of the other) at the center of the steel rod. Without lifting the magnets, move them apart, rubbing along the steel rod towards its ends (one magnet towards X, the other towards Y). Once you reach the ends, lift the magnets and bring them back to the center of the steel rod (again, without touching on the return). Repeat this process many times.
After this, the ends of the steel rod will acquire a strong, permanent magnetism. The ends of the steel rod will acquire the polarity opposite to the poles with which they are rubbed. For example, if the left magnet’s South pole rubbed towards X, then X becomes a North pole. If the right magnet’s North pole rubbed towards Y, then Y becomes a South pole.
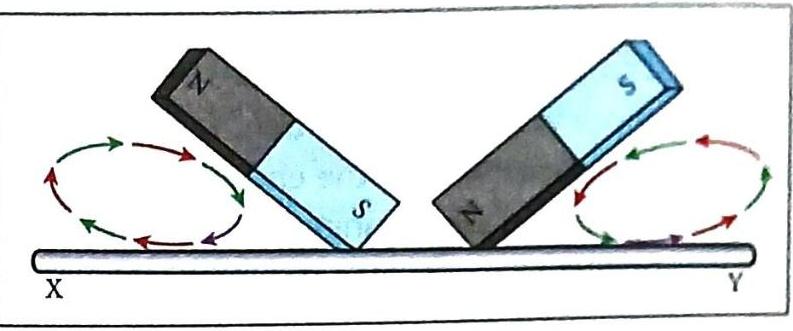
Fig. 7.15 Double touch method.
Fig. 7.15 Double touch method.
4. Electric Method (Electromagnetism)
Strong magnets are often made using electric current. The discovery that an electric current can act like a magnet was made by Danish physicist Hans Christian Oersted in 1820.
An electromagnet is a special type of magnet made by winding a coil of wire around a soft-iron core. When electric current flows through the coil, the soft-iron core becomes magnetized.
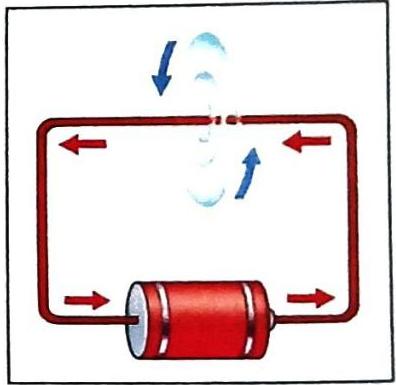
Fig. 7.16 Magnetic effect of electric current.
Fig. 7.16 Magnetic effect of electric current.
To understand this better:
You can wrap insulated copper wire around an iron nail. Connect the bare ends of the copper wire to the terminals of a dry cell (battery). Now, bring the nail close to steel paper clips. You’ll see the paper clips cling to the iron nail, showing it has become a magnet! But as soon as you disconnect the wires from the dry cell, the paper clips fall off, because the nail loses its magnetism.
This shows that the iron nail acts as a magnet only when electric current is flowing through the coil around it. This is a temporary electromagnet.
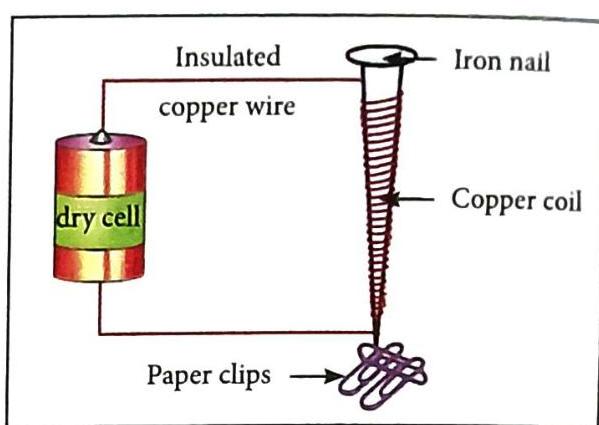
Fig. 7.17 Magnetisation using electric current.
Fig. 7.17 Magnetisation using electric current.
Factors Affecting Electromagnet Strength:
The strength of an electromagnet depends on two main factors:
Uses of Electromagnets
Electromagnets are incredibly useful and are found in many devices we use every day:
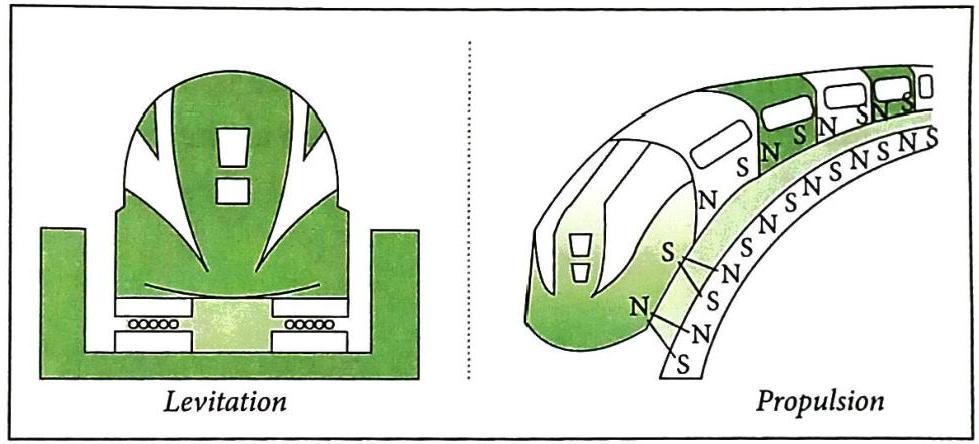
Real-World Application: Maglev Trains
Maglev trains are a fantastic example of powerful electromagnets in action! “Maglev” is short for Magnetic Levitation, which means these trains float (levitate) above their tracks using the principles of magnetism.

Types of Magnets
Magnets can be classified based on how long they keep their magnetic properties:
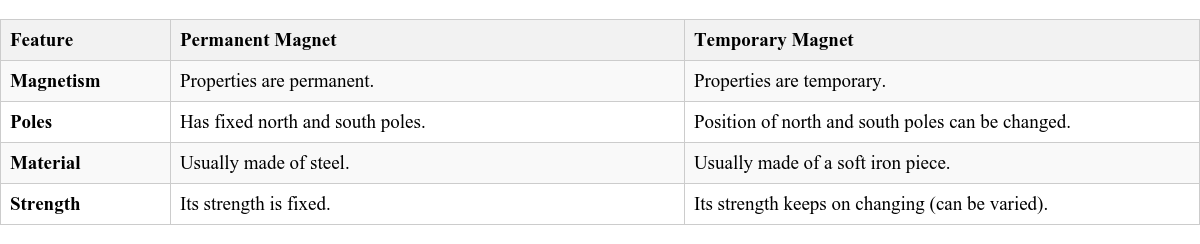
Electromagnets are a special case. They can be either temporary or permanent, depending on the material used for their core. If you use a soft iron piece as the core, you get a temporary electromagnet (like the one in an electric bell). If you use a steel piece as the core, you can create a permanent electromagnet.
Electromagnets are a special case. They can be either temporary or permanent, depending on the material used for their core. If you use a soft iron piece as the core, you get a temporary electromagnet (like the one in an electric bell). If you use a steel piece as the core, you can create a permanent electromagnet.
Uses of Magnets
Magnets are incredibly versatile and are used in countless applications:
Demagnetisation of a Magnet
Just as magnets can be made, their magnetic properties can also be destroyed. This process is called demagnetisation. Here are common ways a magnet can lose its magnetism:
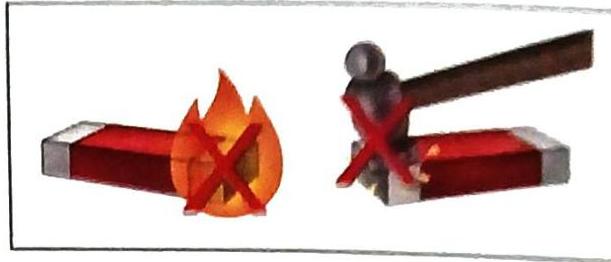
Fig. 7.18 Heating a magnet or hammering it repeatedly demagnetises it.
Fig. 7.18 Heating a magnet or hammering it repeatedly demagnetises it.
Care and Storage of Magnets
To keep your magnets strong and prevent them from losing their properties (self-demagnetisation), they should be stored properly using magnetic keepers.
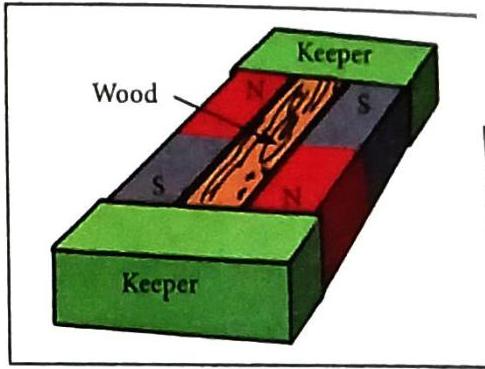
Fig. 7.19 Storing magnets.
Fig. 7.19 Storing magnets.
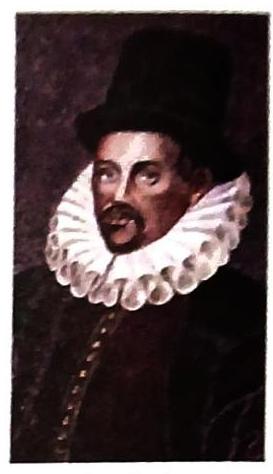
Science History: William Gilbert (1544-1603)
William Gilbert was an English physician and natural philosopher. He was a pioneer in the study of magnetism and is often called the “Father of Magnetism.” He discovered that magnets could be created by rubbing ordinary metals with a magnet. He also found ways to strengthen magnets and observed that they lost their “magical power” when exposed to high temperatures. Most importantly, Gilbert proposed that the Earth itself is a giant magnet, which explains why freely suspended magnets align themselves north-south.
Learning by Doing: Geometry with Magnets
You can observe the interaction of magnets by floating disk magnets in water. If you stick magnets (e.g., with the same pole facing up) into bottle caps and float them, they will repel each other. If you add more, they will arrange themselves into geometric shapes like a triangle (for three magnets) due to the forces of repulsion between them.
Virtual Tour: How to Make a Magnetic Compass
You can explore online resources (like the video at ) to learn how to make a simple magnetic compass. This usually involves magnetizing a sewing needle (often by rubbing it with a permanent magnet, like a bar magnet) and then carefully placing it in a way that allows it to float freely on water (e.g., inserted into a cork). It’s important to make sure the cork and needle are placed gently and centrally to allow free rotation, avoiding touching the sides of the water tub.

Overall Chapter Summary: Magnetism

Want to print your doc?
This is not the way.
This is not the way.

Try clicking the ⋯ next to your doc name or using a keyboard shortcut (
CtrlP
) instead.