Skip to content
Your Progressive Summarization Notebook V.3
Share
Explore
2. Creating Notes

icon picker
2.3 Designing Notes (in Coda)

How to Create Reading Notes Using Progressive Summarization Steps


We will use progressive summarization in class as the basic foundation for learning that takes place. I believe that the single-most important artifact that you will take with you from class will be the notes that you take in your reading, research, and in our class discussions. These will be a record of the “Ah-ha” moments and connections you make to things you’re interested in. These notes will be the “deliverables” that you take with you throughout the rest of your time at College and beyond. I still reference my notes from graduate school, but rarely from undergrad because I had no system of organization and so it is almost impossible to find or use any of my learning from that time period. How we will use progressive summarization in this class will be a process for taking notes and a system for organizing them.
For me, note-taking is a learning “out-loud.” Progressive summarization is designing your notes, so that you can easily retrieve and/or share your learning quickly and easily. Therefore, treat this as your own personal knowledge bank and treasure it.
Think about what will be most helpful to you in 3 months, 12 months and 3 years from now. Keep your future self in mind. Often, your future self will be tired, crunched for time, under a deadline, scattered - make it easier on yourself later, do as much of the heavy lifting now while you’re already in the midst of it. What will you want to know most about what you read and learned?
Use the can help guide your reading. These problems/questions can be like coat-hangers for things you read - they give you a context to focus on.
The primary goals of note-taking in this way is to:
a) make your notes thorough enough that you can understand them later (context),
b) summarize the most important parts of the reading / learning (comprehension),
c) design your notes in such a way that they are quickly “glanceable.”

Think in terms of layers and stages, each step you design your notes to become more and more useful to you. So that when you’re working on a paper and have 25 different sets of notes to work through, you make it easier on yourself to find the key components.

Here is how to create your progressive summarization reading notes for class using Coda

Here is the outline for the process for taking notes in Coda.
Go to
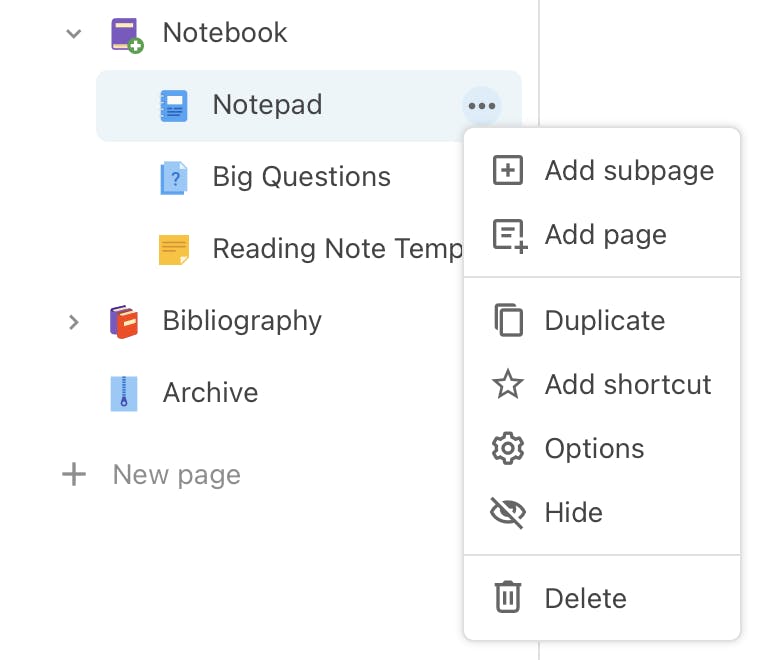
For lecture notes, journal entries, and other personal thoughts write in the the way you would any word processor. You can organize by using headers (highlight a word or phrase and select the capital T for those options) or subpages to the notepad (click the three dots menu to the right of the word “notepad.”
Screen Shot 2021-08-22 at 4.59.34 PM.png
3. Take your reading and research notes using the . Follow the instructions there for guidance. Enter your bibliographic material on each new note you duplicate from the template and those will all go into your for later use.
4. Click the Share globe at the top right of the browser and copy doc link with users being able to comment.
Here is the outline for the process for taking notes in Google Drive:
The first time setting up you want to create a google drive folder with the name of your class, e.g. “REL 110 - An Intro to Quakerism.” Every note you take for this class should be found in this folder. That will save you grief and time later.
Create a google document per book, article, etc. Follow this basic format - Author, Last Name, Author First Name - Title. Like this “Muers, Rachel - Testimony.” At the top of the document write in the pertinent publishing information, link back to book on goodreads or amazon, or link to online article or whatever you like so you can find your source later.
Create your basic layout so you will be ready to take notes:
e.g. Create a Heading - Date - Chapter 1: “Bearing Witness” - Then take notes on that chapter.
Share your google document on Canvas. Click the blue share button at the top right and make sure you share with commenting privileges. Go to the course on Canvas and paste a public google document link on the Canvas for your classmates to read and markup (make sure when you share the document it is set so that anyone can comment).

General Reading and Note-Taking Tips

Take notes on each reading session as you read. You are looking for key ideas, critical narratives, important people, themes that rise up, meta-analysis, counter-arguments, and new frameworks based on the course objectives. Anything that really resonates with you or greatly challenges your current thinking, . These notes are for you and your future self. Be sure to give yourself enough context that you know why you thought this was noteworthy in the past.
After you finish reading the chapter and your notes for your reading for that day - go back through and bold the things that stand out to you now, after finishing the chapter. You can then go back and highlight things that you want to be able to find quickly. You are aiming for glanceability. Pull out the summaries, the brief ideas that you can scan quickly and get the basic gist of the note.
For those of you who do handwritten notes and "sketchnotes" (visual drawings). Please write out your notes in gdocs . If you have pictures and images you want to include in your gdoc - use the google drive app to "scan" your image, your phone's camera or an iOS app like scannable to take a picture of the images and upload them to your google document.

Next: 👉

Want to print your doc?
This is not the way.
Try clicking the ⋯ next to your doc name or using a keyboard shortcut (
CtrlP
) instead.