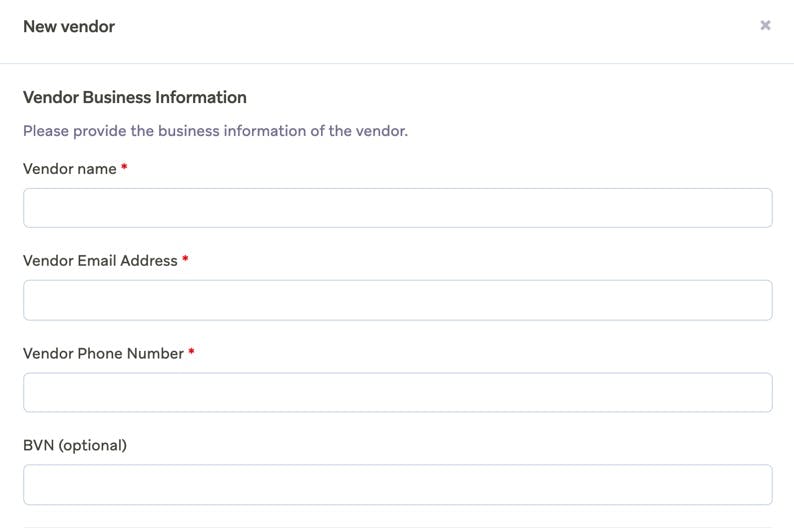
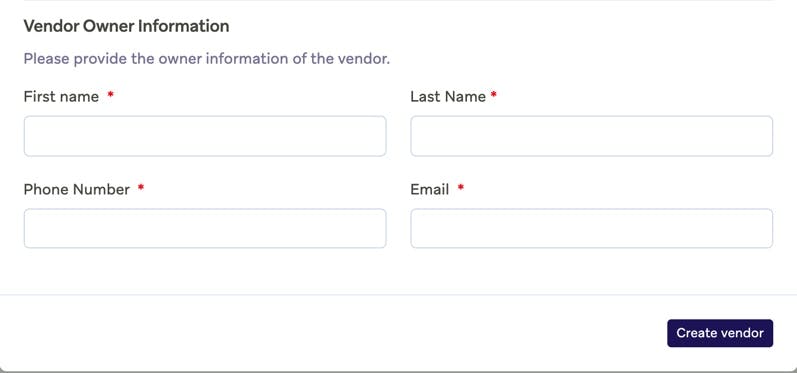
Skip to content
Guide for Schoolable Pay
  • Pages
    • Our Manifesto
    • Account Setup
      • Payment Setup
        • Settlement Account
        • Discounts
        • Payment Items
        • Payment Preferences
        • Grouping payment items
        • Beneficiaries
        • Expense Category
        • User Permissions
      • Payroll Setup
        • Salary items
        • Taxes & Benefits
        • Preferences
      • Administration
        • School profile
        • School Session & Term
        • Promoting Students
        • Bulk data upload
    • Students
      • Adding a new student
      • List students
      • Class Sections
      • Student Tags
    • Families
      • Family list & profile
      • Guardian information
    • Employees
      • How to enable an employee for payroll
      • How to run Payroll Monthly
    • icon picker
      Vendors
    • Invoices
      • Why are invoices needed?
      • Generating an invoice
      • Updating an invoice
      • Sending invoice notifications
      • Adding payments to invoice
      • Archiving an invoice
      • Paying an invoice
      • Invoice Listing
      • Sending invoice receipt
      • Why Invoice Reports are Important in Schools
    • Invoice inflow
    • Settlements
    • Send Money
      • List transfer history
      • Payment Requests
      • How to send money
    • Balance History
    • Apps Marketplace
    • Test Accounts

Vendors

Vendors on Schoolable Pay are those who sell goods or services to the school, e.g, book sellers, uniform and cardigan maker, food seller, etc. The purpose of having a list of vendors is so the school owner can have accurate numbers of vendors in his/her school, and pay them easily and directly from his Schoolable account.

How To Add a New Vendor to your School:

Scroll to “Vendors”
Click “New Vendor”
8A017824-021B-48C9-9E5A-DB36550EA16D_4_5005_c.jpeg
Fill in the Vendor’s business details
29A19986-F95F-48FE-853D-F309D34D6670.jpeg
Fill in the vendor’s personal details
10717800-33FE-4051-ACEC-4ADE7FBC14A3.jpeg
Click “Create Vendor”
An invite email will be sent to the vendor. When the vendor clicks “Accept Invitation”, he will be redirected to open a Schoolable vendor account via:

 
Want to print your doc?
This is not the way.
Try clicking the ··· in the right corner or using a keyboard shortcut (
CtrlP
) instead.