Skip to content
API Overview
Share
Explore
Addressable API Overview

icon picker
Quick Start Guide

This guide walks you through how to quickly setup sending single cards via our JSON API. This is the most popular use-case.
Typical time to get this up and running is less than 30 minutes.

1. Login to Addressable and get API Token

Login to Addressable:
From the main navigation, select Settings
Scroll to the bottom of the page to retrieve Your API key

Cards sent via your API key will be sent via your user.

2. Set handwriting style & return address

While on the settings page, set the following:
Handwriting style
Address Information (default return address)

The address information entered is the return address on the envelope.

3. Setup a card design (“layout template”)
Card layout templates define the design of the front and backside of the card.
Addressable provides a card builder to upload images (card cover artwork, logo, headshots). After you’ve created a layout template, you can make a request via API to get the layout_template_id that will be used.

To setup your layout template:
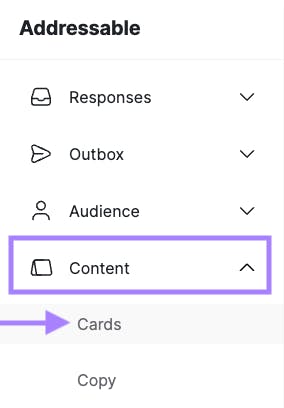
From the navigation, select Content > Cards
layout.png
Select + New Card Layout
Provide a Card Name (this name will be included in the layout_templates response)
Upload Primary Image (card cover artwork)
Upload Cover Logo (optional - used when you’d like the logo included on the card cover)
Select Next
Select Back Card Cover Type
In the Primary Image Area, you can define:
Smart QR Code (optional - enter a URL and text under the QR Code)
Image (optional - used for logo placement on the back of card or headshot)
Select Finish Card

4. Optional - Setup a copy template

If you will be using the same message repeatedly, you can define a Copy Template and reference it in the requests. Copy templates use merge tags such as {{greeting}} to insert personalization.
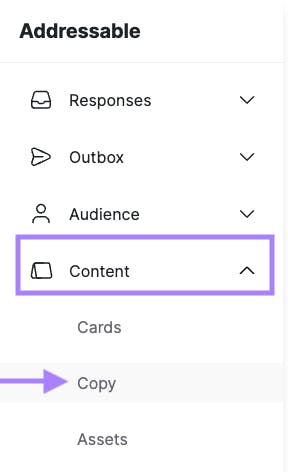
From the navigation, select Content > Copy
copy.png
Select New Copy Template
Name your copy using the Template Title field
Use the Template Body field to enter your message
Click Save

5. Request Templates via API to get template ID

Get layout template ID via API request which will be needed to build json to send a card.

Endpoint

GET https://api.addressable.app/api/v1/layout_templates.json

Headers

X-User-Email: <EMAIL_ADDRESS>
X-User-Token: <API_KEY>

Response

{
"layout_templates": [
{
"layout_template": {
"id": 11677,
"name": "midtest",
...

This ID will be passed as layout_template_id in the request to send a card.

If a Copy Template is Used

If you are using a copy template for your message, make the same request to the message_templates endpoint.

Endpoint

GET https://api.addressable.app/api/v1/message_templates.json

Headers

X-User-Email: <EMAIL_ADDRESS>
X-User-Token: <API_KEY>

Response

{
"message_templates": [
{
"message_template": {
"id": 36821,
"title": "Market Shift - Second Touch ",
...
This ID will be passed as message_template_id in the request to send a card.

6. Send Card

Now that you have the layout and message template ids, you can send a card with a single POST request.

Endpoint

POST https://api.addressable.app/api/v1/custom_notes.json

Headers

X-User-Email: <EMAIL_ADDRESS>
X-User-Token: <API_KEY>

Request Body

Below are a few examples of possible request bodies to send a card. Each shows different options.
NOTE: "card_type": "logo" must be included in requests for legacy reasons. All the other values should be changed for your use case.

Sending a card with a message template:
{
"custom_note": {
"message_template_id": "36821",
"layout_template_id": "11677",
"card_type": "logo",
"to_first_name": "John",
"to_last_name": "Smith",
"to_business_name": "",
"to_address_line_1": "1 Main st",
"to_address_line_2": "unit 123",
"to_city": "San Francisco",
"to_state": "California",
"to_zipcode": "94102"
}
}

Sending a card, manually specifying the message body:
{
"custom_note": {
"body": "Hi {{greeting}},\r\n\r\nI wanted to send you a quick note!\r\n\r\n{{user_name}}",
"layout_template_id": "11677",
"card_type": "logo",
"to_first_name": "John",
"to_last_name": "Smith",
"to_business_name": "",
"to_address_line_1": "1 Main st",
"to_address_line_2": "unit 123",
"to_city": "San Francisco",
"to_state": "California",
"to_zipcode": "94102"
}
}

Override the return address by specifying “from” fields. This is useful if you need to send cards of behalf of other people:
{
"custom_note": {
"body": "Hi {{greeting}},\r\n\r\nI wanted to send you a quick note!\r\n\r\n{{user_name}}",
"layout_template_id": "11677",
"card_type": "logo",
"to_first_name": "John",
"to_last_name": "Smith",
"to_business_name": "",
"to_address_line_1": "1 Main st",
"to_address_line_2": "unit 123",
"to_city": "San Francisco",
"to_state": "California",
"to_zipcode": "94102",
"from_first_name": "Chris",
"from_last_name": "Tosswill",
"from_business_name": "Addressable",
"from_to_line": null,
"from_attn_line": null,
"from_address_line_1": "1013 S Los Angeles",
"from_address_line_2": "FL6",
"from_city": "Los Angeles",
"from_state": "CA",
"from_zipcode": "90015",
}
}


Want to print your doc?
This is not the way.
Try clicking the ⋯ next to your doc name or using a keyboard shortcut (
CtrlP
) instead.