Skip to content
How to extract data from tables in multiple Google Docs and combine into one table in Coda
Share
Explore

icon picker
How to extract data from tables in multiple Google Docs and combine into one table in Coda

This tutorial walks you through how you can extract the data from tables in multiple Google Docs and combine into one structured table in Coda to sort, filter, and organize
If your organization creates multiple Google Docs every day and you want a better way to sort, filter, and organize all these Google Docs, this solution may be useful for you. This tutorial walks you through how to extract the important metadata from a table in a Google Doc and sync that data into a table in Coda.
I often see templates for project briefs, meeting notes, or candidate interview as Google Docs at other organizations which are duplicated over and over again. These Google Docs are then stored in Google Drive which can get very unwieldy to manage unless someone is consistently organizing the folders in Google Drive. Another common trait in these Google Docs: a table near the top of the Google Doc summarizing what the doc is about.
A user recently needed a solution for extracting the data from the tables in their Google Docs into a table in Coda, so I wrote this Google Apps Script to solve the problem.
spongebob.gif
If you want to skip right to using the Google Apps Scripts, go to in this doc or go to . Here is a video tutorial as well:

Why sync data from a Google Doc to a structured table?

If the summary table in your Google Doc contains all the relevant “metadata” for your Google Doc, why not extract that data into a main table where you can better sort, filter, and organize all the Google Docs your organization is creating? This gives you a “catalog” of all the various project briefs, meeting notes, and candidate interview Google Docs your team is creating.
Alternatively, you could just use one Coda doc to manage multiple project briefs, but let’s assume your organization is still accustomed to using Google Docs as the main “data storage” tool for these lightweight use cases.

Features

This Google Apps Script does the following:
Checks a Google Drive folder for any new Google Docs that have been added to the folder
Takes the first table in the Google Doc and extracts the info
Sends the data to a row in a Coda table along with the Google Doc link
Accounts for Google Docs that are shortcuts to a Google Doc owned by someone else (the Google Doc was shared with you)

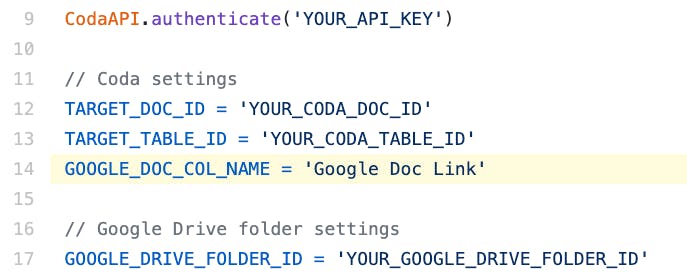
Setting up the script

From to of the , you'll need to enter in some of your own data to make the script work. Step-by-step:
Go to and create a new project and give your project a name. Delete everything in the editor that shows up by default (e.g. myFunction stuff).
Go to Libraries then Resources and paste the following string of text/numbers into the library field: 15IQuWOk8MqT50FDWomh57UqWGH23gjsWVWYFms3ton6L-UHmefYHS9Vl.
Click Add and then select version 9 of the Coda library to use (as of August 2020, version 9 - Coda API v1.0.0 is the latest)
Copy and paste the into your Google Apps Script project and click File then Save.
Go to your Coda , scroll down until you see "API SETTINGS" and click Generate API Token. Copy and paste that API token into the value for YOUR_API_KEY in the script. Note: do not delete the single apostrophes around YOUR_API_KEY.
Get the the doc ID from your Coda doc by copying and pasting all the characters after the _d in the URL of your Coda doc (should be about 10 characters). You can also use the Doc ID Extractor tool in the . Copy and paste your doc ID into TARGET_DOC_ID.
Go back to your and scroll down to the very bottom until you see "Labs." Toggle "Enable Developer Mode" to ON.
Hover over the table name in your Coda doc and click on the 3 dots that show up next to your table name. Click on "Copy table ID" and paste this value into TARGET_TABLE_ID.
In your Coda table, create column names that match exactly the column names from the table in your Google Doc (pay attention to upper and lower case).
In your Coda table, add a column called Google Doc Link.
Get your Google Driver folder ID and paste it into the GOOGLE_DRIVE_FOLDER_ID variable (the ID is everything after when you’re viewing your folder in your browser).
Run the script by clicking “Select function” on the Google Apps Script toolbar, select runSync, and hit the ▶️ button.
To get the script to run every minute, hour, or day, click on the clock 🕒 button to the left of the ▶️ button to create a .
Click Add Trigger, make sure runSync is set as the function to run, "Select event source" should be Time-driven, and play around with the type of time based trigger that fits your needs. I like to set the "Failure notification settings" to Notify me immediately so I know when my script fails to run.

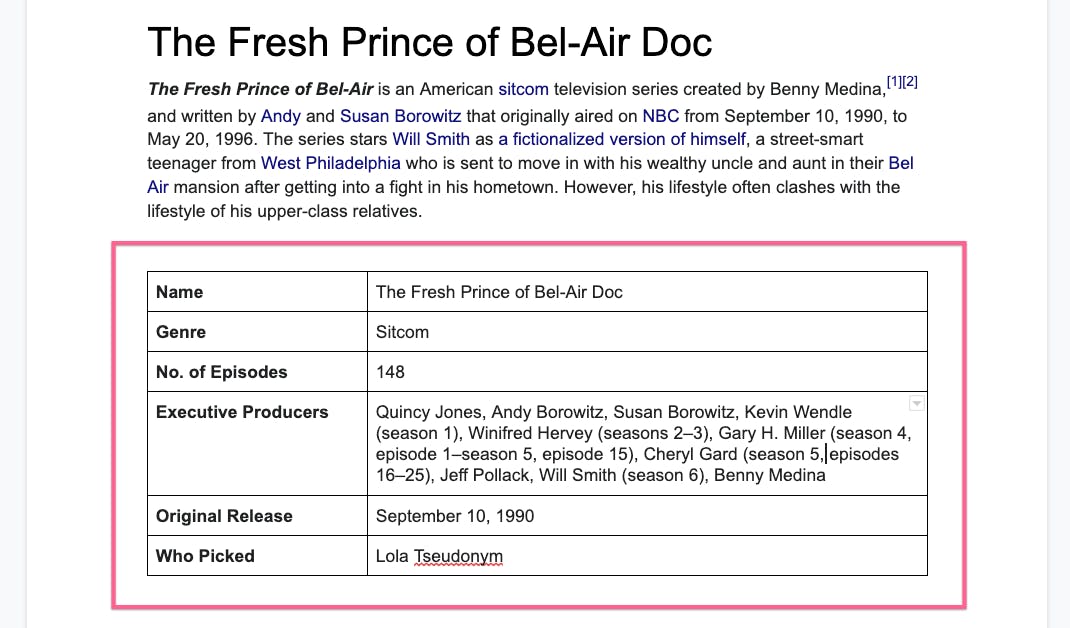
Data is trapped in your Google Doc tables

In order for this script to work, the table in each of your Google Docs needs to be structured like this:
Image 2020-08-18 at 11.39.17 AM.png
Notice how the column “headers” show up as rows and the value of each “header” is in the second column. This is not the traditional way you would use tables in a spreadsheet. The reason you might have the metadata about the Google Doc stored in this structure is because it’s easier to add new headers to the rows when the values for each header can be very long. If this was structured like a regular table, the column headers would be really narrow and adding more columns would make the data too squished.
In the above example, Executive Producers would take up a lot of room if this was laid out like a regular table. By organizing data with the properties in the first column and the values in the second column, it makes it easier to view the data easily in a structured format.
This data, however, is “trapped” in your Google Doc. If you want to see all the Google Docs that have a certain Genre or sort all the Google Docs by the Original Release date, this is not doable in Google Drive. With Google Apps Script, we can tap the and to set this data free 🙌 .

How the script works

As part of set up process, you need to create a table in a Coda doc that has the same properties in your table in your Google Docs. An important caveat:
The property names in the first column of your table have to be consistent across all your Google Docs.
This just ensures that all data is synced over correctly to Coda. If you want additional properties synced, you have to add those columns to your Coda table. The spelling of the column names have to also be consistent with your Coda table:
Image 2020-08-18 at 11.56.18 AM.png
Notice that you also have to add an additional column called Google Doc Link to your table. This will store the link to the Google Doc once the data is synced over to Coda.
Image 2020-08-18 at 11.56.182 AM.png
You can call this column something else, but make sure you replace the variable name in of the script with the new name of this column:
Image 2020-08-18 at 11.58.59 AM.png

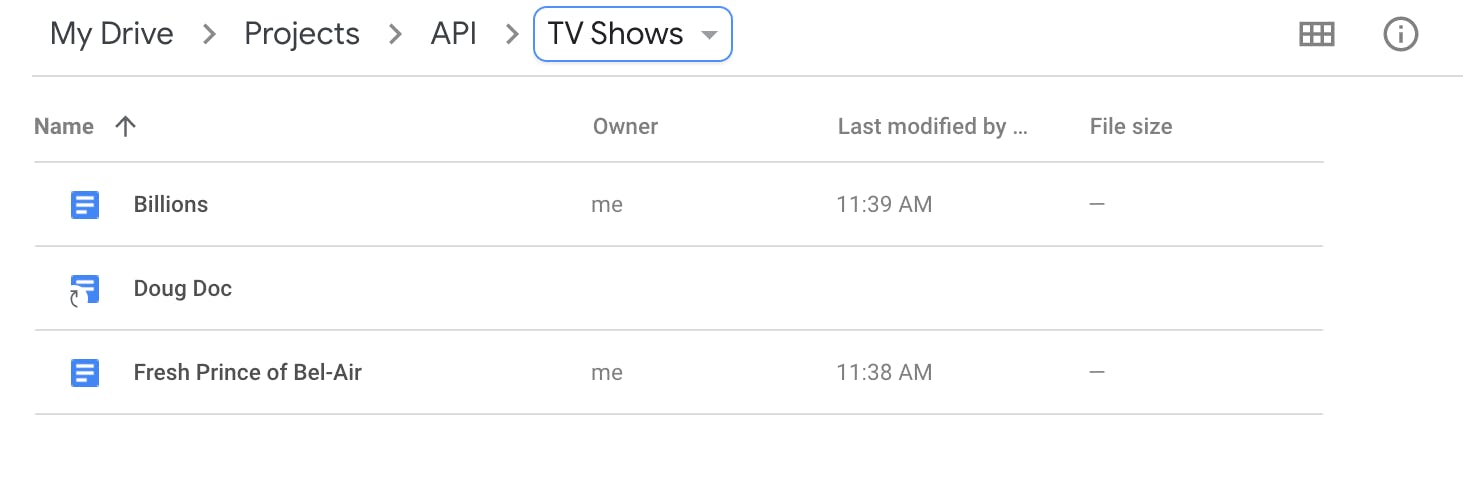
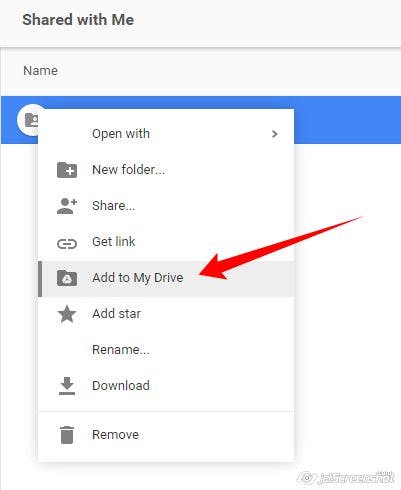
Google Docs in your Google Drive folder

All the Google Docs that contain a table that you want to sync over to Coda should be stored in the same Google Drive folder. Don’t store other types of files in this folder except for the Google Docs you want to sync over the data from the table.
Image 2020-08-18 at 12.01.32 PM.png
This script also works with Google Docs your colleagues have shared with you that you’ve added to your Google Drive. For instance, in the above screenshot “Doug Doc” is a to another doc somewhere else. You’ll now it’s a shortcut when it has that little arrow icon overlaid on the doc icon:
6-shortcut-to-google-doc.png
You can create these shortcuts (and rename the shortcut) when you add someone else’s doc to your Google Drive:
7-add-to-my-drive.jpg

Run the runSync function

The main function to run in the script is the runSync function. This function checks all the current rows in your Coda table that contains existing data you’ve synced over and compares the Google Doc link with what’s currently in your Google Drive folder. If new docs get added to the Google Drive folder, the script only syncs over the data from the tables in those new docs. This leads to another caveat:
If you update existing Google Docs that have already been synced over to the Coda table, those new updates won't show up in Coda.
To get around this, you can simply delete the corresponding rows in your Coda table so that new updates make it over to your Coda table on a fresh sync.
Once the data is synced over, you can change the column formats in your Coda table so that it reflects the right format of your data:
8-google-doc-synced-data-coda-table.png
What’s neat is if you’ve shared your Coda doc with certain people already, those people will automatically show up as a in your table. In the above screenshot, the Who Picked column is a People column format, and the original data from the Google Doc table was just a name. When the name “Adam Davis” was added to Coda, however, Coda automatically finds the right person you’ve shared the doc with and makes it a selectable option in the dropdown. Now that you have this person reference, you can view other data about the person like their email address (and send them messages with the or Packs).

Getting current Google Doc IDs from Coda

The runSync script calls a few other functions in order to make the sync work. The currentFileIds function uses the to get all the current Google Docs you’ve already synced over. Remember the Google Doc Link column you added to your Coda table? This function looks at that column to see what Google Docs have already synced over.

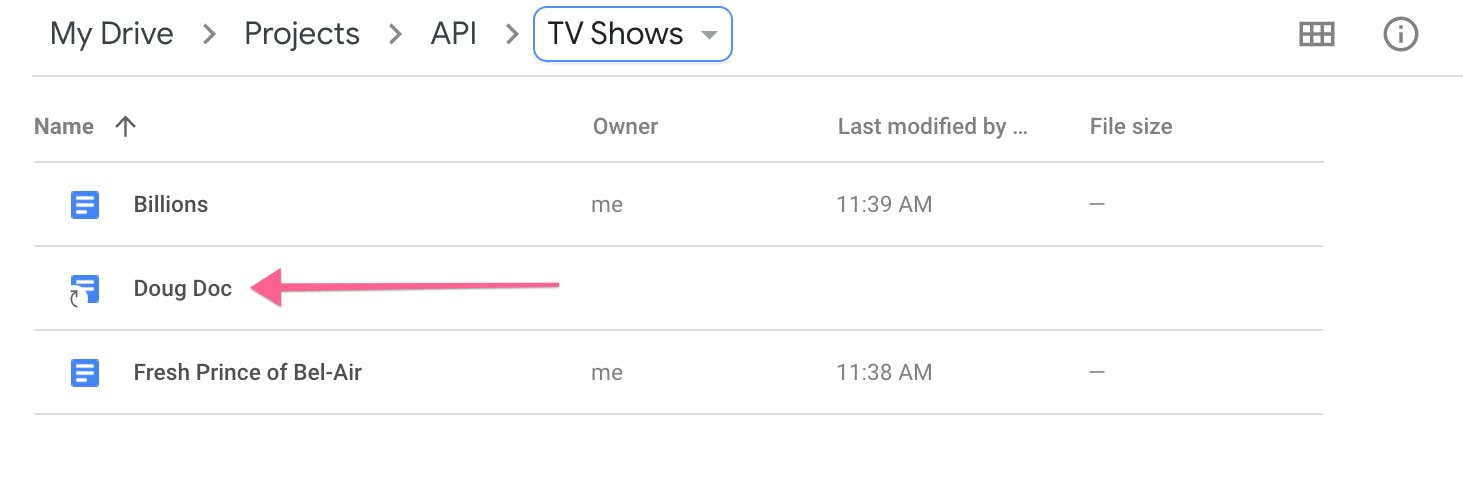
Getting current Google Drive files

Now that we have the current Google Doc IDs from your Coda table, we need to compare this with what’s actually in in your Google Drive folder. The getDriveFiles function uses the Google Drive API to get all the files from the folder you’ve identified in the GOOGLE_DRIVE_FOLDER_ID so that we can see what new Google Docs need to be synced over to Coda.
As I mentioned above, you don’t have to own the Google Doc in order to sync over the data from the table in the Google Doc. As long as you’ve added a shortcut to the Google Doc to Google Drive and that shortcut exists in your Google Drive folder, the getTargedId figures out if that file is a shortcut or not.

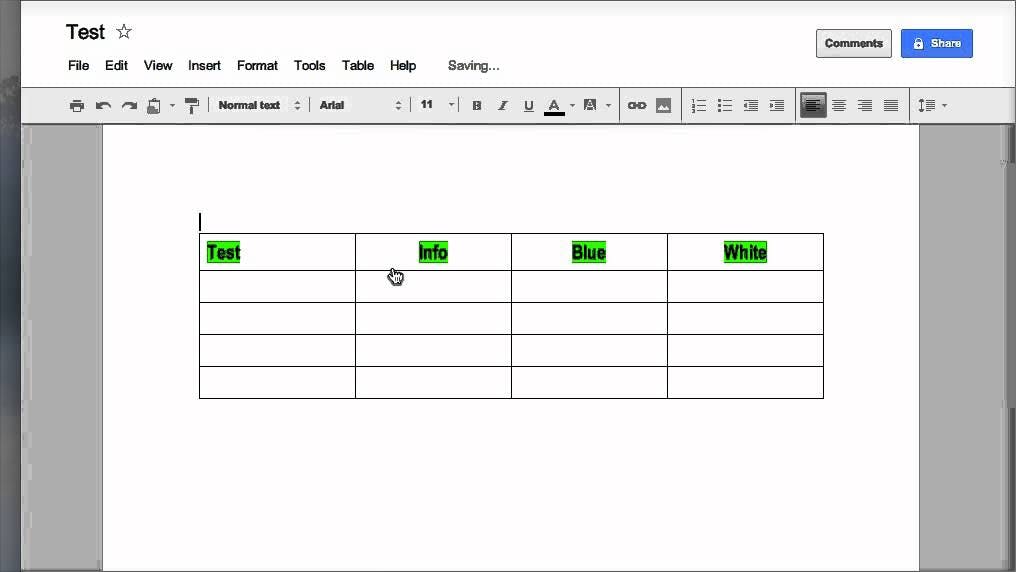
Extracting the data from a table in a Google Doc

The data is “trapped” in your Google Doc table. The getRows function utilizes the Google Docs API to pull that data out of your Google Doc and stores it in a format that’s appropriate for Coda. Another important caveat about the tables in your Google Docs:
The table needs to be the first table in your Google Doc.
If you have multiple tables in your Google Doc and the table with the metadata about your Google Doc is not the first table, then the script won’t work. If for some reason you know that the table you want to sync over to Coda is the third table in all your Google Docs, you can change the index in of the script to:
var table = body.getTables()[2]
The number in the bracket should always be one less than the actual number table in your Google Doc (e.g. if it’s the fifth table, you would put 4 in the brackets).
Another caveat regarding the data that you sync over:
You can't sync over hyperlinks from your Google Doc table to Coda.
This means instead of writing (where the word “Google” is hyperlinked to “google.com”), you’d have to write out the full link like this: “Google: www.google.com”. There are ways to get hyperlinked text to show up in Coda, but the script would’ve gotten much more complex.

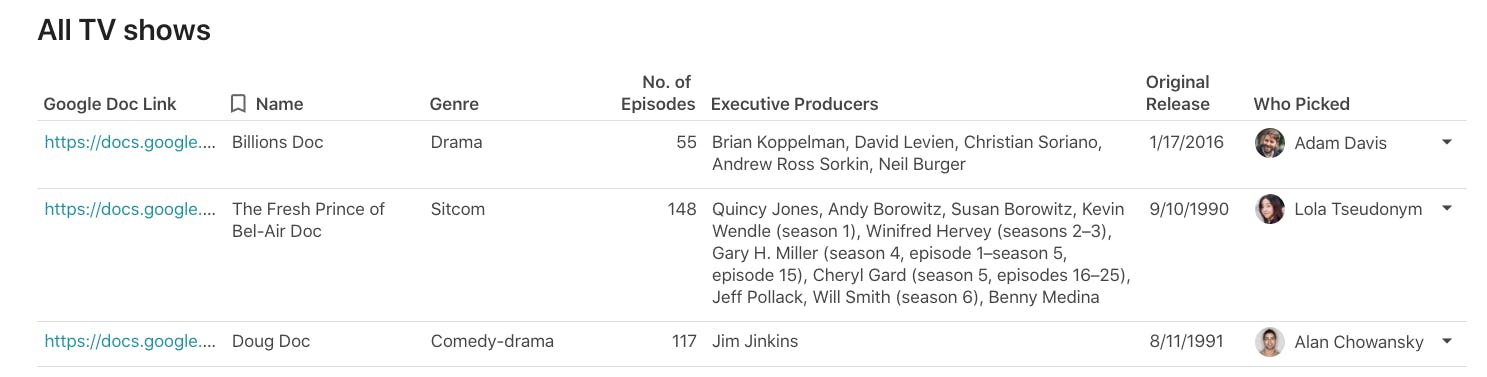
Adding the metadata to Coda

The final step is adding the data to Coda. The addRowToCoda function uses the Coda API once again to add the data from your Google Doc table as a row to your Coda table. Now that the data is in a Coda table, you can start filtering, sorting, and building views off of this data so that you can easily find the Google Doc you’re interested in.

Final words

This script solves a specific niche scenario of adding data from tables in Google Docs to a table in Coda. If the data in your table is structured like a “normal” table with columns along the top, then you’ll have to edit the script to account for this structure:
9-google-doc-table-columns.jpg
You could also sync the data to Google Sheets using the if you’re not ready to use Coda yet.
Want to print your doc?
This is not the way.
Try clicking the ⋯ next to your doc name or using a keyboard shortcut (
CtrlP
) instead.